InterSystems IRIS Deployment Guide - AWS CloudFormation Template - Windows Edition
Purpose
Most CloudFormation articles are Linux-based (no wonder), but there seems to be a demand for automation for Windows as well. Based on this original article by Anton, I implemented an example of deploying a mirror cluster to Windows servers using CloudFormation.I also added a simple walk through.
The complete source code can be found here.
Update: 2021 March 1 I added a way to connect to Windows shell by public key authentication via a bastion host as a one-liner.
Prerequisites and requirements
The same applies to this article. Both binary and license key in your S3 bucket must be for Windows, though.
$ aws s3 cp IRIS-2020.1.0.215.0-win_x64.exe s3://$BUCKET
Differences from the original
When I changed the deployment destination to Windows, I made some modifications while keeping in mind to maintain compatibility with the Linux version.
- Removed default values in YAML files
- You have to provide default values that suit your environment.
- Added two new YAML files for Windows
- based on MirrorNode.yaml → MirrorNode_Windows.yaml
- based on MirrorCluster.yaml → MirrorCluster_Windows.yaml
- Created a new parameter LatestAmiIdForIRISParameter. This is used to choose which Windows edition (Japanese, English etc. Should work with any language edition) to use.
- Separated Arbiter security group
- Added SecurityGroupIngress (port: 3389) for RDP access
- Added listener port: 52773 to external load balancer. Added port:52773 as its target group.
- Normally, you should setup a separate web server for http access, but I'm using built-in Apache server.
- Added an internal load balancer. Registered listener port:52773. Added port:52773 as its target group.
- This is for communications within the same VPC. To enable access to a primary member when communication module is not mirror aware (unlike Web Gateway and ECP app server). Simple Http client for example.
https://docs.aws.amazon.com/elasticloadbalancing/latest/classic/elb-create-internal-load-balancer.html
- This is for communications within the same VPC. To enable access to a primary member when communication module is not mirror aware (unlike Web Gateway and ECP app server). Simple Http client for example.
- Added the following to the CloudFormation output items
- Added HTTPEndpoint.
This is the URL when you access the management portal via the external load balancer. - Added IntHTTPEndpoint.
This is the URL when you access the management portal via the internal load balancer. - Added Node01ViaBastionAlt and Node02ViaBastionAlt.
To workaround annoying "posix_spawn: No such file or directory" error which happens only in Windows version of the OpenSSH client when executing SSH -J. Providing a command with the same effect for convenience.
- Added HTTPEndpoint.
- Fixed the SE.ShardInstaller class
- Added the second argument (database file location) to CreateMirroredDB(), and modified its logic accordingly.
- Restored the commented out parts of CreateMirrorSet() and JoinAsFailover()
When running ##class(SYS.Mirror)CreateMirrorSet() and JoinAsFailover() on Windows, the default ECP Address ($system.INetInfo.LocalHostName()) became Windows host name such as "EC2AMAZ-F1UF3QM".
JoinMirrorAsFailoverMember() failed because this host name cannot be resolved by DNS from other hosts. So I restored the following part:
set hostName=$system.INetInfo.HostNameToAddr($system.INetInfo.LocalHostName())
set mirror("ECPAddress") = hostName
Customization options
PowerShell script files, etc., are created using MirrorNode_Windows.yaml. Please change the following parts to suit your environment and purpose.
-
Localization of Windows environment (timezone, firewall settings)
- c:\cfn\scripts\Setup-config.ps1
timezone is set to "Tokyo Standard Time".
Note: Windows firewall is disabled !
- c:\cfn\scripts\Setup-config.ps1
-
IRIS kit name
- c:\cfn\scripts\Install-IRIS.ps1
$DISTR="IRIS-2020.1.0.215.0-win_x64"
- c:\cfn\scripts\Install-IRIS.ps1
-
Drive creation, assignment
- Resources section
Resources: NodeInstance: Properties: BlockDeviceMappings:- c:\cfn\scripts\drives.diskpart.txt
-
IRIS installation destination, etc.
- c:\cfn\scripts\Install-IRIS.ps1
    $irisdir="h:\InterSystems\IRIS"
    $irissvcname="IRIS_h-_intersystems_iris"
    $irisdbdir="I:\iris\db\"
    $irisjrndir="J:\iris\jrnl\pri"
    $irisjrnaltdir="K:\iris\jrnl\alt"
This PowerShell script file, when combined with /temp/envs.ps1 created at runtime, functions as an unattended installation script for IRIS.
-
Software to pre-install
- c:\cfn\scripts\Install-choco-packages.ps1
AWS CLI is required to use S3. I installed Notepad++ and Google Chrome additionally for convenience.
- c:\cfn\scripts\Install-choco-packages.ps1
Misc
1. Load balancer health check value
Default values are used for load balancer health checks.Uncomment the following in MirrorCluster_Windows.yaml and adjust to the appropriate values.
      #HealthCheckTimeoutSeconds: 10
      #HealthCheckIntervalSeconds: 10
      #UnhealthyThresholdCount: 3
2. Deploying standalone IRIS
If you specify MirrorNode_Windows.yaml when creating the stack, you can start IRIS in a standalone configuration.In this case, select the public subnet as the subnet to deploy.
3. SSH to Windows
If you install OpenSSH on the IRIS operating host, you can SSH to the IRIS host via the bastion host.However, the effectiveness is limited compared to the Linux version, as the commands which can be executed with the CLI on the Windows version of IRIS are somehow restricted.
Execute this on the IRIS host:
PS C:\Users\Administrator> Add-WindowsCapability -Online -Name OpenSSH.Server~~~~0.0.1.0
PS C:\Users\Administrator> Start-Service sshd
When accessing from the Windows 10, I used Git Bash to avoid "posix_spawn: No such file or directory" which is unique to the Windows version of the OpenSSH client.
user@DESKTOP-XXXX MINGW64 ~ ssh -oProxyCommand="ssh -i .ssh/aws.pem -W %h:%p ec2-user@54.95.171.248"  Administrator@10.0.0.62
Administrator@10.0.0.62's password: the password obtained via RDP connection
It may says, load pubkey ".ssh/aws.pem": invalid format, but you can ignore it.
If you copy the .ssh/authorized_keys (public key) from the bastion host to Windows servers, you can use public key authentication with a one-liner:
user@DESKTOP-XXXX MINGW64 ~ ssh -i .ssh/aws.pem -oProxyCommand="ssh -i .ssh/aws.pem -W %h:%p ec2-user@54.95.171.248" Administrator@10.0.0.62
Windows Admin group user requires special settings.I learned how to do that from here.
4. If a Python error appears in cfg-init.log
It seems that the following error may appear in cfn-init.log:
2021-02-12 02:50:32,957 [ERROR] -----------------------BUILD FAILED!------------------------
2021-02-12 02:50:32,957 [ERROR] Unhandled exception during build: 'utf8' codec can't decode byte 0x83 in position 8: invalid start byte
The following instructions have been added to Install-IRIS.ps1 with the hope that it can be eluded:
[Console]::OutputEncoding = [System.Text.Encoding]::UTF8
Example walk through
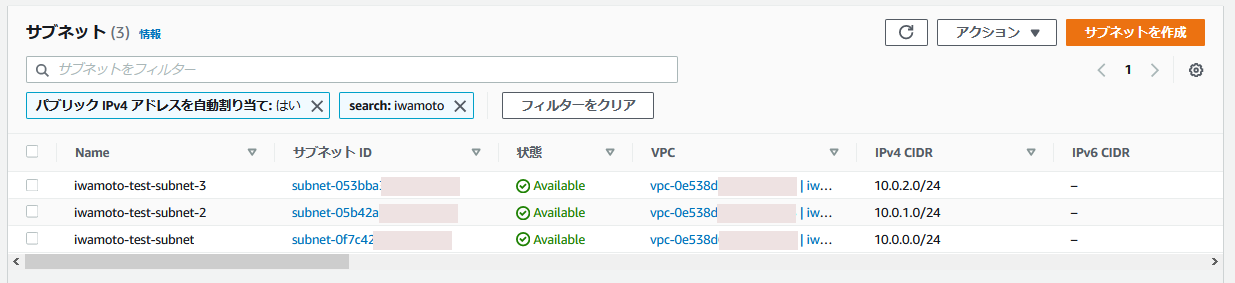
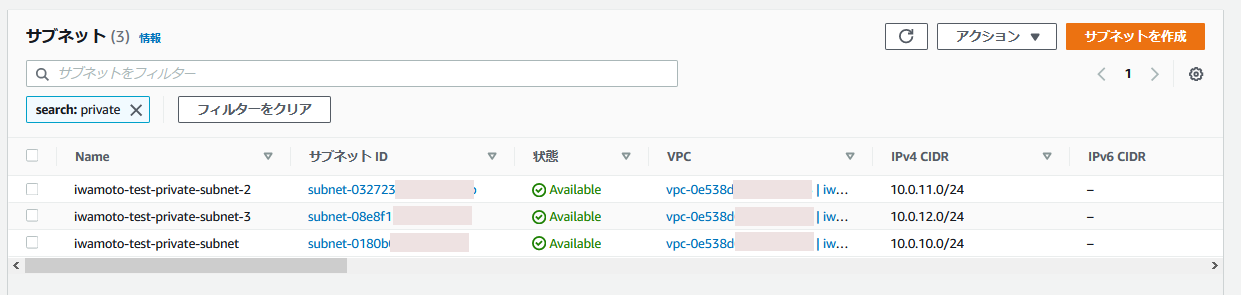
This is an execution example. I have prepared the following subnets for IRIS hosts and arbiter host.
-
Public subnet
-
Private subnet
-
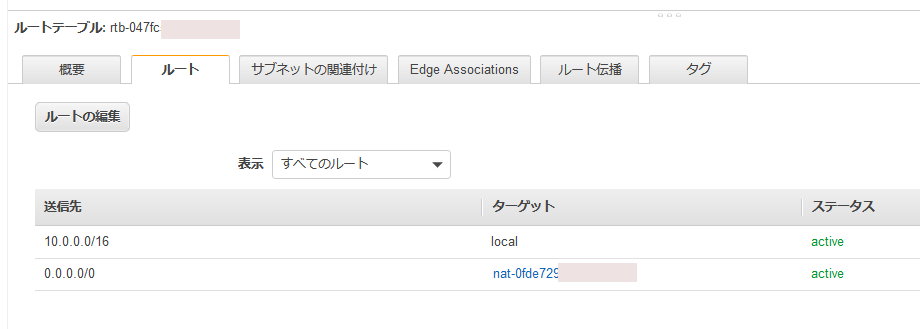
Route table / route
-
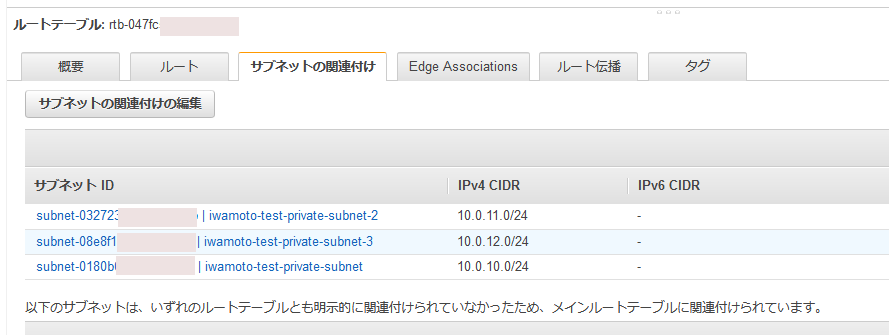
Route table / subnet association
Editing the YAML file
Clone the contents of the Git Repository locally and make the necessary changes.
- Mandatory changes
Change TemplateURL values (there are four of them) in MirrorCluster_Windows.yaml to match your S3 bucket name.
TemplateURL: https://my-cf-templates.s3-ap-northeast-1.amazonaws.com/MirrorNode_Windows.yaml
If you perform deployment repeatedly, it is convenient to set your own default value as follows:
  BastionSubnetIdParameter:
    Default: 'subnet-0f7c4xxxxxxxxxxxx,subnet-05b42xxxxxxxxxxxx'
  InstanceSubnetIdParameter:
    Default: 'subnet-0180bxxxxxxxxxxxx,subnet-03272xxxxxxxxxxxx,subnet-08e8fxxxxxxxxxxxx'
  S3BucketNameParameter:
    Default: my-cf-templates
Note:
- Since the load balancer is set, be sure to specify two subnets belonging to different AZs in BastionSubnetIdParameter.
- Since the load balancer is set, be sure to specify three subnets belonging to different AZs in InstanceSubnetIdParameter.The first two are for IRIS hosts, and the last one is for an Arbiter host.
- The host on which IRIS is installed requires access to the internet during the installation process. To be more specific, the AWS CLI will be installed for S3 access and chocolatey is used for that. If you have not setup a NAT gateway for a private subnet, as a temporary workaround, you may use a public subnet for InstanceSubnetIdParameter.(the bastion host will become meaningless...though)
When you finished your edits, copy them to your S3 bucket.
S3 bucket preparation
The contents of your bucket should look like this:
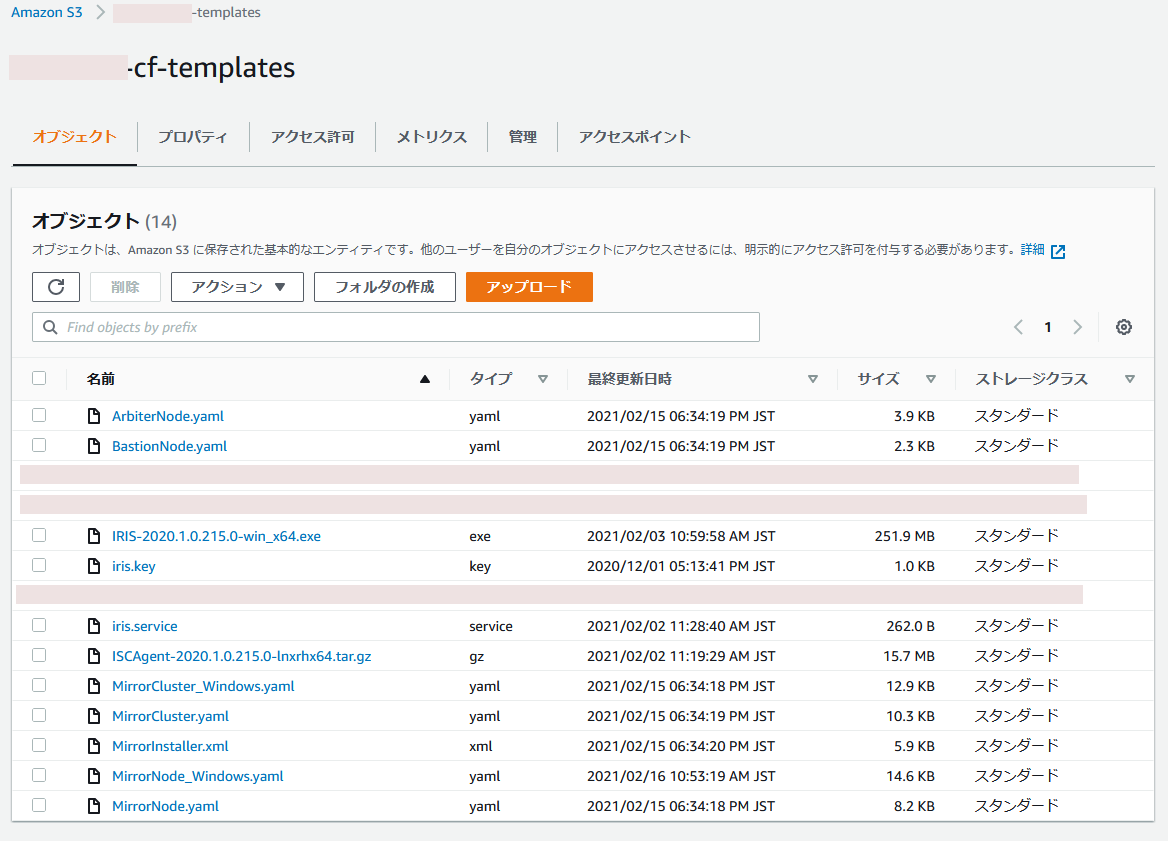
Remember URL of MirrorCluster_Windows.yaml such as https://my-cf-templates.s3-ap-northeast-1.amazonaws.com/MirrorCluster_Windows.yaml . You will need it later.
Running CloudFormation from aws console
- Create stack "with new resources"
The operation flow is the same as Deploying ICM on AWS using CloudFormation. (Sorry. Japanese article only)
Select "Amazon S3 URL" as the template source and specify the URL you recorded earlier. Set the parameters on the Specify Stack Details screen and push Next button.
| Parameter | Setting value example |
|---|---|
| Password for SuperUser/_SYSTEM user | SYS1 |
| S3 bucket with IRIS binaries | my-cf-templates |
| Which VPC should this be deployed to? | vpc-0e538xxxxxxxxxxxx |
| Subnets to deploy Bastion host (public) | subnet-0f7c4xxxxxxxxxxxx,subnet-05b42xxxxxxxxxxxx |
| Subnets to deploy IRIS (private subnet recommended) | subnet-0180bxxxxxxxxxxxx,subnet-03272xxxxxxxxxxxx,subnet-08e8fxxxxxxxxxxxx |
| Allowed CIDR block for external access to the instances | 0.0.0.0/0 |
| EC2 instance type for IRIS nodes | m5.large |
| SSH Key Pair name to connect to EC2 instances | aws |
| IAM Role for EC2 instances | S3FullAccessForEC2 |
| Which language version of Windows should be deployed to? | /aws/service/ami-windows-latest/Windows_Server-2019-English-Full-Base |
There are no particular settings on the "Configure Stack Options" screen. Push next button.
If deployment failed, disabling the Stack creation options "Rollback on failure" will leave the created environments, making it easier to analyze the problem later. (Don't forget to delete it manually when you no longer need them).
There are no particular settings on the "Review" screen. You just review them.
Push the "Create Stack" button, and then, the creation of multiple nested stacks will start.
- Check the output contents. Wait for the stack status to become CREATE_COMPLETE (it took about 15 minutes in my case).
Display the output.You can disable line wrapping with the gear icon.
| Key | Value | Explanation |
|---|---|---|
| BastionPublicIP | 13.115.71.170 | Basion Host public IP |
| HTTPEndpoint | http://iwa-NLB-4b1e6859b5a84ec3.elb.ap-northeast-1.amazonaws.com:52773/csp/sys/%25CSP.Portal.Home.zen | SMP Endpoint as an example for HTTP access |
| IntHTTPEndpoint | http://iwa-Internal-NLB-ae03aa0055ea57e5.elb.ap-northeast-1.amazonaws.com:52773/csp/sys/%25CSP.Portal.Home.zen | Endpoint for internal HTTP access |
| JDBCEndpoint | jdbc:IRIS://iwa-NLB-4b1e6859b5a84ec3.elb.ap-northeast-1.amazonaws.com:51773/DATA | JDBC Connection String |
| Node01PrivateIP | 10.0.10.43 | Node 01 Private IP |
| Node01ViaBastion | ssh -J ec2-user@13.115.71.170 ec2-user@10.0.10.43 -L 52773:10.0.10.43:52773 | Node 01 Connection via Bastion |
| Node01ViaBastionAlt | ssh -i .ssh\aws.pem -L 52773:10.0.10.43:52773 ec2-user@13.115.71.170 | Node 01 Connection via Bastion, Alternative way. |
| Node02PrivateIP | 10.0.11.219 | Node 02 Private IP |
| Node02ViaBastion | ssh -J ec2-user@13.115.71.170 ec2-user@10.0.11.219 -L 52773:10.0.11.219:52773 | Node 02 Connection via Bastion |
| Node02ViaBastionAlt | ssh -i .ssh\aws.pem -L 52773:10.0.11.219:52773 ec2-user@13.115.71.170 | Node 02 Connection via Bastion, Alternative way. |
Click HTTPEndpoint and verify that the Management Portal is displayed.
It will take some time for the load balancer to finish its health checks. You may have to wait a moment.
Log in with the user name "SuperUser" and the password you provided in the parameters.
-
Checking the mirror status
Click the "Show Mirror Monitor" link on the right edge of the home screen of the management portal.If it is successful, it is displayed as shown in the screenshot below.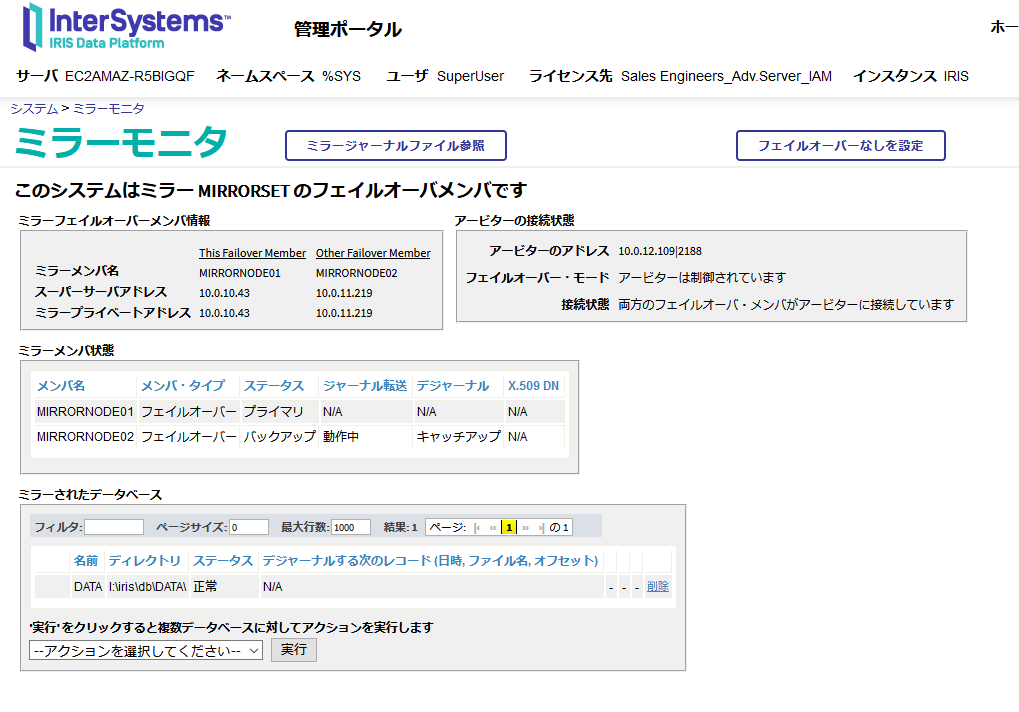
-
Check if operating correctly
- Check the external load balancer
Execute the following command from your client (in this case, Windows 10) and check that HTTP/ 1.1 200 OK is returned.The host name in the URL is the host name of the HTTPEndpoint value used earlier.
C:\Users\iwamoto>curl http://iwa-NLB-4b1e6859b5a84ec3.elb.ap-northeast-1.amazonaws.com:52773/csp/mirror_status.cxw -v
*   Trying 3.114.52.16...
* TCP_NODELAY set
* Connected to iwa-NLB-4b1e6859b5a84ec3.elb.ap-northeast-1.amazonaws.com (3.114.52.16) port 52773 (#0)
> GET /csp/mirror_status.cxw HTTP/1.1
> Host: iwa-NLB-4b1e6859b5a84ec3.elb.ap-northeast-1.amazonaws.com:52773
> User-Agent: curl/7.55.1
> Accept: */*
>
< HTTP/1.1 200 OK
< Content-Type: text/plain
< Connection: close
< Content-Length: 7
<
SUCCESS* Closing connection 0
- Check the internal load balancer
SSH to the bastion host, execute the following command, and check that HTTP/1.1 200 OK is returned.The host name in the URL is the host name of the IntHTTPEndpoint value used earlier.
[ec2-user@ip-172-31-37-178 ~]$ curl http://iwa-Internal-NLB-ae03aa0055ea57e5.elb.ap-northeast-1.amazonaws.com:52773/csp/mirror_status.cxw -v
    ・
    ・
< HTTP/1.1 200 OK
    ・
    ・
- Stop the Mirror primary member
Make an RDP connection to the primary member IRIS host (it should be Node01) and stop IRIS. If Node01 is created in a private subnet (as recommended), an RDP connection cannot be made directly, so you need to execute the following command on client to transfer from localhost.The actual command can be obtained by changing the port of Node01ViaBastionAlt in the output from 52773 to 3389.
C:\Users\iwamoto>ssh -i .ssh\aws.pem -L 3389:10.0.10.43:3389 ec2-user@13.115.71.170
Also, the Windows password must be obtained using the RDP connection method from the AWS console. Then connect to localhost:3389 with RDP and log in as Administrator by using the password you obtained.
You will see the following error until the external load balancer recognizes that the old backup member has been promoted to primary:
curl: (7) Failed to connect to http://iwa-NLB-4b1e6859b5a84ec3.elb.ap-northeast-1.amazonaws.com port 52773: Connection refused
It will take some time (depending on the load balancer health check values, I mentioned earlier). After that, check that both the external and internal load balancer responses are SUCCESS (HTTP / 1.1 200 OK).
Referenced sites
I used the following sites as a reference:
- https://aws.amazon.com/premiumsupport/knowledge-center/cloudformation-drive-letters-windows/
- https://www.concurrency.com/blog/may-2019/key-based-authentication-for-openssh-on-windows
- https://dev.classmethod.jp/articles/about-windows-cfn-init-non-ascii-encoding-error/
- https://dev.classmethod.jp/articles/aws-cloudformation-setup-windows-server-2016/