Find

Article
· Feb 18 34m read

API REST com Swagger no InterSystems IRIS

API REST com Swagger no InterSystems IRIS


Olá,

O protocolo HTTP permite a obtenção de recursos, como documentos HTML. É a base de qualquer troca de dados na Web e um protocolo cliente-servidor, o que significa que as requisições são iniciadas pelo destinatário, geralmente um navegador da Web.

As API REST se beneficiam deste protocolo para trocar mensagens entre cliente e servidor. Isso torna as APIs REST rápidas, leves e flexíveis. As API REST utilizam os verbos HTTP GET, POST, PUT, DELETE e outros para indicar as ações que desejam realizar.

Quando realizamos uma chamada a uma API RESt na verdade o que ocorre é uma chamada HTTP. A API recebe esta chamada e de acordo com o verbo e o caminho solicitados a API executa a ação desejada. No caso da implementação em Iris podemos ver isso claramente na área de definição da URLMap:

XData UrlMap
{
<Routes>
        <Route Url="/cliente" Method="POST" Call="Incluir"  Cors="true"/>
        <Route Url="/cliente/:chave" Method="PUT" Call="Alterar"  Cors="true"/>
        <Route Url="/cliente/:chave" Method="DELETE" Call="Deletar"  Cors="true"/>
        <Route Url="/cliente/:chave" Method="GET" Call="Pesquisar"  Cors="true"/>
        <Route Url="/cliente" Method="GET" Call="Listar"  Cors="true"/>
    </Routes>
}

Veja que temos o caminho (Url) e o verbo (Method) definido para cada chamada (Call). Assim o código que atende a API sabe o que deve realizar.

Essa estrutura na API REST não atende somente ao roteamento das ações que chegam para a API.

Ela também é a base para a criação do arquivo de Swagger da API, conforme vemos na documentação da classe %REST.API, método GetWebRESTApplication: https://docs.intersystems.com/irislatest/csp/documatic/%25CSP.Documatic....

Vamos ver como podemos gerar essa documentação então.

Primeiro vamos publicar nossa API. Vamos utilizar a mesma API do artigo https://community.intersystems.com/post/using-rest-api-flask-and-iam-intersystems-iris-part-1-rest-api

Basta então seguir as orientações e utilizar o código que o artigo disponibiliza para termos nossa API publicada.

Uma vez publicada a API vamos incluir uma nova rota no URLMap e um novo método no nosso código:


        <Route Url="/openapi" Method="GET" Call="OpenAPI" Cors="true"/>

ClassMethod OpenAPI() As %Status
{
    Do ##class(%REST.Impl).%SetContentType("application/json")
    
    Set sc = ##class(%REST.API).GetWebRESTApplication("", "/rest/servico", .swagger)
    
    If $$$ISERR(sc) {
        Quit sc  // If an error occurred, exit the method
    }

        
    Write swagger.%ToJSON()

    Quit $$$OK
}


Inclua no código da API a nova rota e o método associado a ela. Vamos agora fazer um teste. Vamos abrir o Postman e chamar o endpoint referente a geração do Swagger, que é o /openapi:


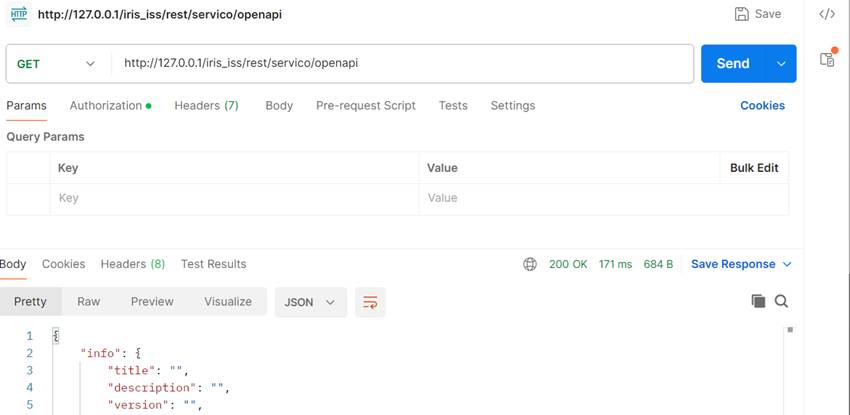
E a seguir temos a definição completa do Swagger gerado pela nossa chamada:

{

    "info": {

        "title": "",

        "description": "",

        "version": "",

        "x-ISC_Namespace": "DEMO"

    },

    "basePath": "/rest/servico",

    "paths": {

        "/cliente": {

            "post": {

                "parameters": [

                    {

                        "name": "payloadBody",

                        "in": "body",

                        "description": "Request body contents",

                        "required": false,

                        "schema": {

                            "type": "string"

                        }

                    }

                ],

                "operationId": "Incluir",

                "x-ISC_ServiceMethod": "Incluir",

                "x-ISC_CORS": true,

                "responses": {

                    "default": {

                        "description": "(Unexpected Error)"

                    },

                    "200": {

                        "description": "(Expected Result)"

                    }

                }

            },

            "get": {

                "operationId": "Listar",

                "x-ISC_ServiceMethod": "Listar",

                "x-ISC_CORS": true,

                "responses": {

                    "default": {

                        "description": "(Unexpected Error)"

                    },

                    "200": {

                        "description": "(Expected Result)"

                    }

                }

            }

        },

        "/cliente/{chave}": {

            "put": {

                "parameters": [

                    {

                        "name": "chave",

                        "in": "path",

                        "required": true,

                        "type": "string"

                    },

                    {

                        "name": "payloadBody",

                        "in": "body",

                        "description": "Request body contents",

                        "required": false,

                        "schema": {

                            "type": "string"

                        }

                    }

                ],

                "operationId": "Alterar",

                "x-ISC_ServiceMethod": "Alterar",

                "x-ISC_CORS": true,

                "responses": {

                    "default": {

                        "description": "(Unexpected Error)"

                    },

                    "200": {

                        "description": "(Expected Result)"

                    }

                }

            },

            "delete": {

                "parameters": [

                    {

                        "name": "chave",

                        "in": "path",

                        "required": true,

                        "type": "string"

                    }

                ],

                "operationId": "Deletar",

                "x-ISC_ServiceMethod": "Deletar",

                "x-ISC_CORS": true,

                "responses": {

                    "default": {

                        "description": "(Unexpected Error)"

                    },

                    "200": {

                        "description": "(Expected Result)"

                    }

                }

            },

            "get": {

                "parameters": [

                    {

                        "name": "chave",

                        "in": "path",

                        "required": true,

                        "type": "string"

                    }

                ],

                "operationId": "Pesquisar",

                "x-ISC_ServiceMethod": "Pesquisar",

                "x-ISC_CORS": true,

                "responses": {

                    "default": {

                        "description": "(Unexpected Error)"

                    },

                    "200": {

                        "description": "(Expected Result)"

                    }

                }

            }

        },

        "/openapi": {

            "get": {

                "operationId": "OpenAPI",

                "x-ISC_ServiceMethod": "OpenAPI",

                "x-ISC_CORS": true,

                "responses": {

                    "default": {

                        "description": "(Unexpected Error)"

                    },

                    "200": {

                        "description": "(Expected Result)"

                    }

                }

            }

        },

        "/test": {

            "get": {

                "operationId": "Test",

                "x-ISC_ServiceMethod": "Test",

                "x-ISC_CORS": true,

                "responses": {

                    "default": {

                        "description": "(Unexpected Error)"

                    },

                    "200": {

                        "description": "(Expected Result)"

                    }

                }

            }

        }

    },

    "swagger": "2.0"

}


O link a seguir nos dá acesso a documentação do Iris que aponta uma ferramenta que recebe a saída da nossa chamada de API e transforma em uma interface amigável de documentação e testes do serviço: https://docs.intersystems.com/irislatest/csp/docbook/DocBook.UI.Page.cls...

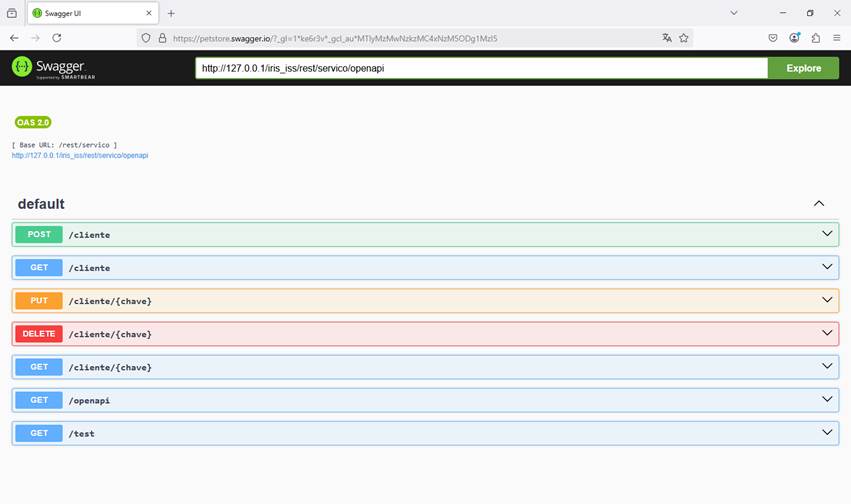
Vamos acionar esta URL e informar o caminho para recuperar a definição Swagger da nossa API: https://swagger.io/tools/swagger-ui/

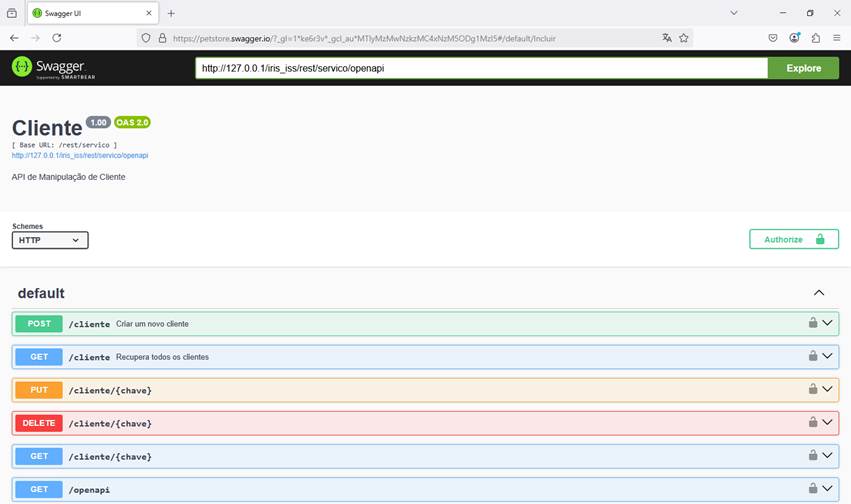
Vamos substituir a chamada de demo da páguma (a chamada petstore) pela nossa chamada: http://127.0.0.1/iris_iss/rest/servico/openapi e veja a tela com a documentação Swagger gerada:

No alto da chamada temos as informações básicas da nossa API:

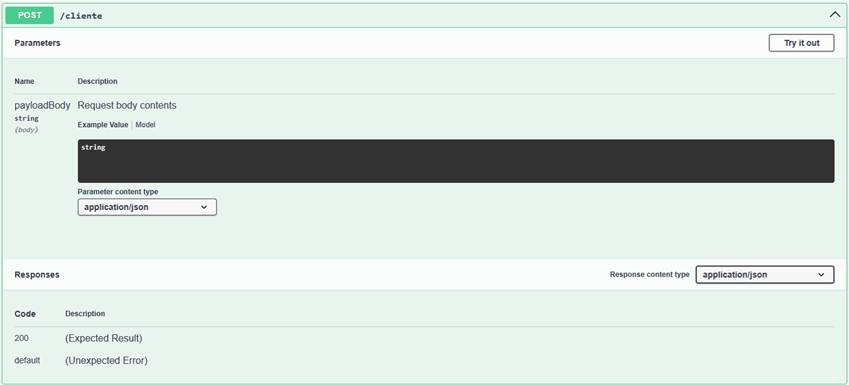
E podemos ainda navegar pelas chamadas e visualizar informações importantes, como na chamada POST para incluir um novo cliente:

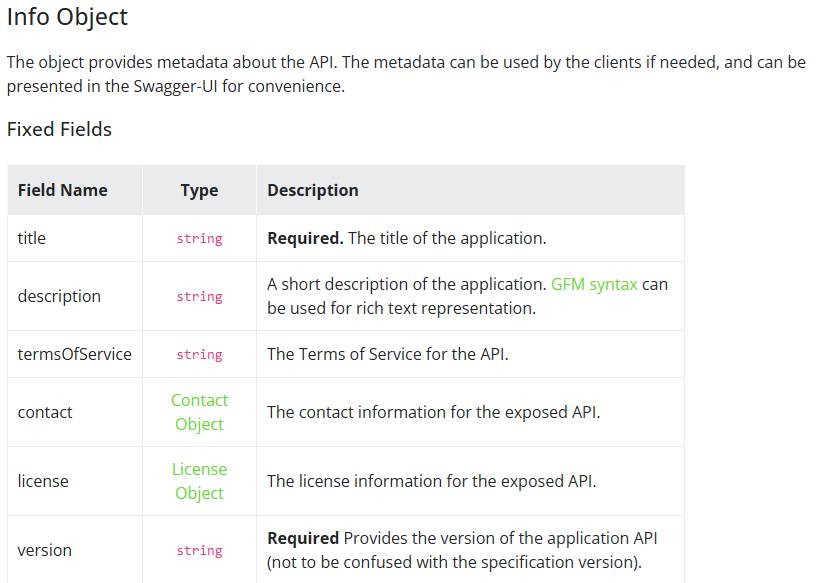
Mas, como vimos um pouco acima, a definição Swagger é na verdade um arquivo no formato JSON que fica disponível para nós na forma de um %DynamicObject (ver documentação em https://docs.intersystems.com/irislatest/csp/documatic/%25CSP.Documatic....) após a chamada ##class(%REST.API).GetWebRESTApplication que realizamos no nosso método OpenAPI. Desta forma, baseados na definição OpenAPI 2.0 podemos incluir ou remover informações do nosso Swagger. Vamos, por exemplo, enriquecer as informações básicas da API. Segundo a definição da Versão 2.0 (https://swagger.io/specification/v2/ ) podemos ter as seguintes informações disponibilizadas:


Vamos então completar as informações que podemos disponibilizar. Para isso vamos alterar nosso método OpenAPI, incluindo as informações básicas, protocolo aceito, autenticação e dados de acesso (host e basePath):

ClassMethod OpenAPI() As %Status
{
              Do ##class(%REST.Impl).%SetContentType("application/json")
    
    Set sc = ##class(%REST.API).GetWebRESTApplication("", "/rest/servico", .swagger)
    
    If $$$ISERR(sc) {
        Quit sc  // If an error occurred, exit the method
    }


              Do ##class(%REST.Impl).%SetContentType("application/json")
    
    Set sc = ##class(%REST.API).GetWebRESTApplication("", "/rest/servico", .swagger)
    
    If $$$ISERR(sc) {
        Quit sc  // If an error occurred, exit the method
    }
    
    Set info = {
        "title": "Cliente",
        "description": "API de Manipulação de Cliente",
        "version": "1.00"
    }

   Do swagger.%Set("info", info)


   Do swagger.%Set("host", "127.0.0.1")
   Do swagger.%Set("basePath", "/iris_iss/rest/servico")


   Set schemes = []
   Do schemes.%Push("http")

   Do swagger.%Set("schemes", schemes)
             
   Set security = [{"basicAuth":[]}]

   Do swagger.%Set("security", security)


   Set securityDefinitions = {}
   Do securityDefinitions.%Set("basicAuth", {})
   Do securityDefinitions.basicAuth.%Set("type", "basic")   

   Do swagger.%Set("securityDefinitions", securityDefinitions)  

 
    Write swagger.%ToJSON()

    Quit $$$OK
}


Chamando novamente a documentação Swagger na página de visualização agora temos a seguinte saída:


Veja que a nossa documentação está bem mais completa, com as informações sobre a API mais detalhadas, como por exemplo, o mecanismo de autenticação (Basic Auth), o protocolo aceito (HTTP) e as definições de versão, descrição e URL.

Podemos agora enriquecer a definição das chamadas, colocando a estrutura esperada nos payloads e exemplos de dados para a chamada. Para isso vamos sobrepor a informação em paths para “/cliente”:

ClassMethod OpenAPI() As %Status
{
              Do ##class(%REST.Impl).%SetContentType("application/json")
    
    Set sc = ##class(%REST.API).GetWebRESTApplication("", "/rest/servico", .swagger)
    
    If $$$ISERR(sc) {
        Quit sc  // If an error occurred, exit the method
    }


              Do ##class(%REST.Impl).%SetContentType("application/json")
    
    Set sc = ##class(%REST.API).GetWebRESTApplication("", "/rest/servico", .swagger)
    
    If $$$ISERR(sc) {
        Quit sc  // If an error occurred, exit the method
    }
    
    Set info = {
        "title": "Cliente",
        "description": "API de Manipulação de Cliente",
        "version": "1.00"
    }
    Do swagger.%Set("info", info)


    Do swagger.%Set("host", "127.0.0.1")
    Do swagger.%Set("basePath", "/iris_iss/rest/servico")

    Set schemes = []
    Do schemes.%Push("http")
    Do swagger.%Set("schemes", schemes)
             
    Set security = [{"basicAuth":[]}]
    Do swagger.%Set("security", security)

    Set securityDefinitions = {}
    Do securityDefinitions.%Set("basicAuth", {})
    Do securityDefinitions.basicAuth.%Set("type", "basic")
    Do swagger.%Set("securityDefinitions", securityDefinitions)
   
    Set incluirPesquisar = {
        "post": {
            "summary": "Criar um novo cliente",
            "description": "Recebe os dados de um cliente e cadastra no sistema.",
            "parameters": [
                {
                    "name": "body",
                    "in": "body",
                    "required": true,
                    "schema": {
                        "type": "object",
                        "properties": {
                            "nome": {
                                "type": "string",
                                "description": "Nome do cliente"
                            },
                            "idade": {
                                "type": "integer",
                                "description": "Idade do cliente"
                            }
                        },                              
                        "required": ["nome", "idade"],
                                           "example": {
                                                          "nome": "João Silva",
                                                          "idade": 30
                                           }
                    }
                }
            ],
            "responses": {
                          "default": {
                    "description": "Falha na chamada da API"
                },
                "200": {
                    "description": "Cliente criado com sucesso"
                },
                "406": {
                    "description": "Falha na inclusão do cliente"
                }                
            }
                            },
              "get": {
                    "summary": "Recupera todos os clientes",
                    "description": "Retorna a lista de clientes com suas informações.",
                    "responses": {
                                  "default": {
                    "description": "Falha na chamada da API"
                },
                      "200": {
                        "description": "Lista de clientes",
                        "schema": {
                          "type": "object",
                          "properties": {
                            "clientes": {
                              "type": "array",
                              "items": {
                                "type": "object",
                                "properties": {
                                  "chave": {
                                    "type": "string",
                                    "description": "Chave única do cliente"
                                  },
                                  "nome": {
                                    "type": "string",
                                    "description": "Nome do cliente"
                                  },
                                  "idade": {
                                    "type": "integer",
                                    "description": "Idade do cliente"
                                  }
                                },
                                "required": ["chave", "nome", "idade"]
                              }
                            }
                          },
                          "example": {
                            "clientes": [
                              {
                                "chave": "1",
                                "nome": "Maria",
                                "idade": 35
                              },
                              {
                                "chave": "2",
                                "nome": "Julio",
                                "idade": 57
                              },
                              {
                                "chave": "4",
                                "nome": "Julia",
                                "idade": 25
                              },
                              {
                                "chave": "5",
                                "nome": "Julia",
                                "idade": 22
                              }
                            ]
                          }
                        }
                      }
                    }      
                            }            
      }
    Do swagger.paths.%Set("/cliente", incluirPesquisar)
   
 
    Write swagger.%ToJSON()

    Quit $$$OK
}


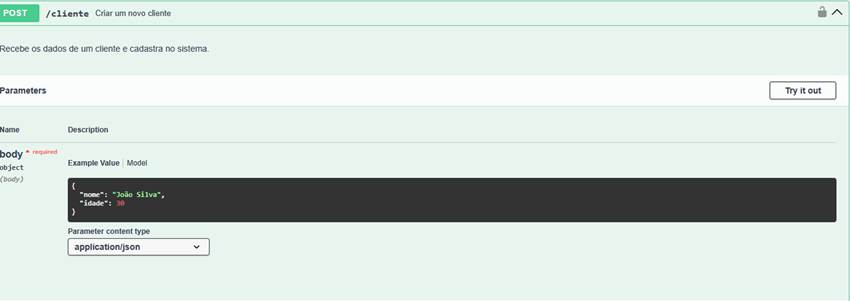
Chamando novamente a documentação podemos visualizar agora os métodos POST para incluir um cliente e GET para recuperar um cliente:

Veja que já temos uma explicação do que é cada um dos métodos disponíveis para o POST e o GET que sobrescrevemos.

Note também não temos mais as tags "x-ISC_ServiceMethod" e "x-ISC_Namespace" que não colocamos na nossa nova definição.

Clicando para expandir o método POST por exemplo, agora temos visualmente um exemplo de chamada (Example Value):

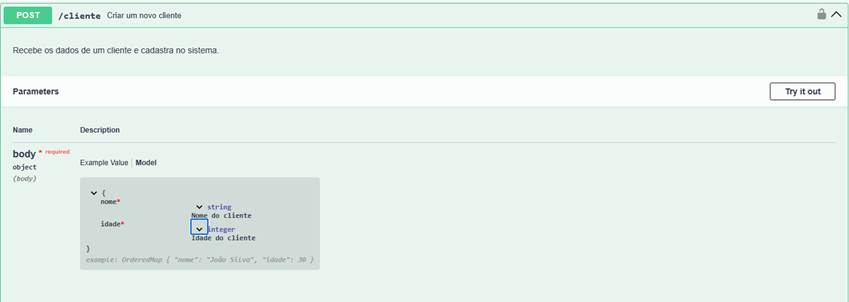
E o formato do payload da chamada (Model):

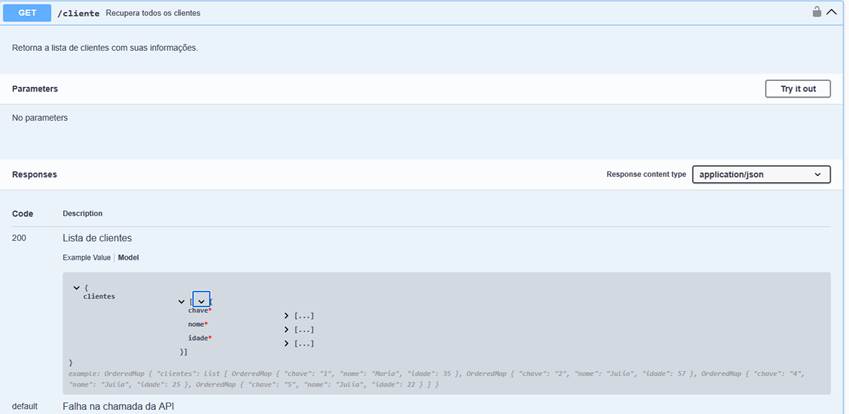
Já na recuperação dos clientes, temos a definição do Response devolvido com exemplo:

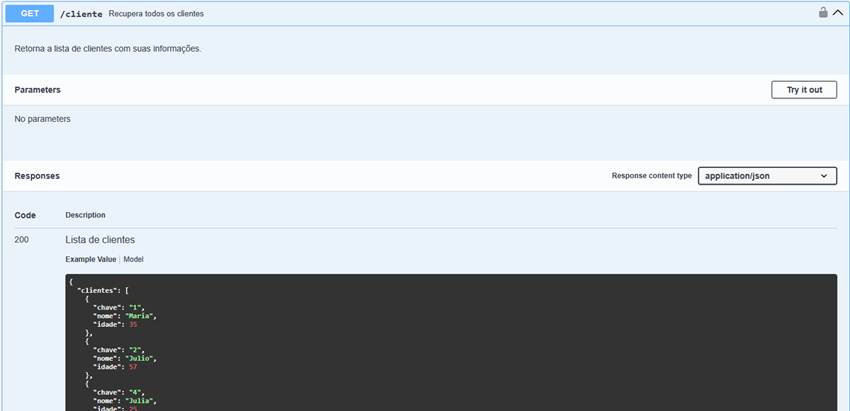
E também com o modelo esperado como resposta:


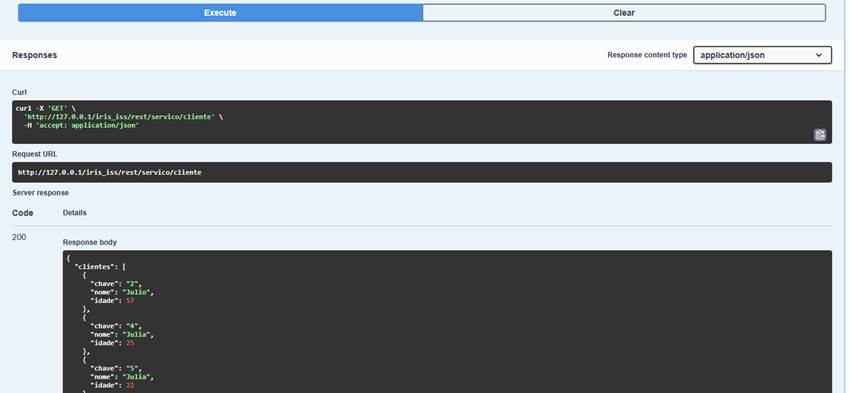
Ainda, podemos testar as chamadas a API pela própria página de documentação. Veja o botão Try it out disponível na página. Clique nele, e a seguir em Execute e veja o resultado:


Estas possibilidades para a abordagem Code First de uma API REST nos abrem muitas possibilidades de documentação, permitindo controlar o que será divulgado, adicionando ou subtraindo as informações que julgamos convenientes no material publicado. A definição OpenAPI é muito completa e detalhada. Existem diversas informações que podemos incluir ou retirar, dependendo do que precisamos ou desejamos disponibilizar nela.

Até a próxima!

Discussion (0)1
Log in or sign up to continue
Article
· Feb 18 22m read

REST API with Swagger in InterSystems IRIS

REST API with Swagger in InterSystems IRIS

Hello

The HTTP protocol allows you to obtain resources, such as HTML documents. It is the basis of any data exchange on the Web and a client-server protocol, meaning that requests are initiated by the recipient, usually a Web browser.

REST APIs take advantage of this protocol to exchange messages between client and server. This makes REST APIs fast, lightweight, and flexible. REST APIs use the HTTP verbs GET, POST, PUT, DELETE, and others to indicate the actions they want to perform.

When we make a call to a RESt API, what actually happens is an HTTP call. The API receives this call and according to the requested verb and path, the API performs the desired action. In the case of the Iris implementation we can see this clearly in the URLMap definition area:

XData UrlMap
{
<Routes>
        <Route Url="/cliente" Method="POST" Call="Incluir"  Cors="true"/>
        <Route Url="/cliente/:chave" Method="PUT" Call="Alterar"  Cors="true"/>
        <Route Url="/cliente/:chave" Method="DELETE" Call="Deletar"  Cors="true"/>
        <Route Url="/cliente/:chave" Method="GET" Call="Pesquisar"  Cors="true"/>
        <Route Url="/cliente" Method="GET" Call="Listar"  Cors="true"/>
        <Route Url="/openapi" Method="GET" Call="OpenAPI" Cors="true"/>
        <Route Url="/test" Method="GET" Call="Test" Cors="true"/>
    </Routes>
}

Notice that we have the path (Url) and the verb (Method) defined for each call (Call). Thus, the code that meets the API knows what it should do.

This structure in the REST API does not only serve the routing of actions that arrive at the API.

It is also the basis for creating the API Swagger file, as seen in the %REST.API class documentation, GetWebRESTApplication method: https://docs.intersystems.com/irislatest/csp/documatic/%25CSP.Documatic....

Let's see how we can generate this documentation then.

First let's publish our API. Let's use the same API as in article https://community.intersystems.com/post/using-rest-api-flask-and-iam-intersystems-iris-part-1-rest-api

Just follow the guidelines and use the code that the article provides to have our API published.

Once the API is published we will include a new route in URLMap and a new method in our code:

<Route Url="/openapi" Method="GET" Call="OpenAPI" Cors="true"/>

ClassMethod OpenAPI() As %Status
{
              Do ##class(%REST.Impl).%SetContentType("application/json")
    
    Set sc = ##class(%REST.API).GetWebRESTApplication("", "/rest/servico", .swagger)
    
    If $$$ISERR(sc) {
        Quit sc  // If an error occurred, exit the method
    }
   
    Write swagger.%ToJSON()

    Quit $$$OK
}

Include the new route and the method associated with it in your API code. Let's now do a test. Let's open Postman and call the endpoint for generating Swagger, which is /openapi:


And below we have the complete definition of the Swagger generated by our call:

{

"info": {

"title": "",

"description": "",

"version": "",

"x-ISC_Namespace": "DEMO"

},

"basePath": "/rest/servico",

"paths": {

"/customer": {

"post": {

"parameters": [

{

"name": "payloadBody",

"in": "body",

"description": "Request body contents",

 "required": false,

"schema": {

"type": "string"

}

}

],

"operationId": "Include",

"x-ISC_ServiceMethod": "Include",

 "x-ISC_CORS": true,

"responses": {

"default": {

"description": "(Unexpected Error)"

},

"200": {

"description": "(Expected Result)"

}

}

},

"get": {

"operationId": "List",

"x-ISC_ServiceMethod": "List",

 "x-ISC_CORS": true,

"responses": {

"default": {

"description": "(Unexpected Error)"

},

"200": {

"description": "(Expected Result)"

}

}

}

},

"/customer/{key}": {

"put": {

"parameters": [

{

"name": "key",

"in": "path",

 "required": true,

"type": "string"

},

{

"name": "payloadBody",

"in": "body",

"description": "Request body contents",

 "required": false,

"schema": {

"type": "string"

}

}

],

"operationId": "Change",

"x-ISC_ServiceMethod": "Change",

 "x-ISC_CORS": true,

"responses": {

"default": {

"description": "(Unexpected Error)"

},

"200": {

"description": "(Expected Result)"

}

}

},

"delete": {

"parameters": [

{

"name": "key",

"in": "path",

 "required": true,

"type": "string"

}

],

"operationId": "Delete",

"x-ISC_ServiceMethod": "Delete",

 "x-ISC_CORS": true,

"responses": {

"default": {

"description": "(Unexpected Error)"

},

"200": {

"description": "(Expected Result)"

}

}

},

"get": {

"parameters": [

{

"name": "key",

"in": "path",

 "required": true,

"type": "string"

}

],

"operationId": "Search",

"x-ISC_ServiceMethod": "Search",

 "x-ISC_CORS": true,

"responses": {

"default": {

"description": "(Unexpected Error)"

},

"200": {

"description": "(Expected Result)"

}

}

}

},

"/openapi": {

"get": {

"operationId": "OpenAPI",

"x-ISC_ServiceMethod": "OpenAPI",

 "x-ISC_CORS": true,

"responses": {

"default": {

"description": "(Unexpected Error)"

},

"200": {

"description": "(Expected Result)"

}

}

}

},

"/test": {

"get": {

"operationId": "Test",

"x-ISC_ServiceMethod": "Test",

 "x-ISC_CORS": true,

"responses": {

"default": {

"description": "(Unexpected Error)"

},

"200": {

"description": "(Expected Result)"

}

}

}

}

},

"Swagger": "2.0"

}


The following link gives us access to Iris's documentation that points to a tool that receives the output of our API call and transforms it into a user-friendly interface for documentation and testing of the service: https://docs.intersystems.com/irislatest/csp/docbook/DocBook.UI.Page.cls...

Let's fire this URL and provide the path to retrieve the Swagger definition from our API: https://swagger.io/tools/swagger-ui/

Let's replace the demo call on the page (the petstore call) with our call: http://127.0.0.1/iris_iss/rest/servico/openapi and see the screen with the generated Swagger documentation:

At the top of the call we have the basic information of our API:

And we can also navigate through the calls and view important information, such as in the POST call to include a new customer:

But, as we saw a little above, the Swagger definition is actually a file in JSON  format that is available to us in the form of a %DynamicObject (see documentation in https://docs.intersystems.com/irislatest/csp/documatic/%25CSP.Documatic....) after the ##class(%REST.API).GetWebRESTApplication() that we perform in our OpenAPI method. In this way, based on the OpenAPI 2.0 definition we can include or remove information from our Swagger. Let's, for example, enrich the basic information of the API. According to the definition of Version 2.0 (https://swagger.io/specification/v2/ ) we may have the following information made available:


Let's then complete the information that we can make available. To do this, we'll change our OpenAPI method, including the basic information, accepted protocol, authentication, and access data (host and basePath):

ClassMethod OpenAPI() As %Status
{
     Do ##class(%REST.Impl).%SetContentType("application/json")
    
    Set sc = ##class(%REST.API).GetWebRESTApplication("", "/rest/servico", .swagger)
    
    If $$$ISERR(sc) {
        Quit sc  // If an error occurred, exit the method
    }
    
    Set info = {
        "title": "Cliente",
        "description": "API de Manipulação de Cliente",
        "version": "1.00"
    }
    Do swagger.%Set("info", info)
    
    Do swagger.%Set("host", "127.0.0.1")
    Do swagger.%Set("basePath", "/iris_iss/rest/servico")

    Set schemes = []
    Do schemes.%Push("http")
    Do swagger.%Set("schemes", schemes)
             
    Set security = [{"basicAuth":[]}]
    Do swagger.%Set("security", security)

    Set securityDefinitions = {}
    Do securityDefinitions.%Set("basicAuth", {})
    Do securityDefinitions.basicAuth.%Set("type", "basic")
    Do swagger.%Set("securityDefinitions", securityDefinitions)
   
    Write swagger.%ToJSON()

    Quit $$$OK
}


Calling the Swagger documentation again on the preview page now we have the following output:


See that our documentation is much more complete, with more detailed information about the API, such as the authentication mechanism (Basic Auth), the accepted protocol (HTTP) and the version, description and URL definitions.

We can now enrich the definition of the calls by putting the expected structure in the payloads and data examples for the call. To do this, let's overlay the information in paths for "/client":

ClassMethod OpenAPI() As %Status
{
    Do ##class(%REST.Impl).%SetContentType("application/json")
    
    Set sc = ##class(%REST.API).GetWebRESTApplication("", "/rest/servico", .swagger)
    
    If $$$ISERR(sc) {
        Quit sc  // If an error occurred, exit the method
    }
    
    Set info = {
        "title": "Cliente",
        "description": "API de Manipulação de Cliente",
        "version": "1.00"
    }
    Do swagger.%Set("info", info)
    
    Do swagger.%Set("host", "127.0.0.1")
    Do swagger.%Set("basePath", "/iris_iss/rest/servico")

    Set schemes = []
    Do schemes.%Push("http")
    Do swagger.%Set("schemes", schemes)
             
    Set security = [{"basicAuth":[]}]
    Do swagger.%Set("security", security)

    Set securityDefinitions = {}
    Do securityDefinitions.%Set("basicAuth", {})
    Do securityDefinitions.basicAuth.%Set("type", "basic")
    Do swagger.%Set("securityDefinitions", securityDefinitions)
   
    Set incluirPesquisar = {
        "post": {
            "summary": "Criar um novo cliente",
            "description": "Recebe os dados de um cliente e cadastra no sistema.",
            "parameters": [
                {
                    "name": "body",
                    "in": "body",
                    "required": true,
                    "schema": {
                        "type": "object",
                        "properties": {
                            "nome": {
                                "type": "string",
                                "description": "Nome do cliente"
                            },
                            "idade": {
                                "type": "integer",
                                "description": "Idade do cliente"
                            }
                        },                              
                        "required": ["nome", "idade"],
                                           "example": {
                                                          "nome": "João Silva",
                                                          "idade": 30
                                           }
                    }
                }
            ],
            "responses": {
                          "default": {
                    "description": "Falha na chamada da API"
                },
                "200": {
                    "description": "Cliente criado com sucesso"
                },
                "406": {
                    "description": "Falha na inclusão do cliente"
                }                
            }
                            },
              "get": {
                    "summary": "Recupera todos os clientes",
                    "description": "Retorna a lista de clientes com suas informações.",
                    "responses": {
                                  "default": {
                    "description": "Falha na chamada da API"
                },
                      "200": {
                        "description": "Lista de clientes",
                        "schema": {
                          "type": "object",
                          "properties": {
                            "clientes": {
                              "type": "array",
                              "items": {
                                "type": "object",
                                "properties": {
                                  "chave": {
                                    "type": "string",
                                    "description": "Chave única do cliente"
                                  },
                                  "nome": {
                                    "type": "string",
                                    "description": "Nome do cliente"
                                  },
                                  "idade": {
                                    "type": "integer",
                                    "description": "Idade do cliente"
                                  }
                                },
                                "required": ["chave", "nome", "idade"]
                              }
                            }
                          },
                          "example": {
                            "clientes": [
                              {
                                "chave": "1",
                                "nome": "Maria",
                                "idade": 35
                              },
                              {
                                "chave": "2",
                                "nome": "Julio",
                                "idade": 57
                              },
                              {
                                "chave": "4",
                                "nome": "Julia",
                                "idade": 25
                              },
                              {
                                "chave": "5",
                                "nome": "Julia",
                                "idade": 22
                              }
                            ]
                          }
                        }
                      }
                    }      
              }            
      }
    Do swagger.paths.%Set("/cliente", incluirPesquisar)
   
    Write swagger.%ToJSON()

    Quit $$$OK
}

Calling the documentation page again we can now see the POST methods  to include a client and GET to retrieve a list:

See that we already have an explanation of what is each of the methods available for POST and GET that we have overwritten.

Note we also no longer have the "x-ISC_ServiceMethod" and "x-ISC_Namespace" tags that we didn't put in our new definition.

Clicking to expand the POST method for example, we now visually have an example call (Example Value):

And the format of the call payload (Model):

In customer recovery, we have the definition of the returned Response with example:

And also with the expected model as an answer:


Also, we can test API calls from the documentation page itself. See the Try it out” button  available on the page. Click on it, then on Execute and see the result:


These possibilities for the Code-first approach  of a REST API open up many possibilities for documentation, allowing us to control what will be disseminated, adding or subtracting the information we deem convenient in the published material.

The OpenAPI definition is very complete and detailed. There is a variety of information that we can include or take away, depending on what we need or want to make available in it.

See you next time!

Discussion (0)1
Log in or sign up to continue
Article
· Feb 18 4m read

OMOP Odyssey - No Code CDM Exploration with Databricks AI/BI Genie (Island of Aeolus)

No Code Text to SQL w/ Databricks Genie and InterSystems OMOP

There are quite a few tools in the OHDSI universe to help you write extremely powerful queries to surface your insights, Atlas, Achiles, DQD, ShinyApp, OMOPSketch and notably SQLRender that helps translate between dialects, of which IRIS dialect is now supported... its a tiresome list and very incomplete.  But in my perusal of such tools to learn this community I did not find one that translates natural language so to speak to sql so I took Databricks AI/BI Genie for a spin and here is a subset of the initial results.

Databricks Workspace Setup

My compute cluster is dead simple, with the InterSystems JDBC Drivers included via a volume and attached.  I am on the lag wagon here a bit with the versions, but 3.7.1 did the trick here without issue.

Secondly, you'll need an init script to run on your cluster on start, I had this in a previous post in a couple of places, but here is a direct link to import_cloudsql_certfiicate.sh again.  Basically you paste the certificate from the InterSystems OMOP Portal, and mount the script on the volume and set it to run on startup like below.  On startup we should have the environment to connect to the database security.


OMOP to Catalog ELT

Table to Table Extract Load Transform was done via a notebook, on the population in the InterSystems OMOP CDM we loaded up previous, the pipeline takes about an hour to run, but admittedly I am pretty cheap and used Personal Compute to get the job done.  The drug_exposure table seemed to take the longest, and note the workaround in the notebook for the reserved word collision `DOMAIN` 👣🔫.  This rips the OMOP Database schema OMOPCDM54 into a catalog schema named the same.

 
If the screenshots are getting in the way, I included the python in the below teaser.

 
OMOP Genie - InterSystems OMOP ELT.py

Most likely an unneeded visual, but Ill include it anyway.


Databricks Genie AI/BI

Does not seem that I needed to be an expert to get started with my first Genie, all and all it seemed "point and prompt", with facilities to help assert things, learn with additional queries, provide some sample questions and tell the Genie how to behave...

Make a Wish

Not sure if that is where the marketing was going with Genie AI/BI but Ill abuse it to tee up our first question, which is pretty simple to start.

How many care sites are there ?

Okay then, cross check with the deployment.

Not earth shattering I know... but we did get the query and the count was accurate as the result.

Can you draw me a pie chart of the distribution of gender in the database ?

Pictures are good.

Here is one right out of the OMOP Queries text from the repository of real world examples.


Count number of people who have at least one observation period in the database that is longer than 365 days.


For this one I was more interested in looking at the difference in style from the text to code represented in the examples...
 

Databricks Genie OMOP Query Example
SELECT
  COUNT(DISTINCT `person_id`)
FROM
  (
    SELECT
      `person_id`
    FROM
      `omopcdm54`.`iccastage`.`observation_period`
    WHERE
      DATEDIFF(`observation_period_end_date`, `observation_period_start_date`) > 365
  ) AS subquery


    SELECT COUNT(DISTINCT person_ID) AS NUM_persons

    FROM observation_period

    WHERE observation_period_END_DATE - observation_period_START_DATE >= 365;


Difference in style, schema location is different, but the result was the  basically the same.

Keep in mind too this is less than interesting as this is "just the CDM" and not the "results of the CDM" which would be way more interesting, but to get to the results we'll have to dive back into the OHDSI community tooling.


1 Comment
Discussion (1)2
Log in or sign up to continue
Article
· Feb 18 5m read

OMOP Odyssey - FHIR® to OMOP ETL (Calypso’s Island)

Professional Grade FHIR® to OMOP Transformation

Lets zero in on the use of the word professional and put it into some context.  It was written by industry experts who wrapped it up in a fee based service with support and some guardrails around flexible options to contribute to its behavior.  I feel its an important distinction to either an open or home grown solution (though it may do the same thing) to consider it to scale or provide mission critical value on the other side of it. The OHDSI community has an entire competency around the subject of ETL to the OMOP database,  WhiteRabbit for instance that analyzes the OMOP database and Rabbit in a Hat to help design the ETL.  I'd short the stock as a bet the community tooling was applied to the InterSystems transformation stack to refine the offering.

Here I go attempting to make a data transformation interesting to a community that probably lives and breathes them, but for sure is a quick start to getting to the front door of the OHDSI Community and the wealth and "Weapons of Mass Solution" to meaningful large scale analytics on your (or somebody elses) healthcare data.

Bulk FHIR

The ingestion standard for the pipeline is Bulk FHIR Export, take a peak at how InterSystems has implemented the Bulk FHIR Coordinator , which the resulting payload for an export is a zipfile containing ndjson files with FHIR resources, one per line.

You can do this yourself with a single exported resource file in json as an example you can use inside something programatically...

 
Generate Simple BulkFHIR.zip


...or we can simplify it to get the ball rolling and generate the a synthetic payload using Synthea and @Dmitry Zasypkin 's solution out on github, which takes care of a 👣 🔫 to correct a referential mismatch between synthea and some FHIR Servers.

Card

So lets follow the directions and generate a a small population of 10 patients for landing in our OMOP Database and highlight the service.

git clone https://github.com/dmitry-zasypkin/synthea-ndjson
cd synthea-ndjson
docker build . -t synthea
docker run --rm -v ./output:/synthea/output -it synthea -p 10
chmod +x patch-synthea-ndjsons.sh
sudo chmod -R 777 output # may need this
./patch-synthea-ndjsons.sh output/fhir
zip -j fhir1.zip output/fhir/*.*

If everything goes well, you should staring at a bulk fhir export zip called `fhir1.zip` in your current working directory.

One thing to note here is that bulk fhir export is actually a supported export option in `synthea.properties`...

exporter.fhir.bulk_data=true

Ok, so lets send it.  Remember the bucket  `arn:aws:s3:::omop-fhir` we had setup previous?  Lets upload the payload to commence loading our OMOP database.


Checking our work:

Inspect the Transform

Back in the InterSystems OMOP Cloud Portal, navigate to "Metrics" in the side panel and lets inspect the transformation results, hopefully we have some.

Took just under a minute for the transform to complete, but it did, and if you highlight the run, you will get the stats and report card on the import of the data, looks like we have two different conditions occur, some errors and some warnings.

Inspecting the OMOP table, you can validate that the number of landed "persons" is 15, and that 13 resources were in error and could not be landed in the ETL.  To see what happened, navigate to the "Errors" navigation item in the InterSystems Portal for the OMOP Service.  Definitely not the fun way to check the OMOP Database, but lets take a quick peak using the SQL Browser and confirm 15 Patients (aka OMOP persons) are in the database.


Highlighting the run in the top pane will reveal two tables below, one for Data Errors and One for Warnings.  For an exhaustive explanation to Errors and Warnings, The InterSystems OMOP Docs can do a better job that I can.

 
Looks like a concept id was missing that is critical to the transform (via the OMOP Data Model), you can check for required fields pretty quickly for the table reference in the CDM documentation for Procedure.


 Also, it appears we tried to post the transform tried to post a location twice, and thankful we did not.

As for the warnings, it appears Synthea filled a quantity field with a string, but the resource persisted anyways as seen here with `{#}`

If you are looking for the mapping under the hood to understand it, you can find it in the InterSystems Documentation (its easy on the eyes and the understanding is straight forward, at least that link is :). 


Transformation Options

In the Configurations tab (and also up front to the provisioning) there were a few options to take a look at in regards to the control of the transformation.  The first two options have to do with source data mapping options, and use FHIRPath expressions to allow you control of the mapping.  I found the fhirpath.js demo to be educational and useful mining FHIRPaths on FHIR resource json.


Person Id Options

These options are important and sort of tough to see the value when using synthetic data. The fhir resource id is an id that never changes and identifies the resource itself, making it pointless to clinical meaning, but important to the operation of the fhir server.  If you are familiar with HealthShare Patient Index and the concept of domain conflicts, the source system is just as important to the identifying if the patient is unique.  These options allow you control over minimizing duplicates and using meaningful identifiers in the OMOP Database.

Filtering

Although he OMOP CDM databases is already classified as a pseudo-anonymised databases, there are organizations who may have a problem with some of the data being shipped to it.  The filtering options send either entire Tables, or Fields within tables to the bit bucket.

Terminology Mapping

You can extend the OMOP Data model vocabularies and concepts by uploading csvs to the bucket key specified in the s3 configuration of your InterSystems OMOP Deployment.  No need to re-hash this as the docs provide ample explanation and specification for the csv format.


https://docs.intersystems.com/services/csp/docbook/DocBook.UI.Page.cls?K...


Load It Up!

Lets get some data up in the InterSystems OMOP CDM and simulate a run of all the US states with a randomized population of of about 100-200 patients a state.  The timings appear to be in the ~5 minute range per state, and this is running the lowest spec (trial) of the service available.

Now back to the OHDSI world, lets take a peak at the data from RStudio.

This OMOP CDM is a fully operational Death Star!

1 Comment
Discussion (1)2
Log in or sign up to continue
Article
· Feb 18 5m read

OMOP Odyssey - Celebration (House of Hades)

Hades DatabaseConnector 6.4.0 now does IRIS stuff!

A well deserved celebration 🎉 that OHDSI officially announced IRIS as a supported platform and dialect with DatabaseConnector 6.4.0 in the OHDSI Hades Project!  Lets showcase this accomplishment and create the OMOP CDM 5.4 on InterSystems IRIS, persona time!


Ms. TLS - I am running InterSystems Cloud Document (Health Connect Cloud or equivalent )

I have a running IRIS Cloud Document workload and managed to create the OMOPCDM54 DATABASE with minimal steps on my system, The Cloud Portal and RStudio.


System

However you import certs on your system, it needs to be done here to connect to InterSystems Cloud Document deployment.  I use the following script loosely across solutions, where I paste in the cert I downloaded from the portal and it imports the cert for me.


import_iris_certificate.sh


The Cloud Portal

This can be done alternate ways over the listener as well, but to highlight it can be done in the Cloud Portal, we can use the SQL Query Tools.


RStudio

Next step is Rstudio, where the OHDSI packages will do most of the work after a little bit of setup.
 

install.packages("devtools")
devtools::install_github("OHDSI/CommonDataModel")
install.packages("DatabaseConnector")
install.packages("SqlRender")
Sys.setenv("DATABASECONNECTOR_JAR_FOLDER" = "/home/sween/Desktop/OMOP/iris-omop-extdb/jars")
library(DatabaseConnector)
downloadJdbcDrivers("iris")


Back to RStudio

We can check to see if the iris dialect (now included with OHDSI tooling) is actually in there.
 

CommonDataModel::listSupportedDialects()

Crowd goes wild, indeed IRIS is in there.


I was ready to go here, but for starters I wanted to just dump the ddls it creates to take a peak at them, and check them in somewhere, this dump the ddls in "dry run" fashion.

CommonDataModel::buildRelease(cdmVersions = "5.4",
                              targetDialects = "iris",
                              outputfolder = "./ddl/iris/")

Inspecting our output folder:


Now lets target our InterSystems Cloud Document instance, and actually create the OMOP database, in two steps, one to connect, and one to execute them.

Connect

cd <- DatabaseConnector::createConnectionDetails(dbms = "iris",
                                                 connectionString = "jdbc:IRIS://k8s-0a6bc2ca-a096b3cb-578f6ec1b7-8b0e928263a4990a.elb.us-east-2.amazonaws.com:443/USER/:::true",
                                                 user = "SQLAdmin",
                                                 port = "443",
                                                 password = "PASSWORD",
                                                 pathToDriver = "./jars",
)

Execute

CommonDataModel::executeDdl(connectionDetails = cd,
                            cdmVersion = "5.4",
                            cdmDatabaseSchema = "OMOPCDM54"
                            )

If everything goes well, no errors will be reported in RStudio

Check your work on the InterSystems Cloud Document deployment, its empty, but its there!

👣🔫 Alert, and will mention this one again on the OMOP Journey.  In the CDM for IRIS, there is something to be aware of with a name colission of sorts with the "DOMAIN" table.  IF you look in the screenshot above, you can see DOMAIN is all caps.  This is because domain is a keyword on InterSystems SQL Workloads.  So keep in mind that you have to account for quoting the table name for operations to that table if they exist.
 

for table in cdmtables:
    try:
        if table == "domain":
            sql = f'(select * from OMOPCDM54."{table}") AS temp_table;'
        else:
            sql = f'(select * from OMOPCDM54.{table}) AS temp_table;'


Mr. Developer ( I am using IRIS and cant be bothered with implementation overhead like TLS )

Im in a hurry, and security is somebody elses job, and want the OMOP database on my local IRIS Community, Eval, Container or POD. Most of the steps apply above, outside a new connection string and we will create the schema through the SMP.


Now back in RStudio  again, point to the developer instance.

cd <- DatabaseConnector::createConnectionDetails(dbms = "iris",
                                                 connectionString =
"jdbc:IRIS://192.168.1.162:1972/USER",
                                                 user = "_SYSTEM",
                                                 port = "1972",
                                                 password = "SYS",
                                                 pathToDriver = "./jars",
)

CommonDataModel::executeDdl(connectionDetails = cd,
                            cdmVersion = "5.4",
                            cdmDatabaseSchema = "OMOPCDM54"
                            )

Connecting with nostalgic credentials...


Now Refresh the SMP and expand the OMOPCDM54 schema.


Woooo!

🙌 🎉 

Excellent work and shout outs for those involved in this effort!

2 Comments
Discussion (2)2
Log in or sign up to continue