Securing your APIs with OAuth 2.0 in InterSystems API Management – Part 3
In this 3-part series of articles, is shown how you can use IAM to simply add security, according to OAuth 2.0 standards, to a previously unauthenticated service deployed in IRIS.
In the first part, was provided some OAuth 2.0 background together with some IRIS and IAM initial definitions and configurations in order to facilitate the understanding of the whole process of securing your services.
The second part discussed and showed in detail the steps needed to configure IAM to validate the access token present in the incoming request and forward the request to the backend if the validation succeeds.
This last part of the series will discuss and demonstrate the configurations needed to IAM generate an access token (acting as an authorization server) and validate it, together with some important final considerations.
If you want to try IAM, please contact your InterSystems Sales Representative.
Scenario 2: IAM as an authorization server and access token validator
In this scenario, differently from the first scenario, we are going to use a plugin called “OAuth 2.0 Authentication”.
In order to use IAM as the authorization server in this Resource Owner Password Credentials flow, the username and password must be authenticated by the client application. The request to get the access token from IAM should be made only if the authentication is successful.
Let’s start by adding it to our “SampleIRISService”. As you can see in the screenshot below, we have some different fields to fill up in order to configure this plugin.
.png)
First of all, we are going to paste the id of our “SampleIRISService” into the field “service_id” to enable this plugin to our service.
In the field “config.auth_header_name” we are going to specify the header name that will carry the authorization token. In this case, I’ll leave the default value of “authorization”.
The “OAuth 2.0 Authentication” plugin supports the Authorization Code Grant, Client Credentials, Implicit Grant or Resource Owner Password Credentials Grant OAuth 2.0 flows. As we are using the Resource Owner Password Credentials flow in this article, we will check the box “config.enable_password_grant”.
In the “config.provision_key” field, enter any string to be used as the provision key. This value will be used to request an access token to IAM.
In this case, I left all the other fields with the default value. You can check the full reference for each field in the plugin documentation available here.
Here is how the plugin configuration looks like at the end:
.png)
Once the plugin is created, we need to create the credentials to our “ClientApp” consumer.
To do so, go to “Consumers” on the left menu and click on “ClientApp”. Next, click on “Credentials” tab and then on “New OAuth 2.0 Application” button.
.png)
On the following page, enter any name to identify your application on the field “name”, define a client id and a client secret, respectively, on the fields “client_id” and “client_secret” and lastly, enter the URL in your application where users will be sent after authorization on the field “redirect_uri”. Then, click on “Create”.
.png)
Now, you are ready to send requests.
The first request that we need to make is to obtain the access token from IAM. The “OAuth 2.0 Authentication” plugin automatically create an endpoint appending the path “/oauth2/token” to the already created route.
Therefore, in this case, we would need to make a POST request to the URL:
https://iamhost:8443/event/oauth2/token
In the request body, you should include the following JSON:
{ "client_id": "clientid", "client_secret": "clientsecret", "grant_type": "password", "provision_key": "provisionkey", "authenticated_userid": "1"}
As you can see, this JSON contains values defined both during “OAuth 2.0 Authentication” plugin creation, such as “grant_type” and “provision_key”, and during Consumer’s credentials creation, such as “client_id” and “client_secret”.
The parameter “authenticated_userid” should also be added by the client application when the username and password provided are successfully authenticated. Its value should be used to uniquely identify the authenticated user.
The request and its respective response should look like this:
.png)
With that, we can now make a request to get the event data including the “access_token” value from the response above as a “Bearer Token” in a GET request to the URL
.png)
If your access token expires, you can generate a new access token using the refresh token that you received together with the expired access token by making a POST request to the same endpoint used to get an access token, with a slightly different body:
{ "client_id": "clientid", "client_secret": "clientsecret", "grant_type": "refresh_token", "refresh_token": "E50m6Yd9xWy6lybgo3DOvu5ktZTjzkwF"}
The request and its respective response should look like this:
.png)
One interesting feature of the “OAuth 2.0 Authentication” plugin is the ability to view and invalidate access tokens.
To list the tokens, send a GET request to the following endpoint of IAM’s Admin API:
https://iamhost:8444/{workspace_name}/oauth2_tokens
where {workspace_name} is the name of the IAM workspace used. Make sure to enter the necessary credentials to call IAM’s Admin API in case if you have enabled RBAC.
.png)
Note that “credential_id” is the id of the OAuth application that we created inside the ClientApp consumer (in this case is called SampleApp) and “service_id” is the id of our “SampleIRISService” which this plugin is applied to.
To invalidate a token, you can send a DELETE request to the following endpoint
https://iamhost:8444/Sample/oauth2_tokens/{token_id}
where {token_id} is the id of the token to be invalidated.
.png)
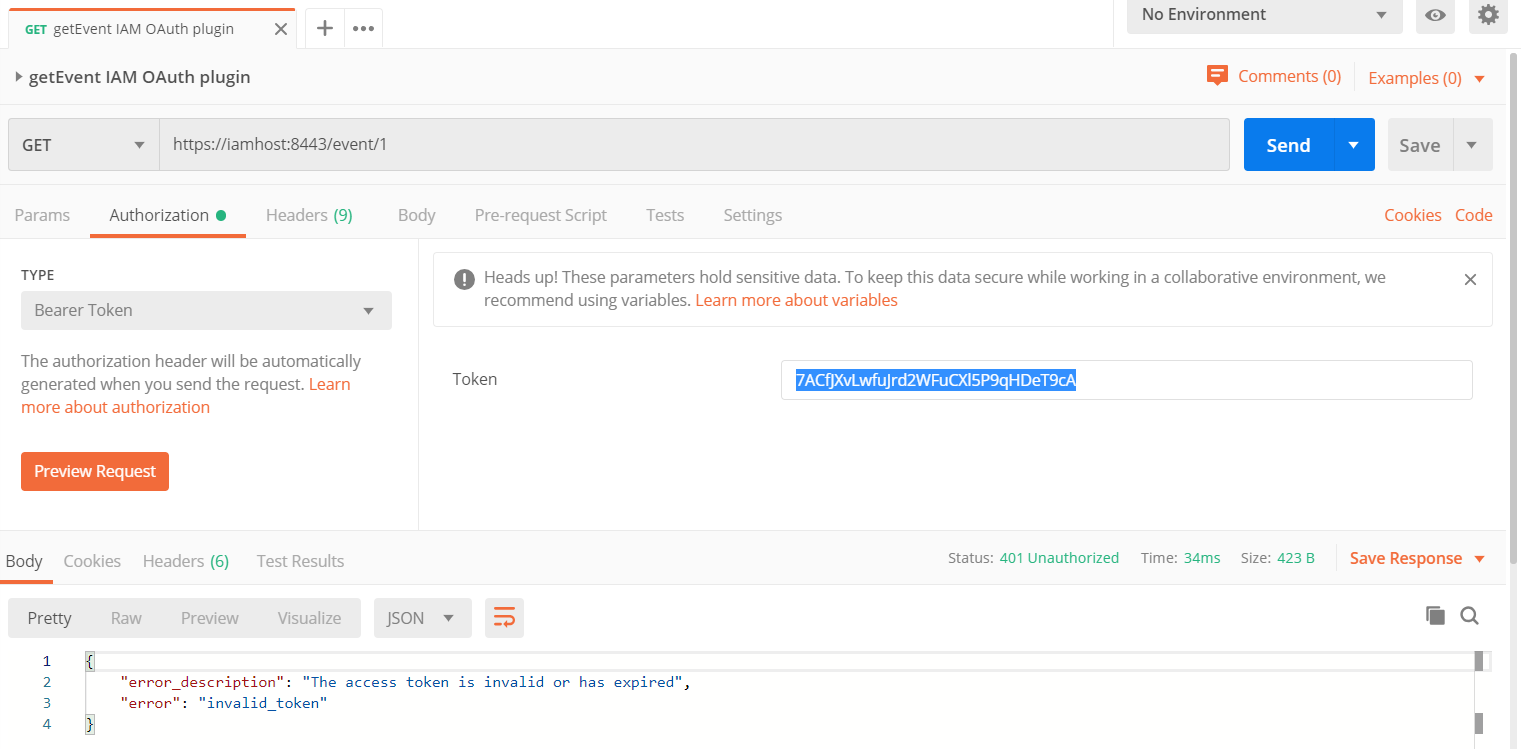
If we try to use the invalidated token, we get a message saying that the token is invalid or expired if we send a GET request containing this invalidated token as a Bearer Token to the URL:
Final Considerations
In this article was demonstrated how you can add OAuth 2.0 authentication in IAM to an unauthenticated service deployed in IRIS. You should keep in mind that the service itself will continue to be unauthenticated in IRIS. Therefore, if anyone calls the IRIS service endpoint directly, bypassing the IAM layer, will be able to see the information without any authentication. For that reason, it is important to have security rules in a network level to prevent unwanted requests to bypass IAM layer.
You can learn more about IAM here.
If you want to try IAM, please contact your InterSystems Sales Representative.
Comments
Great article, Vinicius! It surely helps to get an idea of how OAuth works on IAM.
I have been trying to setup the OAuth plugin to implict grant, but every time I send a post message, I get the "invalid grant type" even sending the grant type as implicit. Do we have some material or documentation to study on how should we do it?