Accessing data via ECP with eXTreme for .NET
Some readers of my previous article, Caché eXTreme for .NET - direct access to globals from C#, wondered if you could access information not just from the same instance in which you’re working, but also from another instance on the same computer, or from an instance located on another computer in the same local network. Some theorized, correctly, that this would be possible using the Enterprise Cache Protocol (ECP). In this article I’m going to show how it can be done.
The last I heard, eXTreme for .NET still uses an in-memory connection and runs in the same process as the IRIS instance, though at least one comment suggested the possibility of moving away from in-memory to TCP/IP.
But, even if you can’t use TCP/IP to connect to an instance on another computer, you can use ECP to connect your local database instance to another instance on a different computer in a local network and work with this remote database as if it’s the local one. ECP is a distributed data caching architecture that manages the distribution of data and locks among a heterogeneous network of server systems. In this article, I’m going to take advantage of this architecture to store my data to another instance.
The general idea is that I have a database with my data in one instance of IRIS and this will be my data server. I’m going to call this instance IRIS. I’ll also need another instance to which I’ll connect from my eXTreme application, and this will be my application server. I’ll call this instance IRIST. In this case, both instances are located on the same computer. (I have only one computer with 64-bit anything, in my case Windows). But this doesn’t change the result—I still need to connect the two different instances in order to access the database of one from the other.
Before doing anything in Visual Studio, however, we need to set up the ECP on both IRIS instances.
First, we’ll enable the ECP service on both the data (IRIS) and application (IRIST) servers. To do this, go to Management Portal > System Administration > Security > Services. In the list of services, select %Service.ECP and on the Edit Service page, click the Service Enabled checkbox, as shown below. Don’t forget to click the Save button.

Next, we’ll configure the data server, incrementing the number of allowed application servers from the default of 1. Again, go to Management Portal > System Administration > Configuration > Connectivity > ECP Settings and in the pane on the right, “This System as an ECP Data Server,” change the “Maximum number of application servers” to 2 (or one more than whatever you have in use already). Then click Save and restart the instance for the change to take effect.

Because I’m lazy and this is just an example, I’ll use the USER database, but you can create a new one or use any database you have on hand (that you won’t worry about if it becomes unreadable).
Next, we’ll configure our application server. The first step is to connect the application server to our data server. Go to Management Portal > System Administration > Configuration > Connectivity > ECP Settings > Data Servers.

Then click the Add Server button and fill in the information about your data server. In my case, when I was setting up my data server, I didn’t choose the option Enabled or Required from the radiogroup “ECP SSL/TLS support,” so I don’t check “Use SSL/TLS.”

If you’re using another computer, you need to provide its name or IP address in the Server Name field.

Click Save and you’ll see a new entry in the list of ECP data servers. In my case, the Status is Normal, which means that the connection is operating as it should. You can read more on ECP Connection States in the documentation.

If you’re connecting instances on different computers on the (local) network, you need to make sure your port (51773, in my case) is open. Check your configuration of firewalls, antivirus, and so forth.
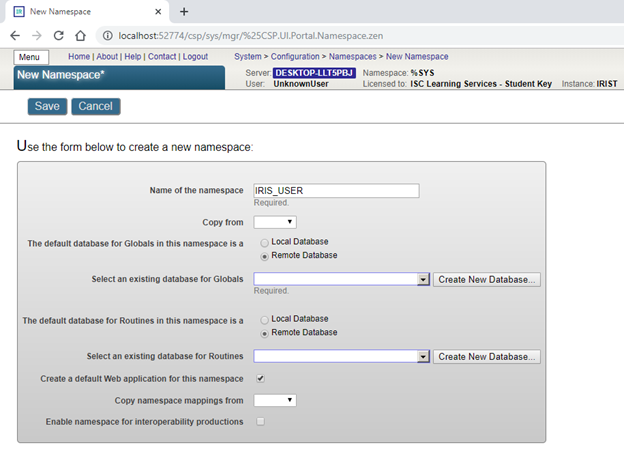
Once the link is established, we need to map our remote database (USER, from IRIS) to our local application server (IRIST). To do this, we need to create a new database, so go to Management Portal > System Administration > Configuration > System Configuration > Namespaces and click the Create New Namespace button. Give the namespace a name and select “Remote Database” for the options, indicating the default database for Globals and for Routines.
Now you need to create this remote database. To do so, click the “Create New Database…” button. Choose the remote server you created in the previous step from the dropdown list.

Then choose the directory of that instance.
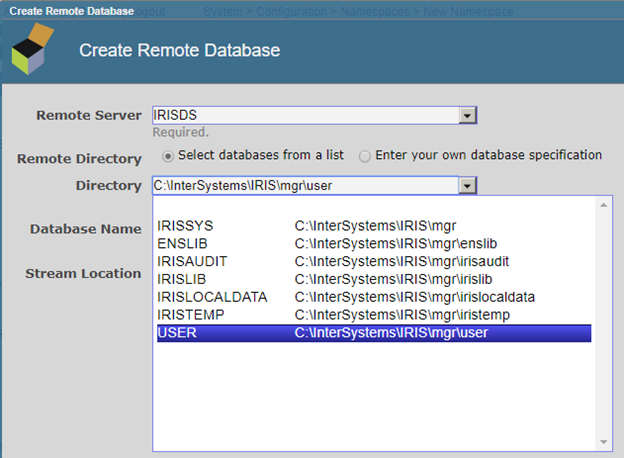
And come up with a new Database Name.

Click Finish and don’t forget to choose the same database for Routines. Clear the checkbox “Enable namespace for interoperability productions,” click Save at the top of the page, and you’re all set.
Before we start working with our globals from C#, let’s check that everything is working and that we have access to the data stored in another instance. To do this, you can, for example, open a terminal on the application server (IRIST), switch the current namespace to the one you created, and set the value of some global.

Then, in a terminal on the data server, you should be able to read this value.
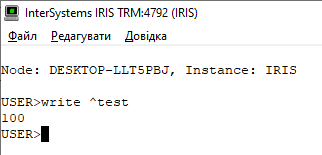
We get the correct value, which means we can proceed with a test application in C# and use eXTreme technology to work with data stored in our data server while having an in-memory connection to our application server.
First, let me remind you about the adjustments that need to be made for it all to work. To start, environmental variables for Windows must be set:
- GLOBALS_HOME should contain the full path to the directory where you put the DBMS. In my case, this is C:\InterSystems\IRIST\.
- PATH must contain the full path to the Bin directory. In my case, this is C:\InterSystems\IRIST\Bin\.
With both of my instances on the same computer, I have to set the path to my application server instance in the environmental variables, because nowhere in my application code am I directly specifying the instance I’ll be working with.
By the way, if you just set the variables, you’ll need to log into your Windows user instance again for the changes to take effect.
Now let’s open the existing eXTreme application from my previous article. To make sure it will work, check that your license allows such connections. Also, see if the version of .NET you chose for your project is the same as the version referenced in your eXTreme library.
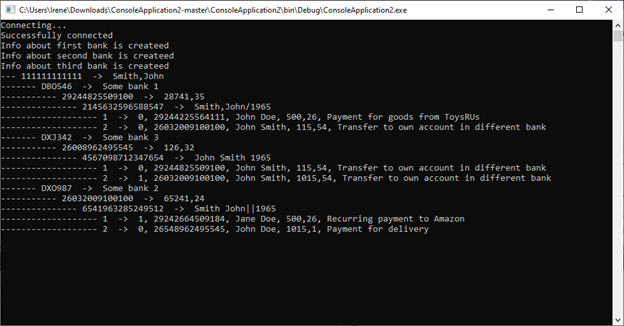
Before switching to the remote database, I decided to check if my program still works.

And it works perfectly. I can see my globals in the database. For now, they’re in the local database of the IRIST instance.

Now all I need to do to switch to my remote database is change the namespace when I’m connecting to the local instance, IRIST.
So instead of using the following code:
Connection myConn = ConnectionContext.GetConnection();
myConn.Connect("USER", "_SYSTEM", "SYS");
I’ll use:
Connection myConn = ConnectionContext.GetConnection();
myConn.Connect("IRIS_USER", "_SYSTEM", "SYS");
Thus, I’ll be accessing the namespace IRIS_USER from local application server instance IRIST, which is mapped to a remote database of the data server instance IRIS. The output is the same:
And we can see this global in the IRIS instance:

And through ECP:

Mission accomplished! You can use the InterSystems.CacheExtreme.dll library, which you can find in ..\bin\debug\ folder of the example, to connect to IRIS. And you can use ECP to connect to a remote database from an eXTreme application.
You can read more about setting up the ECP environment in First Look: Scaling Systems for User Volume with InterSystems Distributed Caching. The sample project in this article is the same as in the previous one and is on GitHub.