Projeto 7 – SQL Outbound Adapter
Vamos montar nossa próxima integração utilizando o adaptador SQL Onbound Adapter. Vamos criar um BS que utilizará o SOAP Inbound Adapter, que vai chamar dois BPs que por sua vez chamarão um BO que utilizará o SQL Outbound Adapter. Nosso BS terá duas capacidades: incluir e consultar. Cada capacidade chamará um BP diferente, porém os dois BPs chamarão o mesmo BO, que também terá duas capacidades. Cada capacidade será chamada de acordo com a mensagem recebida.
Vamos começar verificando a tabela que será acessada. Vamos cria-la utilizando o modelo abaixo:
Class ws.database.cliente Extends (%Persistent, %Populate, %XML.Adaptor)
{
Property code As %Integer(MAXVAL = 999);
Property name As %String;
}
Agora vamos criar a configuração ODBC para acessar esta tabela. A tabela poderia estar em qualquer banco que disponibilize acesso ODBC. Para o nosso teste vamos usar o próprio IRIS. Abra o utilitário Fonte de Dados ODBC no Windows e crie um novo DSN de Sistema:
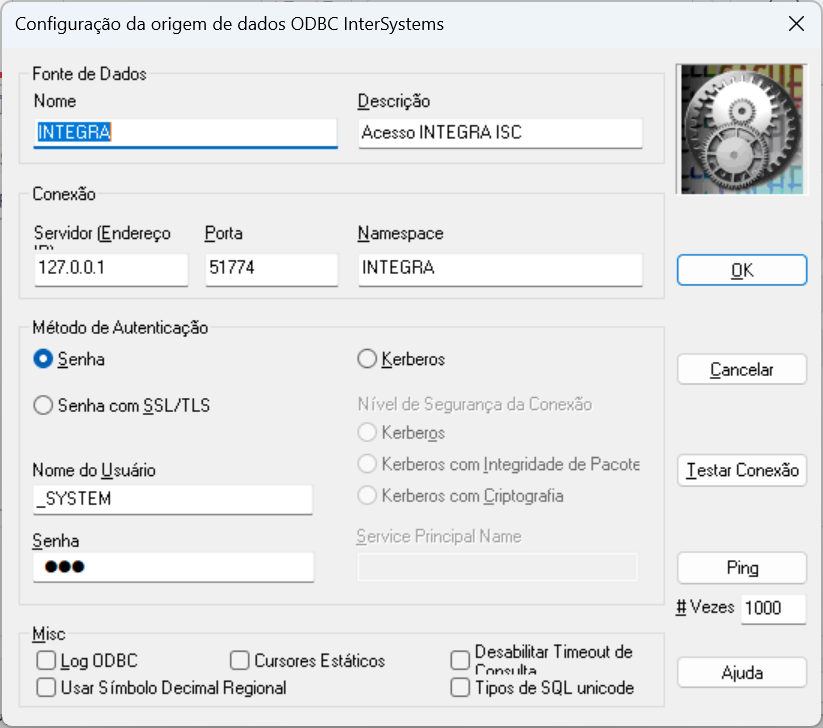
Preencha a tela com os dados de acesso do seu ambiente e depois clique em Testar Conexão para validar a configuração feita:

Caso você tenha realizado os passos da postagem referente ao SQL Inbound Adapter você já terá visto a tabela de cliente e a configuração ODBC (https://pt.community.intersystems.com/post/desenvolvendo-integra%C3%A7%C...)
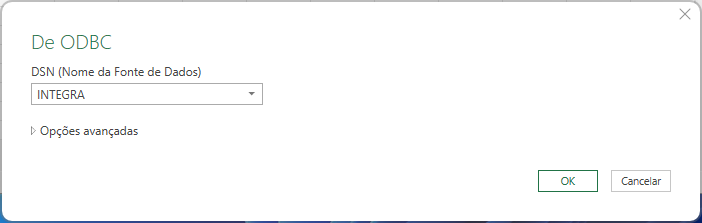
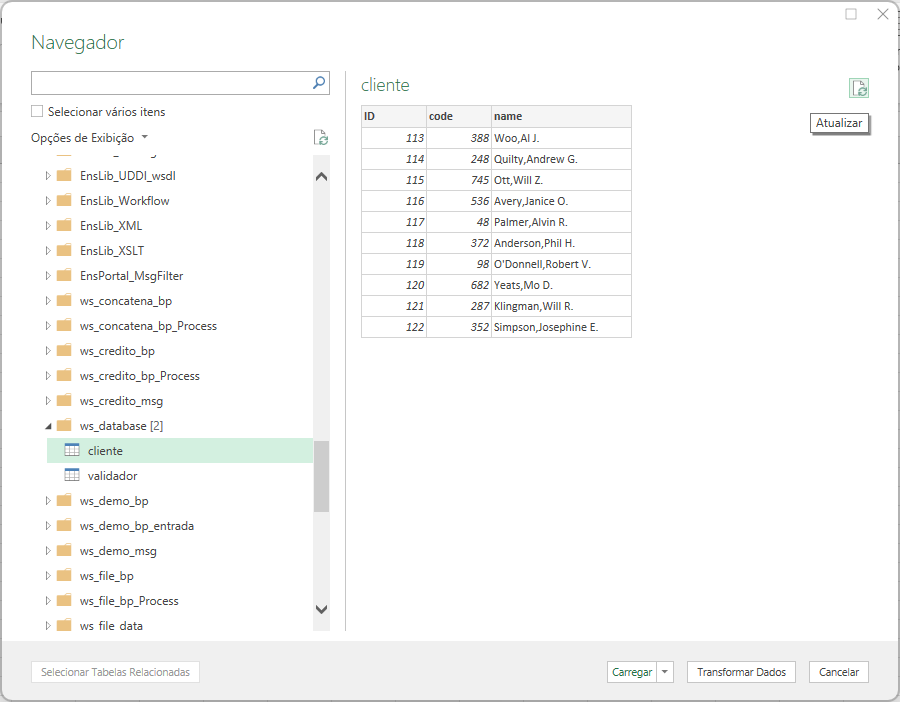
Agora que temos nossa configuração ODBC montada e testada, vamos testar o acesso a nossa tabela. Existem diversos programas de acesso a dados via ODBC, como por exemplo o próprio Excel. Vá em Dados->Obter Dados->De outras Fontes->Do ODBC e selecione o DSN criado:
Clique em OK e veja a lista de pacotes disponíveis. Navegue até o pacote ws_database, expanda a lista e clique sobre a tabela cliente:
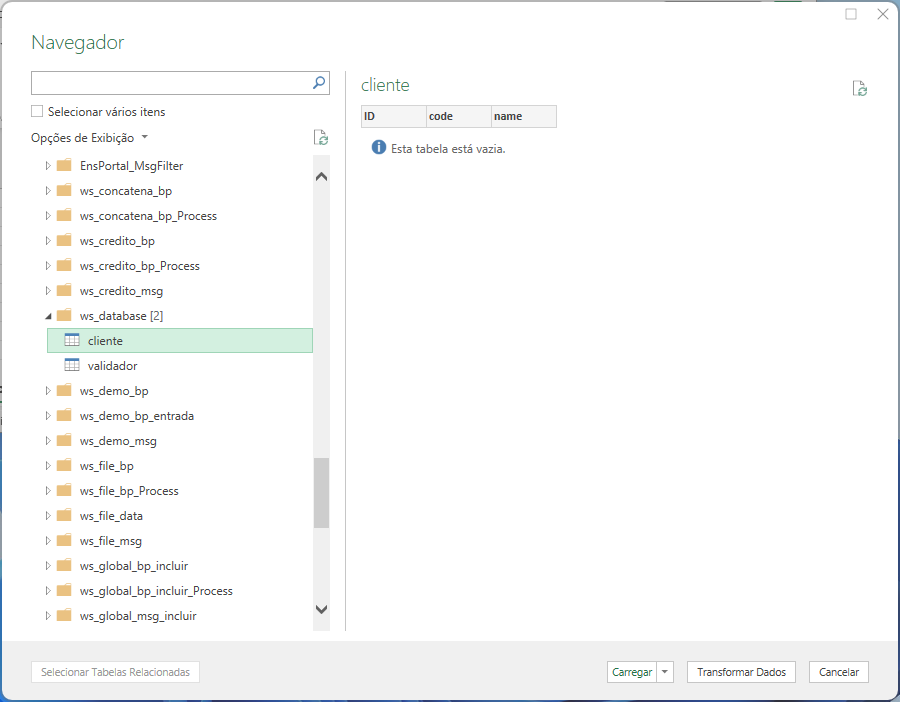
Nossa tabela está vazia. Podemos incluir alguns registros nela apenas para vermos a comunicação acontecendo. Nossa tabela herda de %Populate, assim podemos pedir ao IRIS para criar alguns registros na tabela para testes:
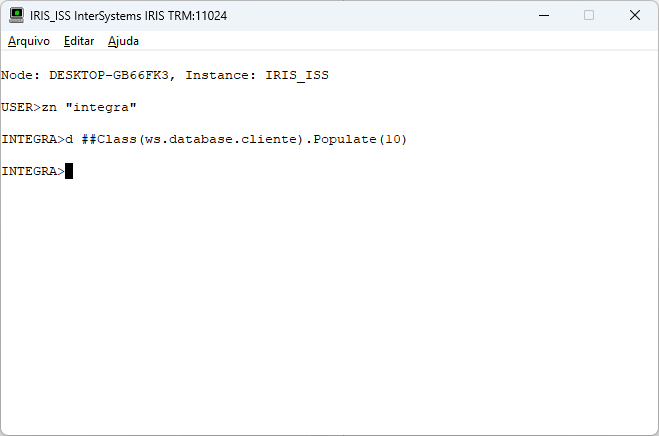
Agora, refazendo a consulta teremos 10 registros na nossa tabela. Para isso clique no botão Atualizar que está na tela:
Com nossa conexão ODBC configurada e testada, vamos agora criar as classes de mensagem da nossa integração:
Class ws.odbc.msg.incluir.Request Extends Ens.Request
{
Parameter XMLTYPE = "incluirReq";
Property codigo As %Integer;
Property nome As %String;
}
Class ws.odbc.msg.incluir.Response Extends Ens.Response
{
Parameter XMLTYPE = "incluirResp";
Property status As %Boolean;
Property mensagem As %String;
Property sessionId As %Integer;
}
Class ws.odbc.msg.consultar.Request Extends Ens.Request
{
Parameter XMLTYPE = "consultarReq";
Property codigo As %Integer;
}
Class ws.odbc.msg.consultar.Response Extends Ens.Response
{
Parameter XMLTYPE = "consultarResp";
Property nome As %String;
Property status As %Boolean;
Property mensagem As %String;
Property sessionId As %Integer;
}
No total serão 4 classes: request e response da capacidade incluir e requst e response da capacidade consultar.
Vamos agora montar nosso BS, que terá então duas capacidades: incluir e consultar:
Class ws.odbc.bs.Service Extends EnsLib.SOAP.Service
{
Parameter ADAPTER = "EnsLib.SOAP.InboundAdapter";
Parameter SERVICENAME = "odbc";
Method consultar(pInput As ws.odbc.msg.consultar.Request) As ws.odbc.msg.consultar.Response [ WebMethod ]
{
Set tSC=..SendRequestSync("bpODBCConsultar",pInput,.tResponse)
Quit tResponse
}
Method incluir(pInput As ws.odbc.msg.incluir.Request) As ws.odbc.msg.incluir.Response [ WebMethod ]
{
Set tSC=..SendRequestSync("bpODBCIncluir",pInput,.tResponse)
Quit tResponse
}
}
Com o BS ponto podemos acessar o WSDL do serviço, já que ele é um serviço SOAP:

Vamos utilizar este endereço para carregar o serviço no SoapUI. Para mais informações sobre o SoapUI veja o post https://pt.community.intersystems.com/post/desenvolvendo-intergra%C3%A7%C3%B5es-com-o-intersystems-iris que tem dados de instalação e download.
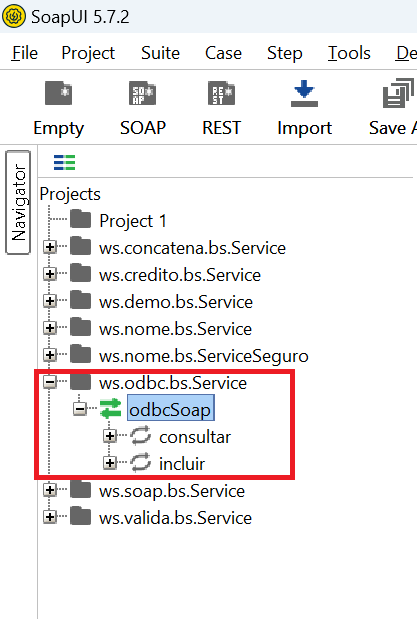
Abra o SoapUI, vá em File->New SOAP Service e preencha a caixa de texto Initial WSDL com o endereço do WSDL do nosso serviço:
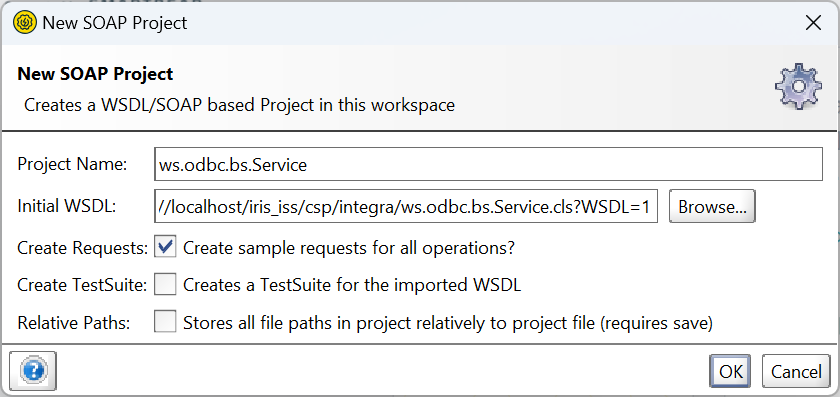
Clique em OK e o serviço será configurado no SoapUI:
Agora vamos criar nosso BO. O código está abaixo. Note que temos duas capacidades e o XDATA tem as duas entradas informando a capacidade a ser executada dependendo do request recebido:
Class ws.odbc.bo.Operation Extends Ens.BusinessOperation
{
Parameter ADAPTER = "EnsLib.SQL.OutboundAdapter";
Parameter INVOCATION = "Queue";
Method consultar(pRequest As ws.odbc.msg.consultar.Request, Output pResponse As ws.odbc.msg.consultar.Response) As %Status
{
Set sql="select name from ws_database.cliente where code = ?"
set tSC = ..Adapter.ExecuteQuery(.tRS,sql,pRequest.codigo)
Set pResponse=##class(ws.odbc.msg.consultar.Response).%New()
If tSC
{
If tRS.%Next()
{
Set pResponse.nome = tRS.%Get("name")
Set pResponse.sessionId=..%SessionId
} Else {
Set pResponse.nome = ""
Set pResponse.status = 0
Set pResponse.mensagem = "registro não encontrado"
Set pResponse.sessionId=..%SessionId
}
} Else {
Set pResponse.nome = ""
Set pResponse.status = 0
Set pResponse.mensagem = $SYSTEM.Status.GetErrorText(tSC)
Set pResponse.sessionId=..%SessionId
}
Quit $$$OK
}
Method incluir(pRequest As ws.odbc.msg.incluir.Request, Output pResponse As ws.odbc.msg.incluir.Response) As %Status
{
Set sql="insert into ws_database.cliente (code, name) values (?, ?)"
set tSC = ..Adapter.ExecuteUpdate(.nrows,sql,pRequest.codigo,pRequest.nome)
Set pResponse=##class(ws.odbc.msg.incluir.Response).%New()
If 'tSC
{
Set pResponse.status = 0
Set pResponse.mensagem = $SYSTEM.Status.GetErrorText(tSC)
Set pResponse.sessionId=..%SessionId
} Else {
Set pResponse.status = 1
Set pResponse.mensagem = ""
Set pResponse.sessionId=..%SessionId
}
Quit $$$OK
}
XData MessageMap
{
<MapItems>
<MapItem MessageType="ws.odbc.msg.incluir.Request">
<Method>incluir</Method>
</MapItem>
<MapItem MessageType="ws.odbc.msg.consultar.Request">
<Method>consultar</Method>
</MapItem>
</MapItems>
}
}
Note também que estamos utilizando o adaptador EnsLib.SQL.OutboundAdapter no nosso código. Verifique as duas capacidades e veja o SQL que está sendo executado em cada uma.
Agora vamos montar nossos BPs. Serão dois, um para a capacidade incluir e outro para a capacidade consultar. Note que os dois BPs usam o mesmo BO, mas mandando mensagens de request diferentes. Desta forma o BO sabe qual capacidade acessar.
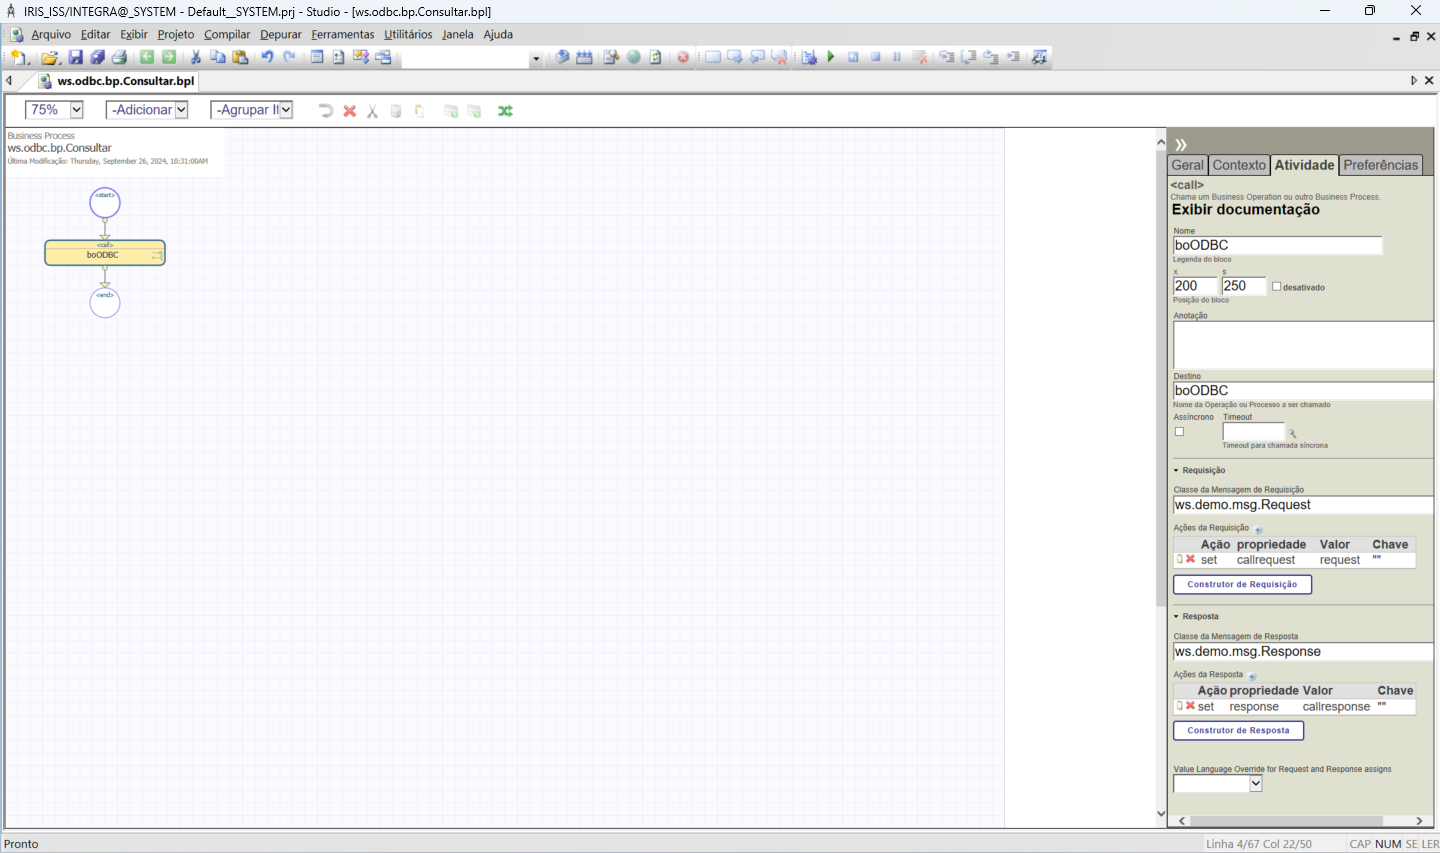
E o código do BP Consultar:
///
Class ws.odbc.bp.Consultar Extends Ens.BusinessProcessBPL [ ClassType = persistent, ProcedureBlock ]
{
/// BPL Definition
XData BPL [ XMLNamespace = "http://www.intersystems.com/bpl" ]
{
<process language='objectscript' request='ws.odbc.msg.consultar.Request' response='ws.odbc.msg.consultar.Response' height='2000' width='2000' >
<sequence xend='200' yend='350' >
<call name='boODBC' target='boODBC' async='0' xpos='200' ypos='250' >
<request type='ws.demo.msg.Request' >
<assign property="callrequest" value="request" action="set" languageOverride="" />
</request>
<response type='ws.demo.msg.Response' >
<assign property="response" value="callresponse" action="set" languageOverride="" />
</response>
</call>
</sequence>
</process>
}
Storage Default
{
<Type>%Storage.Persistent</Type>
}
}
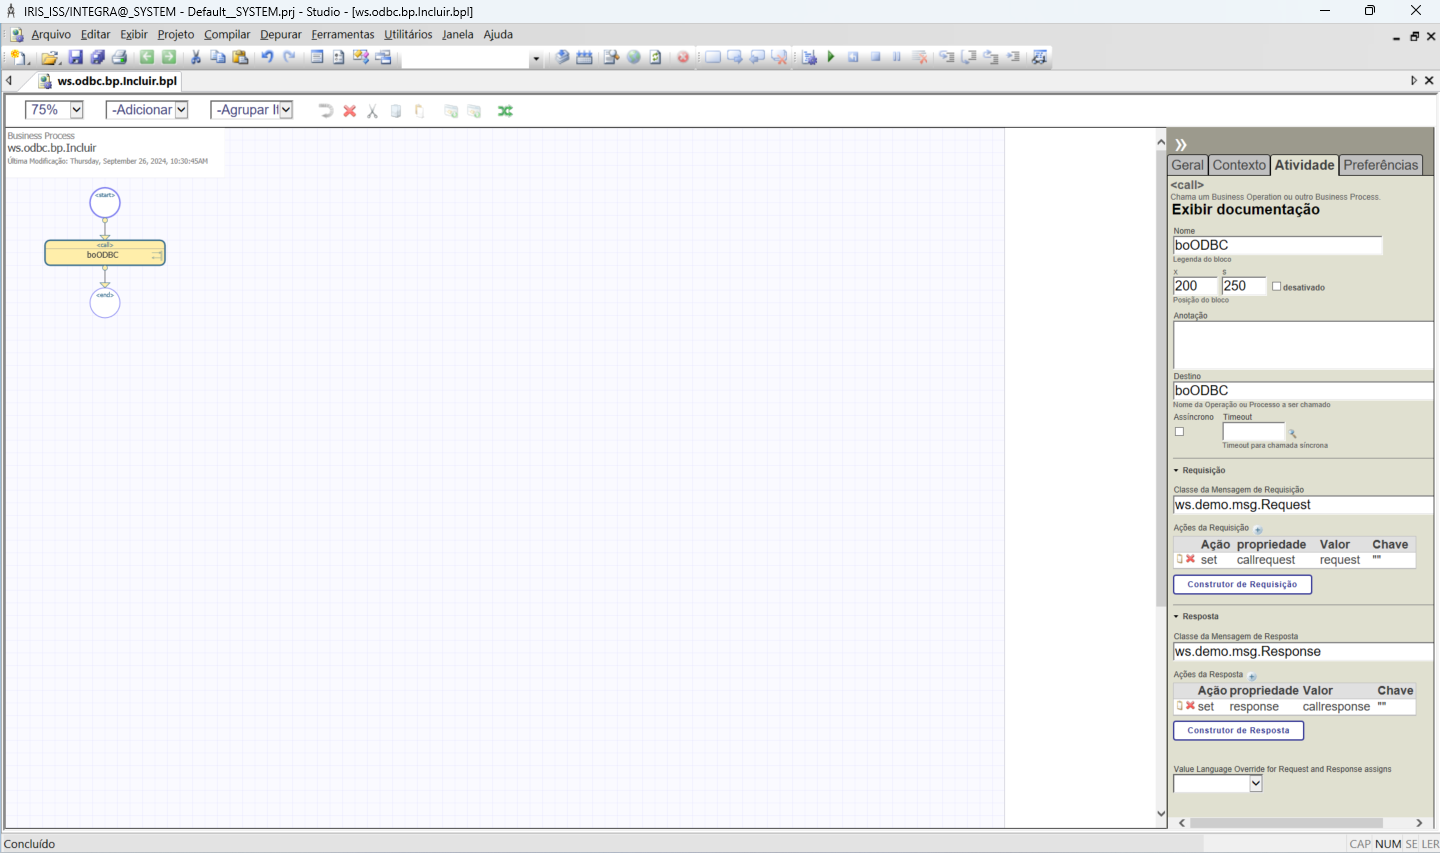
E o código do BP Incluir:
///
Class ws.odbc.bp.Incluir Extends Ens.BusinessProcessBPL [ ClassType = persistent, ProcedureBlock ]
{
/// BPL Definition
XData BPL [ XMLNamespace = "http://www.intersystems.com/bpl" ]
{
<process language='objectscript' request='ws.odbc.msg.incluir.Request' response='ws.odbc.msg.incluir.Response' height='2000' width='2000' >
<sequence xend='200' yend='350' >
<call name='boODBC' target='boODBC' async='0' xpos='200' ypos='250' >
<request type='ws.demo.msg.Request' >
<assign property="callrequest" value="request" action="set" languageOverride="" />
</request>
<response type='ws.demo.msg.Response' >
<assign property="response" value="callresponse" action="set" languageOverride="" />
</response>
</call>
</sequence>
</process>
}
Storage Default
{
<Type>%Storage.Persistent</Type>
}
}
Veja o post https://pt.community.intersystems.com/post/desenvolvendo-integra%C3%A7%C3%B5es-com-intersystems-iris-call-no-business-process para mais detalhes da montagem de um BP.
Agora que temos nossa tabela criada, o acesso ODBC configurado e nossos componentes desenvolvidos vamos coloca-los na production. O procedimento é o mesmo que vimos nas integrações anteriores.
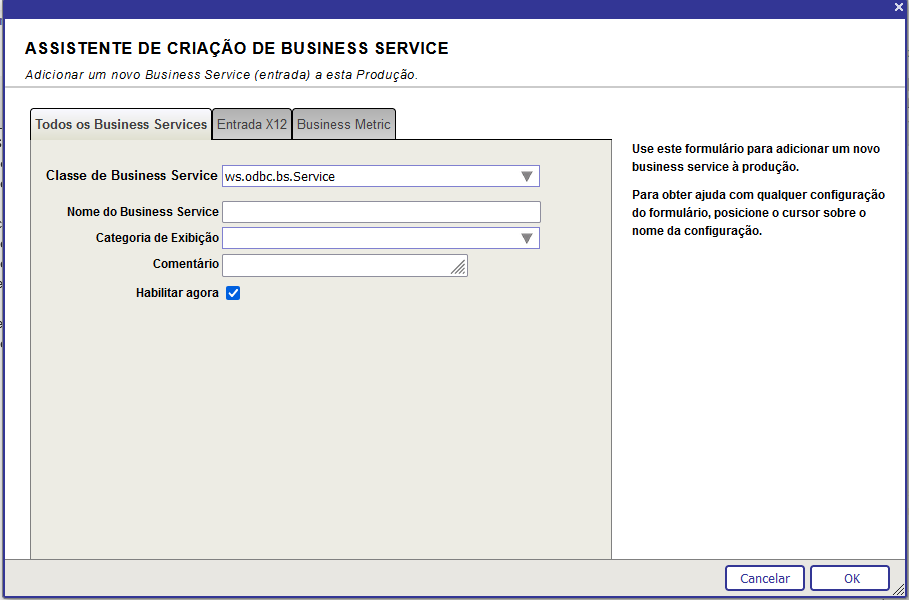
Vamos colocar nosso BS na production. Abra o Painel de Administração e vá para a nossa production de teste. Clique no botão (+) ao lado do nome Services e preencha a tela a seguir com os dados apresentados:
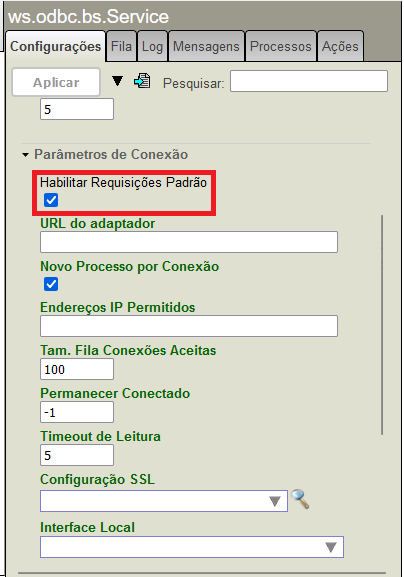
Agora volte a production e clique no nome do nosso BS (ws.odbc.bs.Service) e veja a configuração dele. Expanda a área Parâmetros de Conexão e marque a caixa Habilitar Requisições Padrão conforme a tela abaixo:
A seguir clique em Atualizar e nosso BS de teste estará pronto.
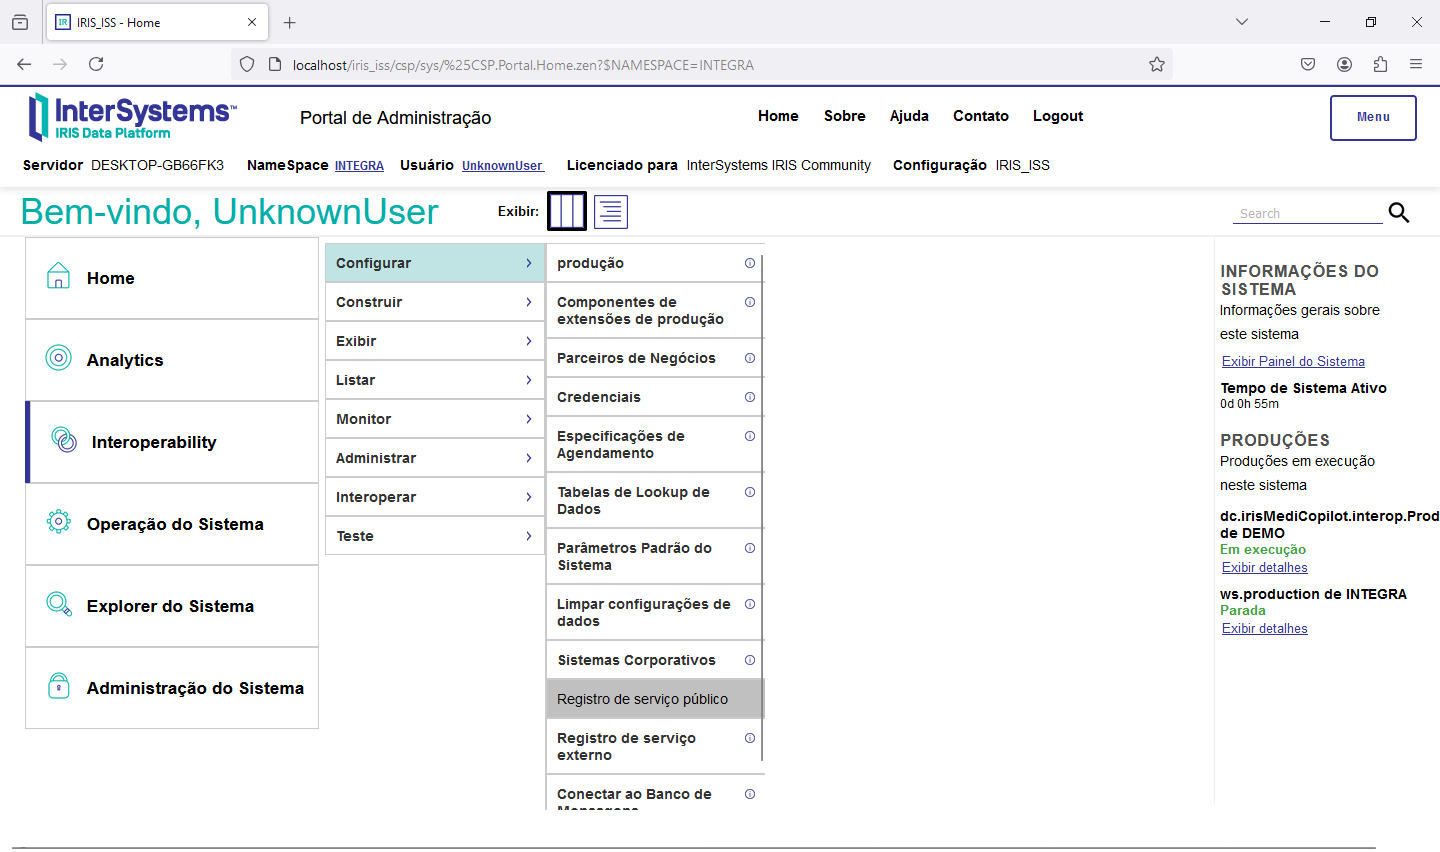
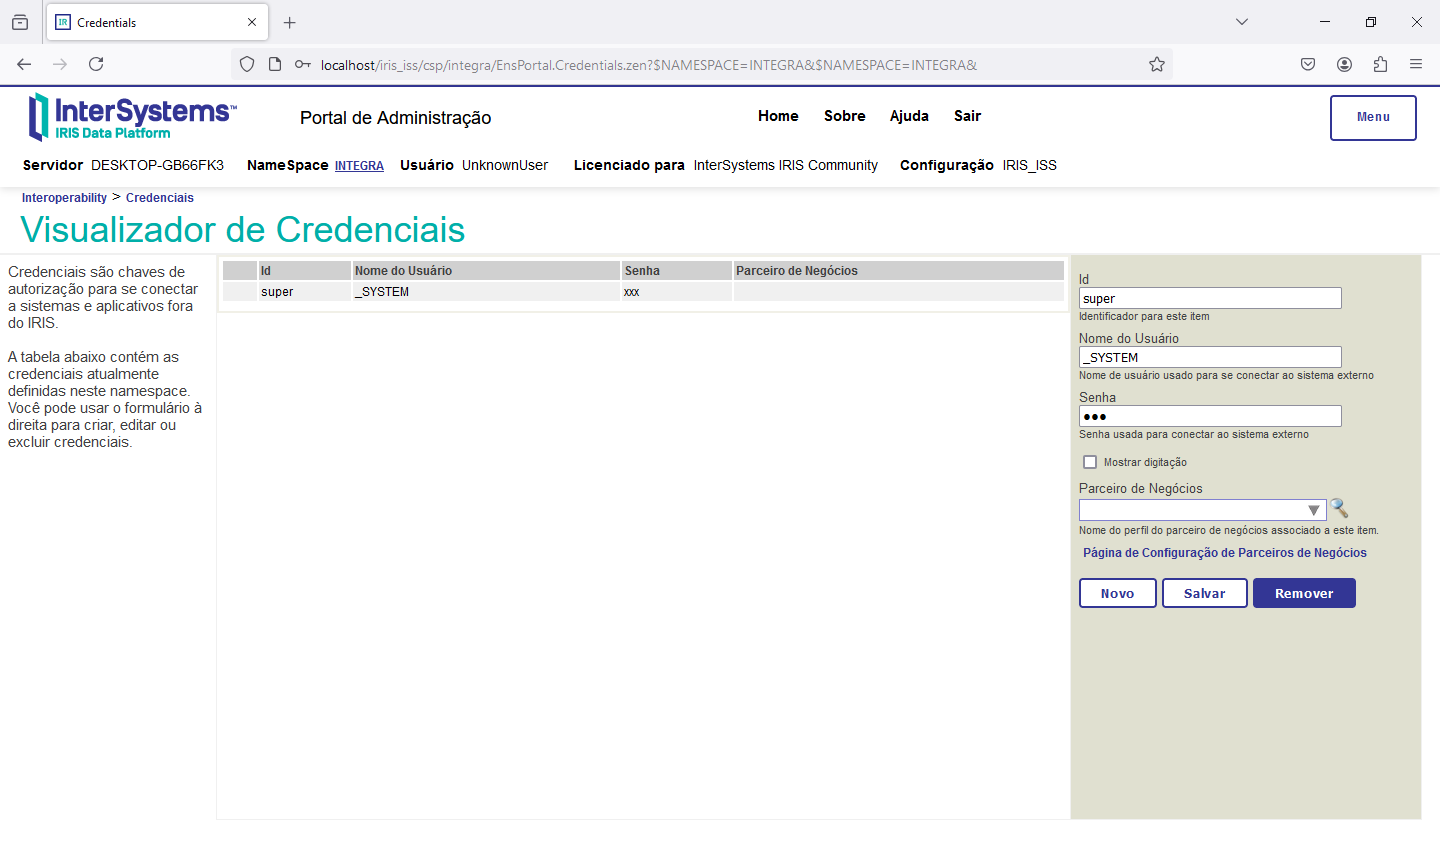
Antes de prosseguir vamos precisar criar uma Credencial no ambiente para poder validar o acesso ODBC. Isso é feito dentro do próprio IRIS na opção Interoperabilidade->Configurar->Credenciais:
Clique em Novo, preencha os dados da Credencial (no caso usei os dados do usuário _SYSTEM e informei que o nome da credencial será super:
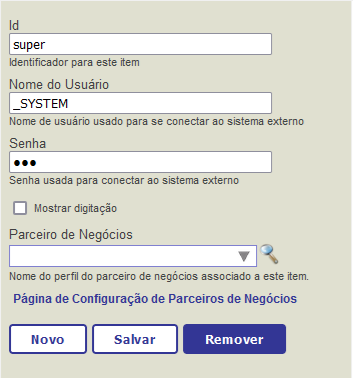
Clique em salvar e a credencial estará disponível no ambiente:
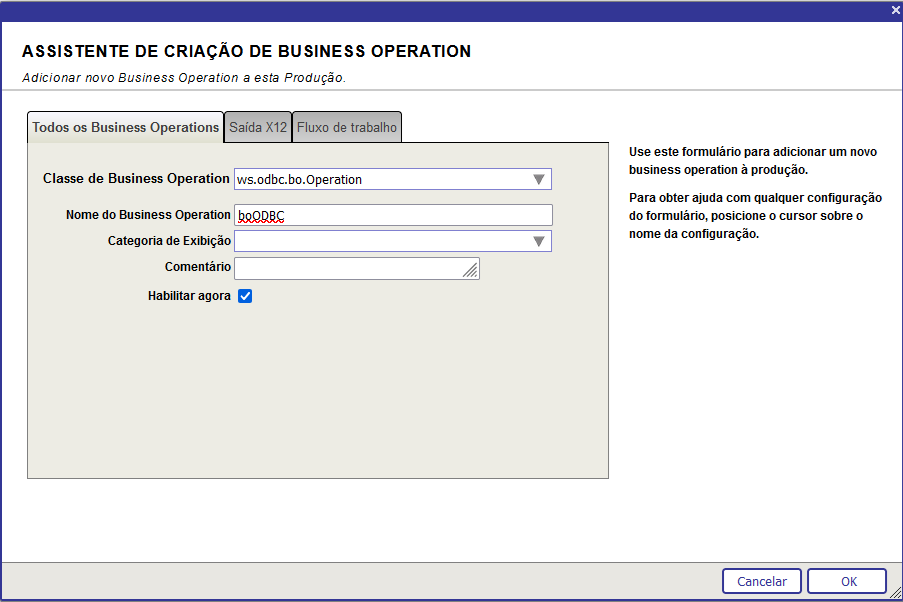
Volte a tela da production. Clique no botão (+) ao lado do Operations e preencha a tela conforme abaixo:
Vamos agora entrar na configuração do nosso BO e terminar de ajustar o acesso. Vá em Paâmetros Básicos e preencha conforme a tela abaixo:
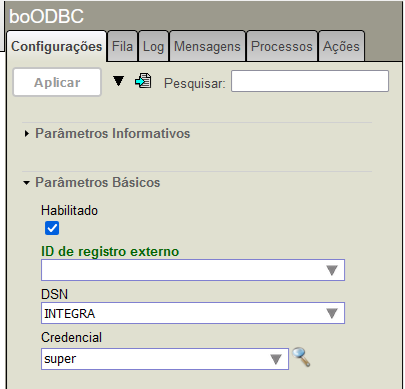
Em DSN informe o nome do DSN que criamos na Fonte de Dados ODBC e em Credencial informe o nome da Credencial que criamos no ambiente de Integração. Clique em Aplicar e temos nosso BO configurado.
Agora vamos para os nossos BPs. Clique no botão (+) ao lado de Processes e preencha a tela com os dados do nosso BP de Inclusão:
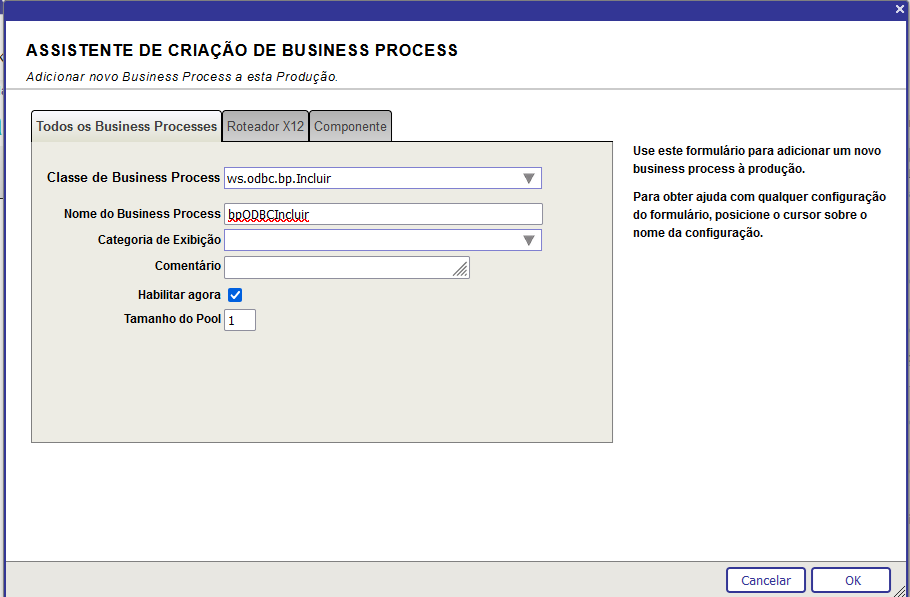
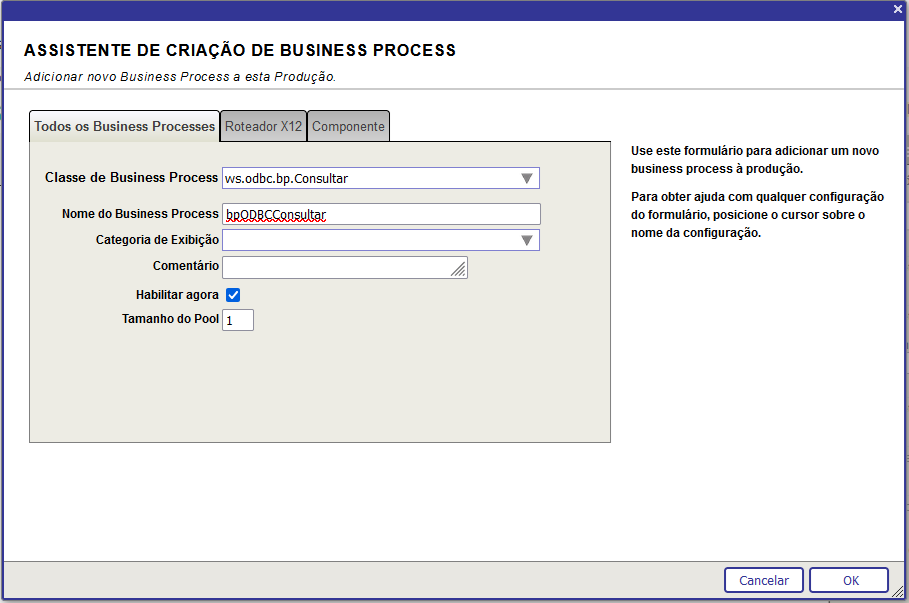
Clique em OK e repita a operação, desta vez incluindo o BP de Consulta:
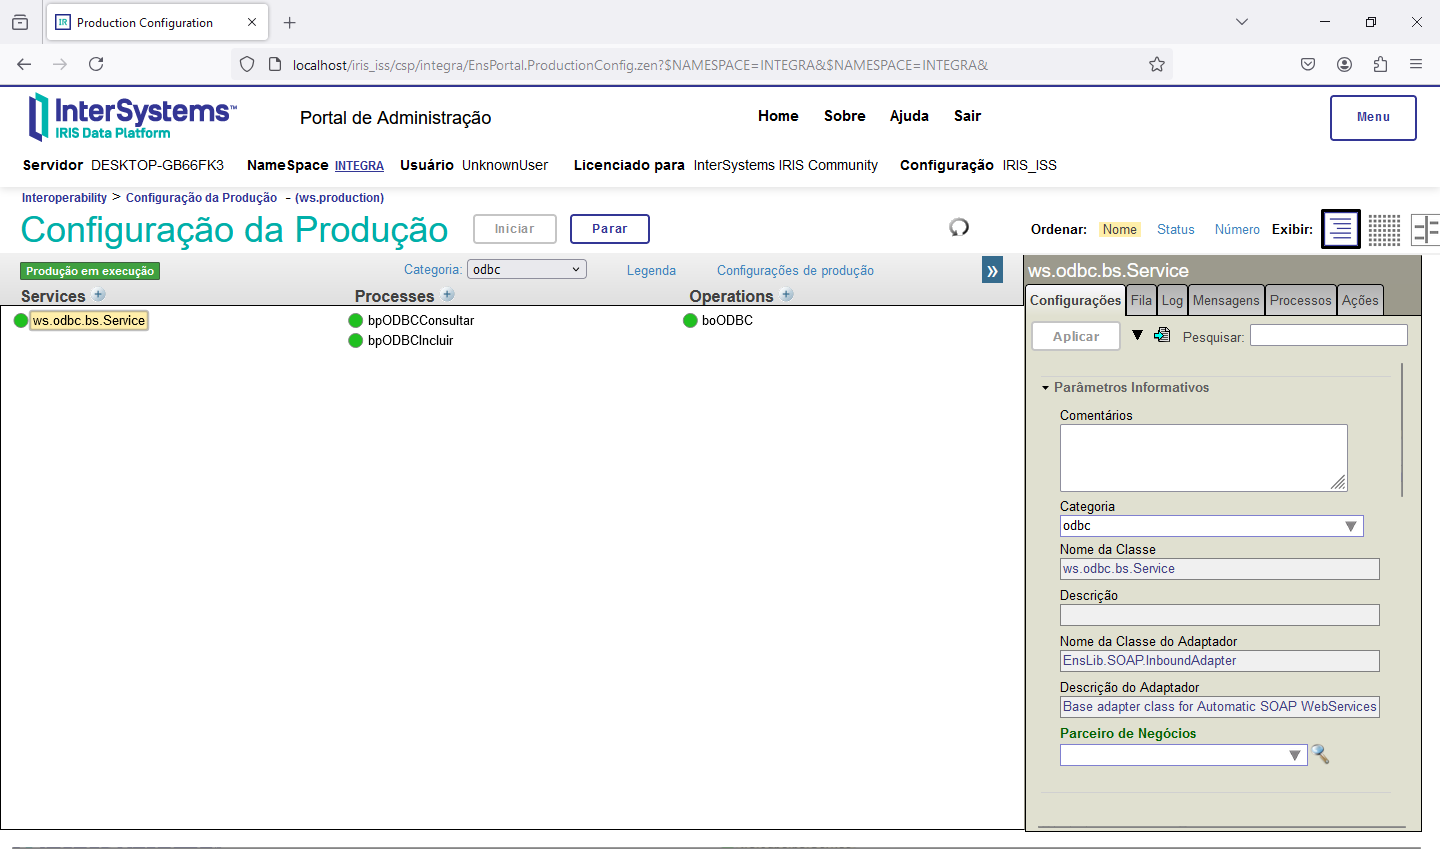
Clique em OK e o BP será colocado na production. Agora veja como a production ficou:
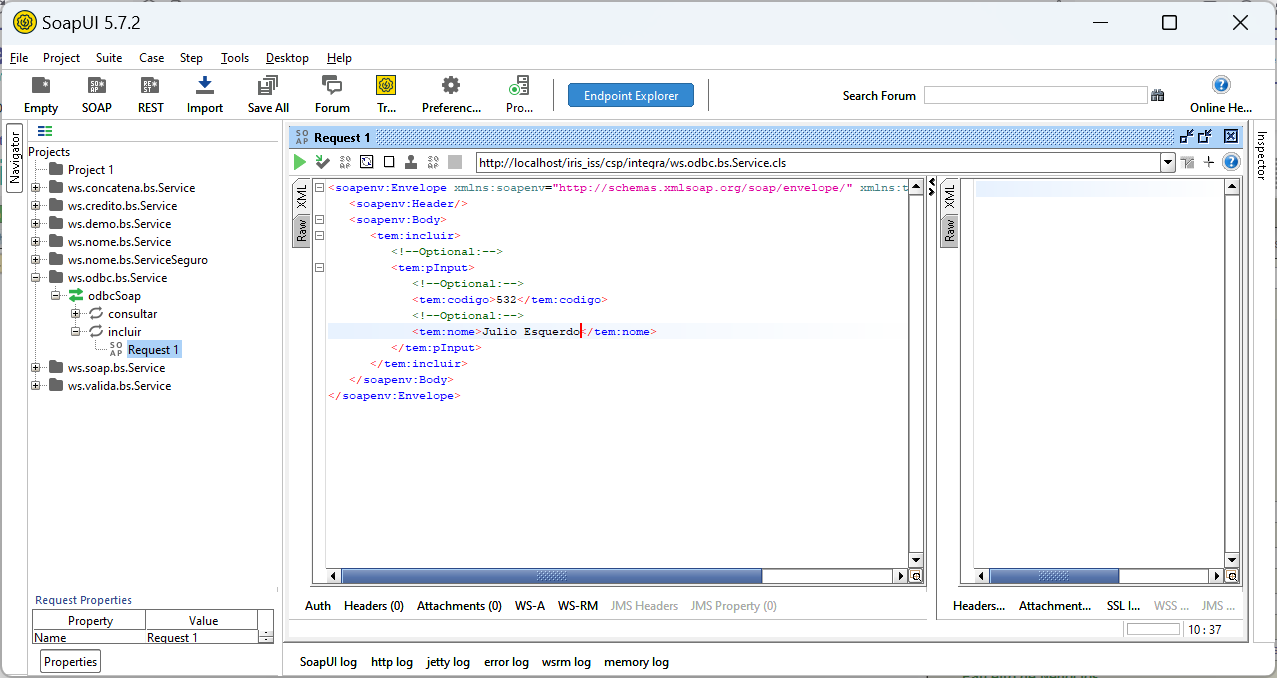
Volte ao SoapUI e faça um teste. Vá para a opção incluir do nosso serviço e preencha a tela com um código e um nome (lembre de verificar se este código não exuste na tabela):
Clique no botção de play e veja a resposta recebida:
HTTP/1.1 200 OK
Cache-Control: no-cache
Pragma: no-cache
Content-Length: 437
Content-Type: text/xml; charset=UTF-8
Expires: Thu, 29 Oct 1998 17:04:19 GMT
Server: Microsoft-IIS/10.0
Date: Thu, 24 Oct 2024 18:42:47 GMT
<?xml version="1.0" encoding="UTF-8" ?>
<SOAP-ENV:Envelope xmlns:SOAP-ENV='http://schemas.xmlsoap.org/soap/envelope/' xmlns:xsi='http://www.w3.org/2001/XMLSchema-instance' xmlns:s='http://www.w3.org/2001/XMLSchema'>
<SOAP-ENV:Body><incluirResponse xmlns="http://tempuri.org"><incluirResult><status>true</status><mensagem></mensagem><sessionId>2471</sessionId></incluirResult></incluirResponse></SOAP-ENV:Body>
</SOAP-ENV:Envelope>
Vá no Integrador e veja o trace da mensagem que você recebeu em sessionId (2471):

Agora volte ao SoapUI e seleciona a opção consultar. Preencha o campo código com o código que você acabou de incluir e execute:
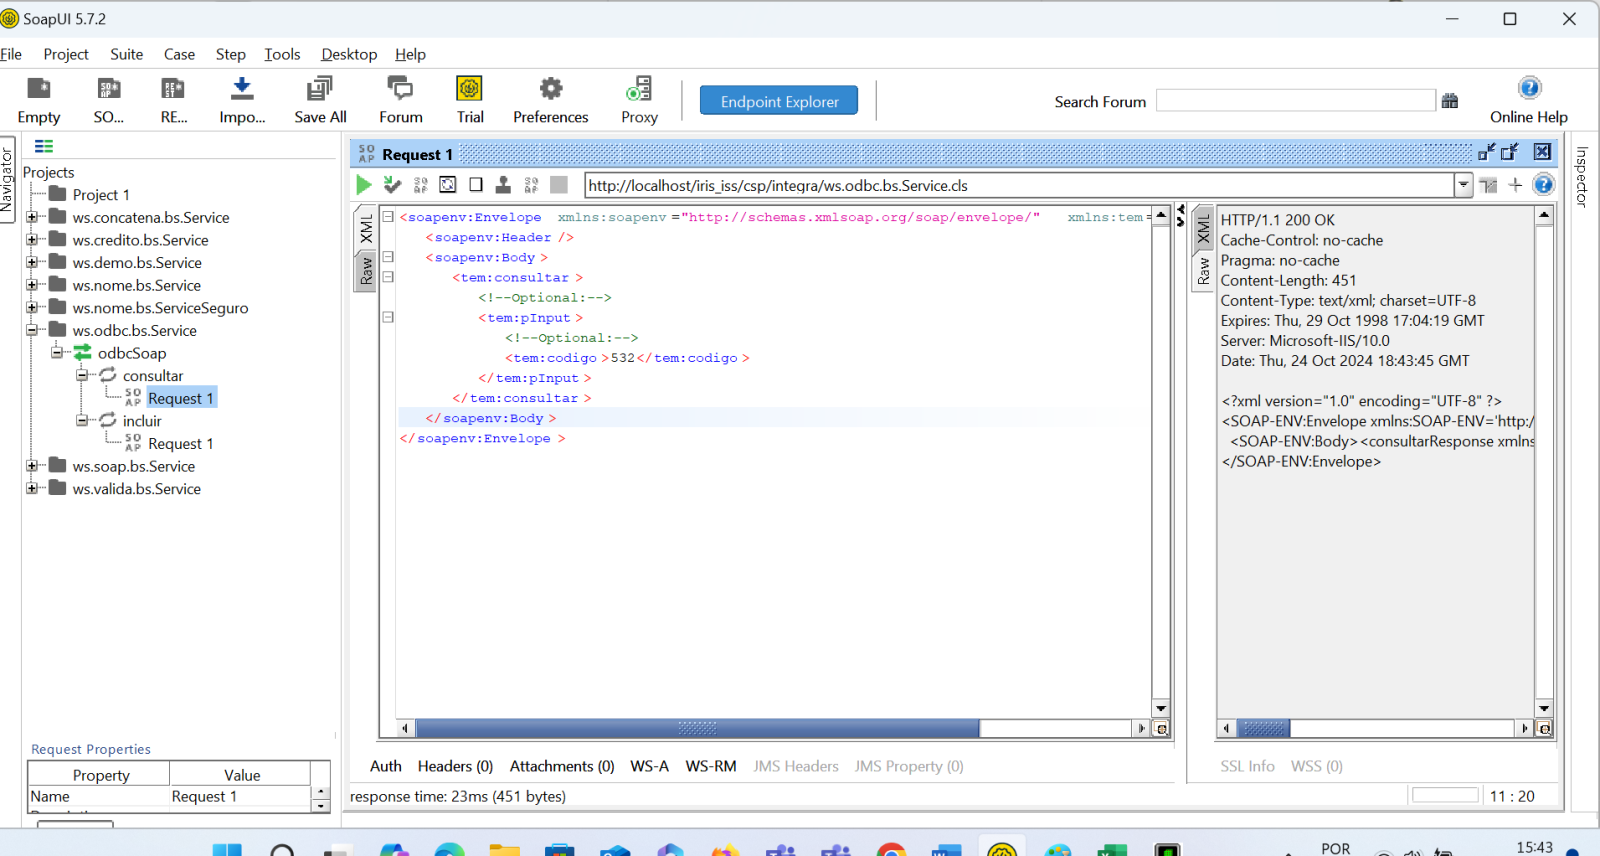
Verifique o response recebido:
HTTP/1.1 200 OK
Cache-Control: no-cache
Pragma: no-cache
Content-Length: 451
Content-Type: text/xml; charset=UTF-8
Expires: Thu, 29 Oct 1998 17:04:19 GMT
Server: Microsoft-IIS/10.0
Date: Thu, 24 Oct 2024 18:43:45 GMT
<?xml version="1.0" encoding="UTF-8" ?>
<SOAP-ENV:Envelope xmlns:SOAP-ENV='http://schemas.xmlsoap.org/soap/envelope/' xmlns:xsi='http://www.w3.org/2001/XMLSchema-instance' xmlns:s='http://www.w3.org/2001/XMLSchema'>
<SOAP-ENV:Body><consultarResponse xmlns="http://tempuri.org"><consultarResult><nome>Julio Esquerdo</nome><mensagem></mensagem><sessionId>2475</sessionId></consultarResult></consultarResponse></SOAP-ENV:Body>
</SOAP-ENV:Envelope>
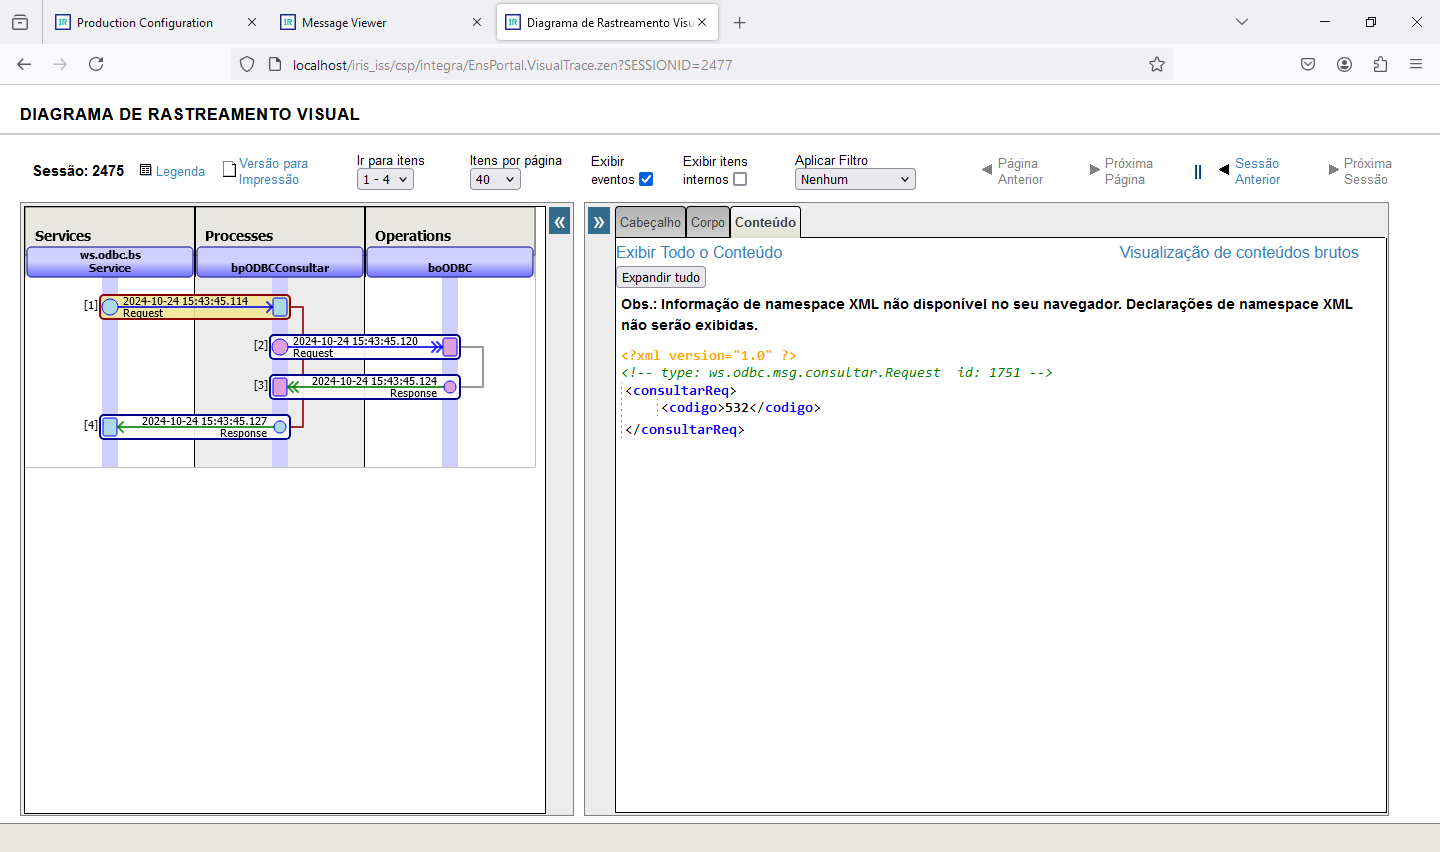
E consultando o trace da integração do SessionID 2475 temos as informações trafegadas:
Assim realizamos a inclusão e a consulta de dados em uma tabela via ODBC, recebendo os dados via um serviço SOAP.
Este mesmo adaptador poderia ser utilizado com JDBC para realizar a mesma operação bastando para isso informar os parâmetros de conexão na configuração do BO.
Lembre-se que podemos colocar o TCPTRACE para verificar o tráfego que ocorre entre o SoapUI e o nosso BS, o que é especialmente útil em situações de teste.
Com isso concluímos esta integração. Utilizamos em nosso teste o IRIS 2024.1 que está disponível para download na sua versão Community na internet.
Até a próxima!

.png)