Python ODBC connection into IRIS database - 2nd quick note
Keywords: PyODBC, unixODBC, IRIS, IntegratedML, Jupyter Notebook, Python 3
Purpose
A few months ago I touched on a brief note on "Python JDBC connection into IRIS", and since then I referred to it more frequently than my own scratchpad hidden deep in my PC. Hence, here comes up another 5-minute note on how to make "Python ODBC connection into IRIS".
ODBC and PyODBC seem pretty easy to set up in a Windows client, yet every time I stumbled a bit somewhere on setting up an unixODBC and PyODBC client in a Linux/Unix-style server.
Is there a as simple yet consistent approach as it's supposed to be to simply make PyODBC/unixODBC plumbing work in a vanilla linux client without any IRIS installation, against a remote IRIS server?
Scope
Recently I happened to spend a bit time, wrestling a bit to make a PyODBC demo work from scratch within Jupyter Notebook in a Linux Docker environment. Hence comes up recording this note in a slightly verbose way for later quick reference.
In-Scope:
In this note we are going to touch these components:
- PyODBC over unixODBC
- Jupyter Notebook server with Tensorflow 2.2 and Python 3
- IRIS2020.3 CE server with IntegratedML, including sample test data.
within this environment
- Docker Engine with Docker-compose over AWS Ubuntu 16.04
- Docker Desktop for MacOS, and Docker Toolbox for Windows 10 are tested too
Out-of-Scope:
Again, non-functional sides are not evaluated in this demo environment. They are important and can be site specific, such as:
- End-2-End Security & Audit.
- Performance & Scalability
- Licensing and Supportability etc etc
Environment
Any vanilla Linux Docker images can be used for the configs and test steps below, but one simple way to set up such an environment in 5 minutes is to
- Git clone this demo template
- Run "docker-compose up -d" in the cloned directory which contains the docker-compose.yml file.
It will simply create a demo environment, as shown in this topology below, of 2 containers. One for Jupyter Notebook server as a PyODBC client, and another for an IRIS2020.3 CE server.
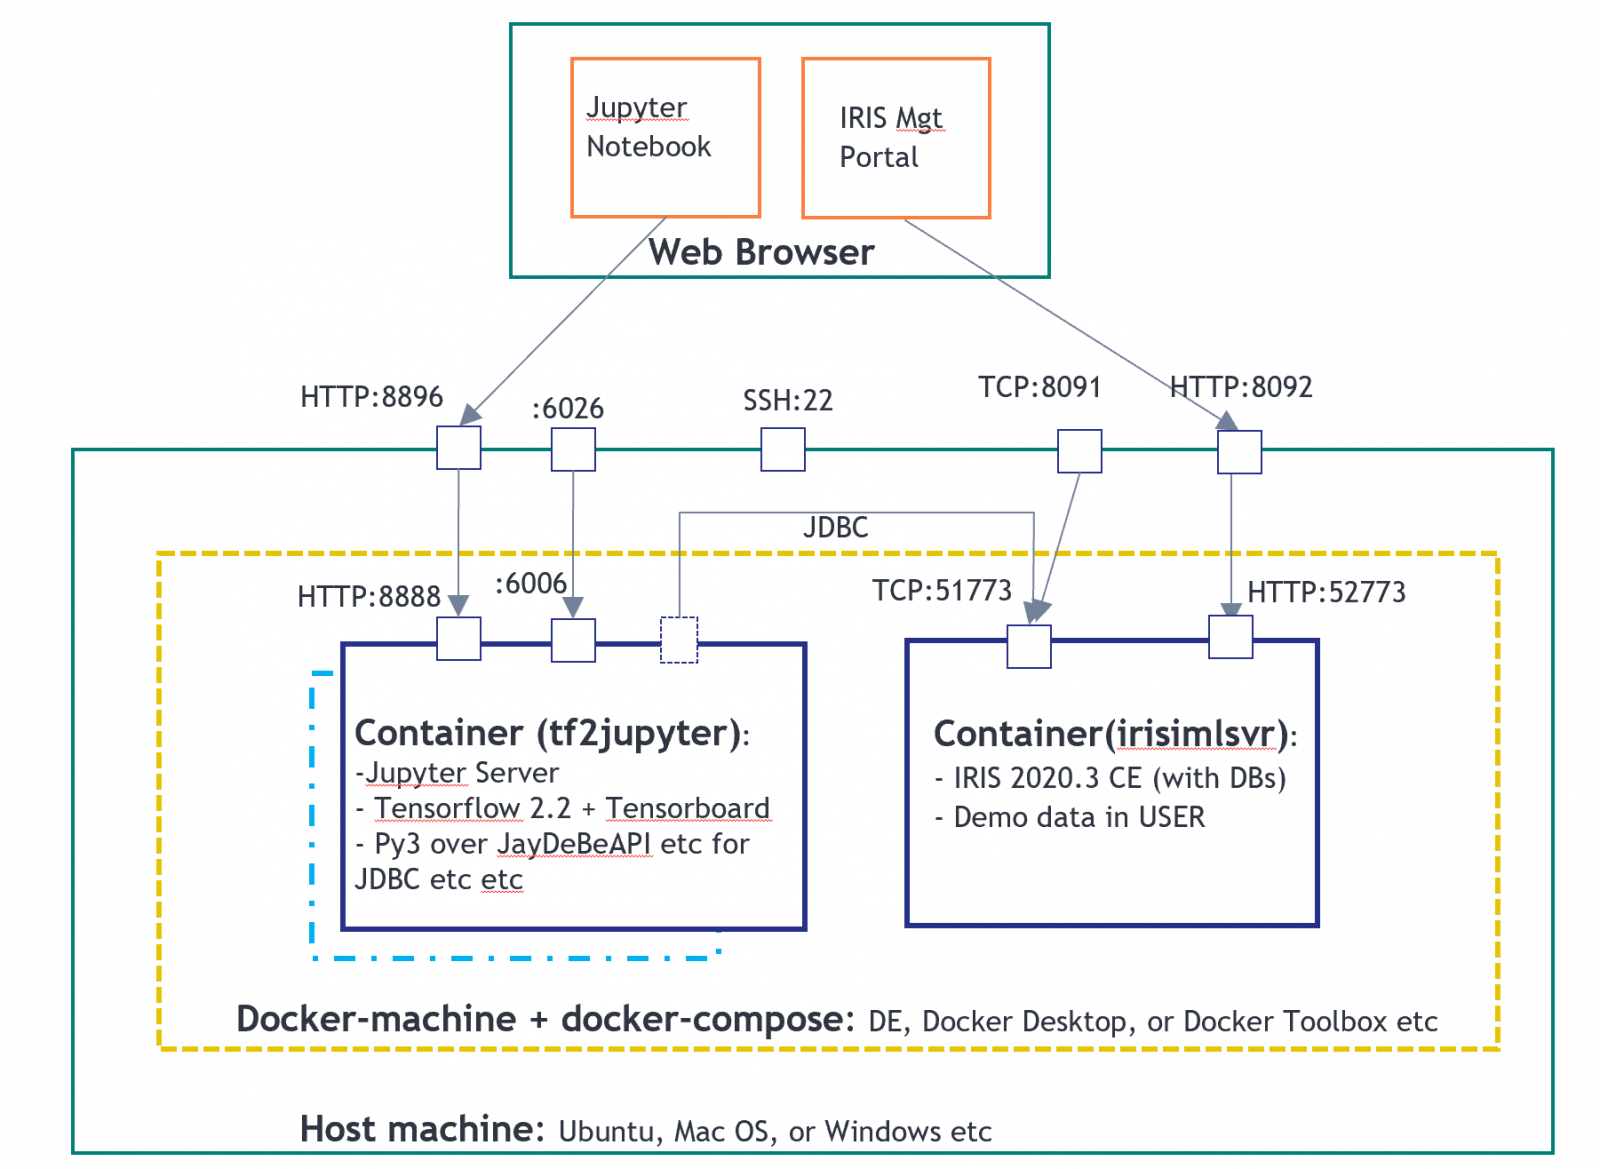
In above environment, the tf2jupyter only contains a "Python over JDBC" client configuration; it does not contain any ODBC or PyODBC client configuration yet.
So we will run the following steps to set up such, directly from within the Jupyter Notebook to make it self-explanatory.
Steps
I ran the following configurations and tests in an AWS Ubuntu 16.04 server. My colleague @Thomas Dyar ran them in MacOS. It is also tested briefly in Docker Toolbox for Windows. However, let us know if you encounter any issues.
The following steps can simply be automated into its Dockerfile. I manually recorded it here in case I just forgot how it was done after few months.
1. Official documentations:
2. Connect into Jupyter server
I used local Putty's SSH tunneling into remote AWS Ubuntu port 22, then mapped to port 8896 as in the above topology.
(In local docker environment, you can directly http to the docker machine's IP:8896 too, for example.)

3. Run ODBC installation from within Jupyter Notebook
Run the following directly from within a Jupyter cell:
!apt-get update
!apt-get install gcc
!apt-get install -y tdsodbc unixodbc-dev
!apt install unixodbc-bin -y
!apt-get clean -y
It will install gcc(including g++) compiler, FreeTDS, unixODBC, and unixodbc-dev needed to recompile the PyODBC driver in next step.
This step is not needed on a native Windows server or PC for PyODBC installation.
4. Run PyODBC installation from within Jupyter
!pip install pyodbcCollecting pyodbc
Downloading pyodbc-4.0.30.tar.gz (266 kB)
|████████████████████████████████| 266 kB 11.3 MB/s eta 0:00:01
Building wheels for collected packages: pyodbc
Building wheel for pyodbc (setup.py) ... done
Created wheel for pyodbc: filename=pyodbc-4.0.30-cp36-cp36m-linux_x86_64.whl size=273453 sha256=b794c35f41e440441f2e79a95fead36d3aebfa74c0832a92647bb90c934688b3
Stored in directory: /root/.cache/pip/wheels/e3/3f/16/e11367542166d4f8a252c031ac3a4163d3b901b251ec71e905
Successfully built pyodbc
Installing collected packages: pyodbc
Successfully installed pyodbc-4.0.30
The above is the minimised pip install for this docker demo. In official documentation, for "MacOS X Installation", a more verbose pip install is provided.
5 Re-configure the ODBC INI files and links in Linux:
Run the following to re-create the odbcinst.ini and odbc.ini links
!rm /etc/odbc.ini
!ln -s /tf/odbc.ini /etc/odbc.ini
Note: The reason for the above is, step 3 & 4 would normally create 2 blank (hence invalid) ODBC files in \etc\ directory. Unlike Windows installation, these blanks ini files cause troubles, hence we need to delete them first, then simply re-create a link to the real ini files provided in a mapped Docker volume: /tf/odbcinst.ini, and /tf/odbc.ini
Let's check these 2 ini files - in this case they are the simplest form for Linux ODBC configs:
[InterSystems ODBC35]
UsageCount=1
Driver=/tf/libirisodbcu35.so
Setup=/tf/libirisodbcu35.so
SQLLevel=1
FileUsage=0
DriverODBCVer=02.10
ConnectFunctions=YYN
APILevel=1
DEBUG=1
CPTimeout=<not pooled>
[IRIS PyODBC Demo]
Driver=InterSystems ODBC35
Protocol=TCP
Host=irisimlsvr
Port=51773
Namespace=USER
UID=SUPERUSER
Password=SYS
Description=Sample namespace
Query Timeout=0
Static Cursors=0
The above files are pre-configured and provided in the mapped drive. It refers to the driver file libirisodbcu35.so, which can be acquired from within the IRIS server's container instance too (in its {iris-installation}/bin directory).
Hence to make the above ODBC installation work, these 3 files must be existing in the mapped drive (or any Linux drive) with the right file permissions:
- libirisodbcu35.so
- odbcinst.ini
- odbc.ini
6. Verify PyODBC installation
unixODBC 2.3.4
DRIVERS............: /etc/odbcinst.ini
SYSTEM DATA SOURCES: /etc/odbc.ini
FILE DATA SOURCES..: /etc/ODBCDataSources
USER DATA SOURCES..: /root/.odbc.ini
SQLULEN Size.......: 8
SQLLEN Size........: 8
SQLSETPOSIROW Size.: 8
print(pyodbc.drivers())
['InterSystems ODBC35']
The above outputs will indicate the ODBC driver has the valid links for now.
We should be able to run some Python ODBC test in Jupyer Notebook
7. Run Python ODBC connection into IRIS samples:
import time
#input("Hit any key to start")
dsn = 'IRIS PyODBC Demo'
server = 'irisimlsvr' # IRIS server container or the docker machine's IP
port = '51773' # or 8091 if docker machine IP is used
database = 'USER'
username = 'SUPERUSER'
password = 'SYS'
cnxn = pyodbc.connect('DRIVER={InterSystems ODBC35};SERVER='+server+';PORT='+port+';DATABASE='+database+';UID='+username+';PWD='+ password)
cnxn.setdecoding(pyodbc.SQL_CHAR, encoding='utf8')
cnxn.setdecoding(pyodbc.SQL_WCHAR, encoding='utf8')
cnxn.setencoding(encoding='utf8')
cursor = cnxn.cursor()
start= time.clock()
dataTable = 'DataMining.IrisDataset'
dataTablePredict = 'Result12'
dataColumn = 'Species'
dataColumnPredict = "PredictedSpecies"
modelName = "Flower12" #chose a name - must be unique in server end
#cursor.execute("CREATE MODEL %s PREDICTING (%s) FROM %s" % (modelName, dataColumn, dataTable))
#cursor.execute("TRAIN MODEL %s FROM %s" % (modelName, dataTable))
#cursor.execute("Create Table %s (%s VARCHAR(100), %s VARCHAR(100))" % (dataTablePredict, dataColumnPredict, dataColumn))
#cursor.execute("INSERT INTO %s SELECT TOP 20 PREDICT(%s) AS %s, %s FROM %s" % (dataTablePredict, modelName, dataColumnPredict, dataColumn, dataTable))
#cnxn.commit()
cursor.execute("SELECT * from %s ORDER BY ID" % dataTable) #or use dataTablePredict result by IntegratedML if you run step 4 above
row = cursor.fetchone()
while row:
print(row)
row = cursor.fetchone()
cnxn.close()
end= time.clock()
print ("Total elapsed time: ")
print (end-start)
(1, 1.4, 0.2, 5.1, 3.5, 'Iris-setosa')
(2, 1.4, 0.2, 4.9, 3.0, 'Iris-setosa')
(3, 1.3, 0.2, 4.7, 3.2, 'Iris-setosa')
(4, 1.5, 0.2, 4.6, 3.1, 'Iris-setosa')
(5, 1.4, 0.2, 5.0, 3.6, 'Iris-setosa')
... ...
... ...
... ...
(146, 5.2, 2.3, 6.7, 3.0, 'Iris-virginica')
(147, 5.0, 1.9, 6.3, 2.5, 'Iris-virginica')
(148, 5.2, 2.0, 6.5, 3.0, 'Iris-virginica')
(149, 5.4, 2.3, 6.2, 3.4, 'Iris-virginica')
(150, 5.1, 1.8, 5.9, 3.0, 'Iris-virginica')
Total elapsed time:
0.023873000000000033
A couple of gotcha here:
- cnxn = pyodbc.connect() - in Linux environment, the connection string passed in this call must be literally correct without any spaces.
- set the connection encoding properly with e.g. utf8. Default would not work for strings in this case.
- libirisodbcu35.so - ideally this driver file should be aligned closely with the version of remote IRIS server.
Next
Now we got a Docker environment with a Jupyter notebook including Python3 and Tensorflow2.2 (without GPU) over PyODBC (as well as JDBC) connection into a remote IRIS server. They should work for all bespoke SQL Syntax such as those proprietary to IRIS Integrated ML, so why not try exploring a bit more into IntegratedML's capability and be inventive with its SQL way of driving ML life-cycles?
Also, I wish we could next touch on or recap the simplest approach on IRIS Native or even magic SQL in Python environment to hook into IRIS server. And, there is the excellent Python Gateway available now so we can even try to invoke the external Python ML applications and services directly from within IRIS server - I wish we could try more on that too.
Appendix
The above notebook file will be checked into this Github repository as well as Open Exchange too.