InterSystems Data Platforms and performance – VM Backups and IRIS freeze/thaw scripts
Hi, this post was initially written for Caché. In June 2023, I finally updated it for IRIS. If you are revisiting the post since then, the only real change is substituting Caché for IRIS! I also updated the links for IRIS documentation and fixed a few typos and grammatical errors. Enjoy :)
In this post, I show strategies for backing up InterSystems IRIS using External Backup with examples of integrating with snapshot-based solutions. Most solutions I see today are deployed on Linux on VMware, so a lot of the post shows how solutions integrate VMware snapshot technology as examples.
IRIS backup - batteries included?
IRIS online backup is included with an IRIS install for uninterrupted backup of IRIS databases. But there are more efficient backup solutions you should consider as systems scale up. External Backup integrated with snapshot technologies is the recommended solution for backing up systems, including IRIS databases.
Are there any special considerations for external backup?
Online documentation for External Backup has all the details. A key consideration is:
"To ensure the integrity of the snapshot, IRIS provides methods to freeze writes to databases while the snapshot is created. Only physical writes to the database files are frozen during the snapshot creation, allowing user processes to continue performing updates in memory uninterrupted."
It is also important to note that part of the snapshot process on virtualised systems causes a short pause on a VM being backed up, often called stun time. Usually less than a second, so not noticed by users or impacting system operation; however, in some circumstances, the stun can last longer. If the stun is longer than the quality of service (QoS) timeout for IRIS database mirroring, then the backup node will think there has been a failure on the primary and will failover. Later in this post, I explain how you can review stun times in case you need to change the mirroring QoS timeout.
A list of other InterSystems Data Platforms and performance series posts is here.
You should also review IRIS online documentation Backup and Restore Guide for this post.
Backup choices
Minimal Backup Solution - IRIS Online Backup
If you have nothing else, this comes in the box with the InterSystems data platform for zero downtime backups. Remember, IRIS online backup only backs up IRIS database files, capturing all blocks in the databases that are allocated for data with the output written to a sequential file. IRIS Online Backup supports cumulative and incremental backups.
In the context of VMware, an IRIS Online Backup is an in-guest backup solution. Like other in-guest solutions, IRIS Online Backup operations are essentially the same whether the application is virtualised or runs directly on a host. IRIS Online Backup must be coordinated with a system backup to copy the IRIS online backup output file to backup media and all other file systems used by your application. At a minimum, system backup must include the installation directory, journal and alternate journal directories, application files, and any directory containing external files the application uses.
IRIS Online Backup should be considered as an entry-level approach for smaller sites wishing to implement a low-cost solution to back up only IRIS databases or ad-hoc backups; for example, it is helpful in the set-up of mirroring. However, as databases increase in size and as IRIS is typically only part of a customer's data landscape, External Backups combined with snapshot technology and third-party utilities are recommended as best practice with advantages such as including the backup of non-database files, faster restore times, enterprise-wide view of data and better catalogue and management tools.
Recommended Backup Solution - External backup
Using VMware as an example, Virtualising on VMware adds functionality and choices for protecting entire VMs. Once you have virtualised a solution, you have effectively encapsulated your system — including the operating system, the application and the data — all within .vmdk (and some other) files. When required, these files can be straightforward to manage and used to recover a whole system, which is very different from the same situation on a physical system where you must recover and configure the components separately -- operating system, drivers, third-party applications, database and database files, etc.
VMware snapshot
VMware’s vSphere Data Protection (VDP) and other third-party backup solutions for VM backup, such as Veeam or Commvault, take advantage of the functionality of VMware virtual machine snapshots to create backups. A high-level explanation of VMware snapshots follows; see the VMware documentation for more details.
It is important to remember that snapshots are applied to the whole VM and that the operating system and any applications or the database engine are unaware that the snapshot is happening. Also, remember:
By themselves, VMware snapshots are not backups!
Snapshots enable backup software to make backups, but they are not backups by themselves.
VDP and third-party backup solutions use the VMware snapshot process in conjunction with the backup application to manage the creation and, very importantly, deletion of snapshots. At a high level, the process and sequence of events for an external backup using VMware snapshots are as follows:
- Third-party backup software requests the ESXi host to trigger a VMware snapshot.
- A VM's .vmdk files are put into a read-only state, and a child vmdk delta file is created for each of the VM's .vmdk files.
- Copy on write is used with all changes to the VM written to the delta files. Any reads are from the delta file first.
- The backup software manages copying the read-only parent .vmdk files to the backup target.
- When the backup is complete, the snapshot is committed (VM disks resume writes and updated blocks in delta files written to parent).
- The VMware snapshot is now removed.
Backup solutions also use other features such as Change Block Tracking (CBT) to allow incremental or cumulative backups for speed and efficiency (especially important for space saving), and typically also add other important functions such as data deduplication and compression, scheduling, mounting VMs with changed IP addresses for integrity checks etc., full VM and file level restores, and catalogue management.
VMware snapshots that are not appropriately managed or left to run for a long time can use excessive storage (as more and more data is changed, delta files continue to grow) and also slow down your VMs.
You should think carefully before running a manual snapshot on a production instance. Why are you doing this? What will happen if you revert back in time to when the snapshot was created? What happens to all the application transactions between creation and rollback?
It is OK if your backup software creates and deletes a snapshot. The snapshot should only be around for a short time. And a crucial part of your backup strategy will be to choose a time when the system has low usage to minimise any further impact on users and performance.
IRIS database considerations for snapshots
Before the snapshot is taken, the database must be quiesced so that all pending writes are committed, and the database is in a consistent state. IRIS provides methods and an API to commit and then freeze (stop) writes to databases for a short period while the snapshot is created. This way, only physical writes to the database files are frozen during the creation of the snapshot, allowing user processes to continue performing updates in memory uninterrupted. Once the snapshot has been triggered, database writes are thawed, and the backup continues copying data to backup media. The time between freeze and thaw should be quick (a few seconds).
In addition to pausing writes, the IRIS freeze also handles switching journal files and writing a backup marker to the journal. The journal file continues to be written normally while physical database writes are frozen. If the system were to crash while the physical database writes are frozen, data would be recovered from the journal as usual during start-up.
The following diagram shows freeze and thaw with VMware snapshot steps to create a backup with a consistent database image.
VMware snapshot + IRIS freeze/thaw timeline (not to scale)
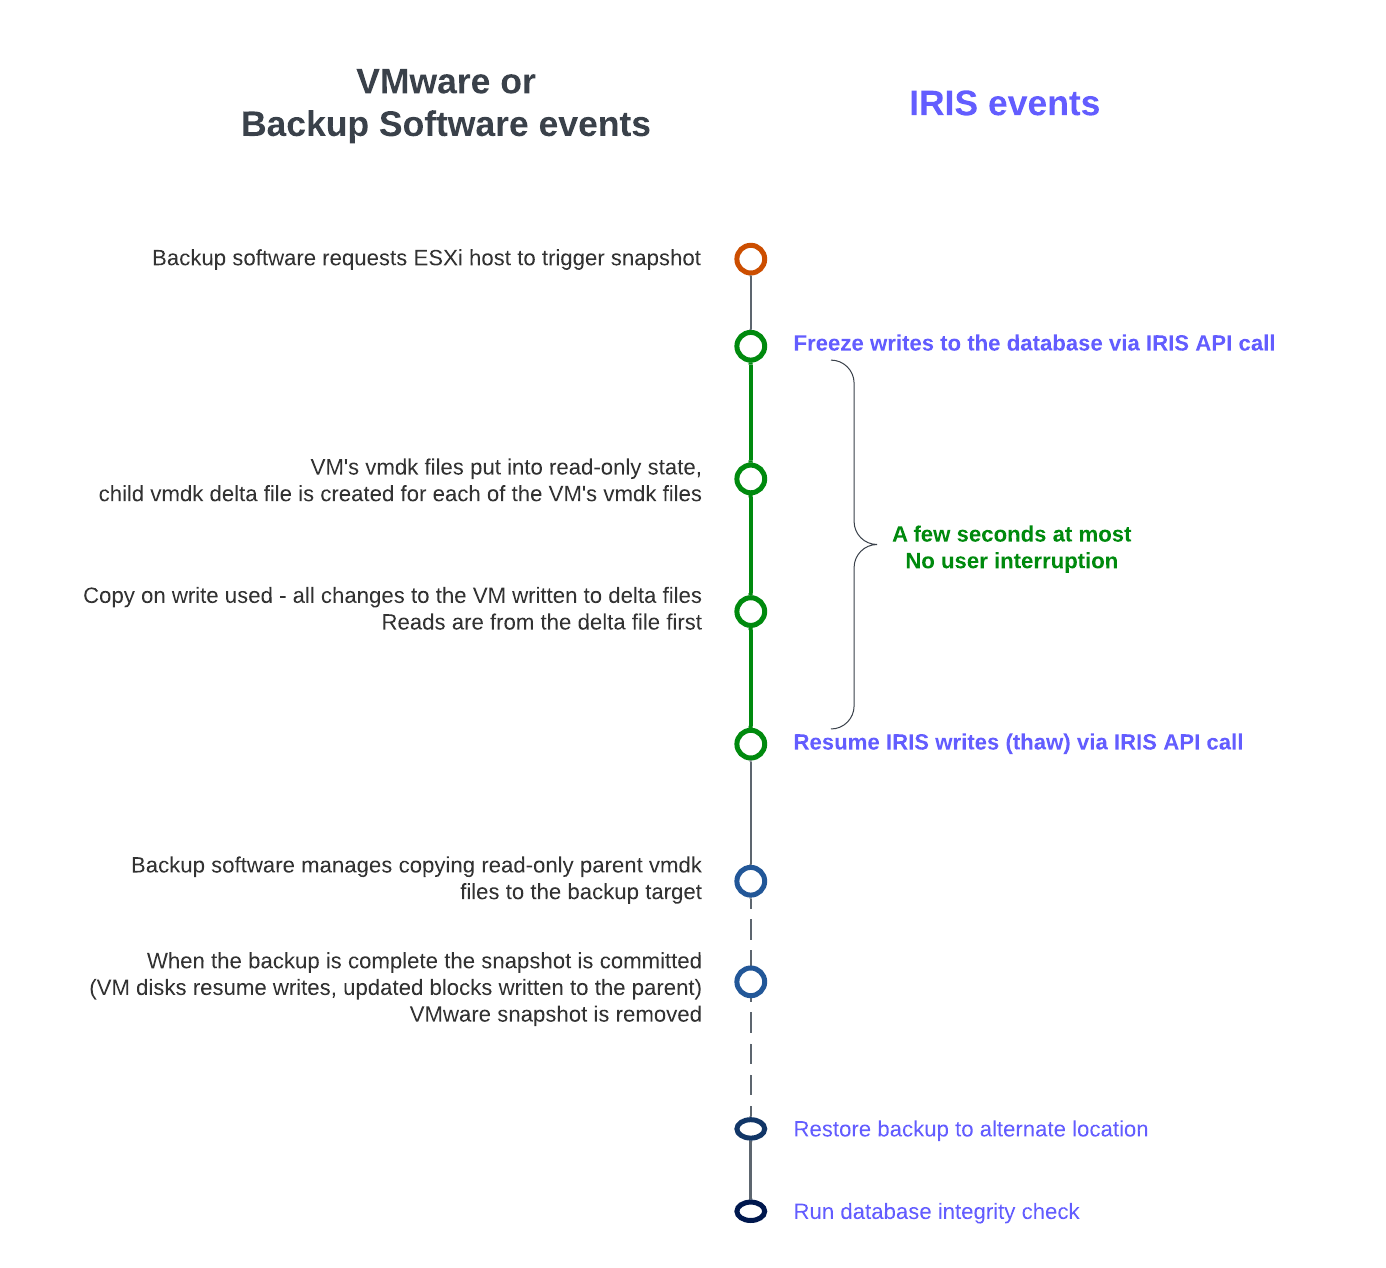
Note the short time between Freeze and Thaw -- only the time to create the snapshot, not the time to copy the read-only parent to the backup target.
Summary - Why do I need to freeze and thaw the IRIS database when VMware is taking a snapshot?
The process of freezing and thawing the database is crucial to ensure data consistency and integrity. This is because:
Data Consistency: IRIS can be writing journals, or the WIJ or doing random writes to the database at any time. A snapshot captures the state of the VM at a specific point in time. If the database is actively being written during the snapshot, it can lead to a snapshot that contains partial or inconsistent data. Freezing the database ensures that all transactions are completed and no new transactions start during the snapshot, leading to a consistent disk state.
Quiescing the File System: VMware's snapshot technology can quiesce the file system to ensure file system consistency. However, this does not account for the application or database level consistency. Freezing the database ensures that the database is in a consistent state at the application level, complementing VMware's quiescing.
Reducing Recovery Time: Restoring from a snapshot that was taken without freezing the database might require additional steps like database repair or consistency checks, which can significantly increase recovery time. Freezing and thawing ensure the database is immediately usable upon restoration, reducing downtime.
Integrating IRIS Freeze and Thaw
vSphere allows a script to be automatically called on either side of snapshot creation; this is when IRIS Freeze and Thaw are called. Note: For this functionality to work correctly, the ESXi host requests the guest operating system to quiesce the disks via VMware Tools.
VMware tools must be installed in the guest operating system.
The scripts must adhere to strict name and location rules. File permissions must also be set. For VMware on Linux, the script names are:
# /usr/sbin/pre-freeze-script
# /usr/sbin/post-thaw-script
Below are examples of freeze and thaw scripts our team use with Veeam backup for our internal test lab instances, but these scripts should also work with other solutions. These examples have been tested and used on vSphere 6 and Red Hat 7.
While these scripts can be used as examples and illustrate the method, you must validate them for your environments!
Example pre-freeze-script:
#!/bin/sh
#
# Script called by VMWare immediately prior to snapshot for backup.
# Tested on Red Hat 7.2
#

LOGDIR=/var/log
SNAPLOG=$LOGDIR/snapshot.log

echo >> $SNAPLOG
echo "`date`: Pre freeze script started" >> $SNAPLOG
exit_code=0

# Only for running instances
for INST in `iris qall 2>/dev/null | tail -n +3 | grep '^up' | cut -c5-  | awk '{print $1}'`; do

    echo "`date`: Attempting to freeze $INST" >> $SNAPLOG

    # Detailed instances specific log
    LOGFILE=$LOGDIR/$INST-pre_post.log

    # Freeze
    irissession $INST -U '%SYS' "##Class(Backup.General).ExternalFreeze(\"$LOGFILE\",,,,,,1800)" >> $SNAPLOG $
    status=$?

    case $status in
        5) echo "`date`:   $INST IS FROZEN" >> $SNAPLOG
           ;;
        3) echo "`date`:   $INST FREEZE FAILED" >> $SNAPLOG
           logger -p user.err "freeze of $INST failed"
           exit_code=1
           ;;
        *) echo "`date`:   ERROR: Unknown status code: $status" >> $SNAPLOG
           logger -p user.err "ERROR when freezing $INST"
           exit_code=1
           ;;
    esac
    echo "`date`:   Completed freeze of $INST" >> $SNAPLOG
done

echo "`date`: Pre freeze script finished" >> $SNAPLOG
exit $exit_code
Example thaw script:
#!/bin/sh
#
# Script called by VMWare immediately after backup snapshot has been created
# Tested on Red Hat 7.2
#

LOGDIR=/var/log
SNAPLOG=$LOGDIR/snapshot.log

echo >> $SNAPLOG
echo "`date`: Post thaw script started" >> $SNAPLOG
exit_code=0

if [ -d "$LOGDIR" ]; then

    # Only for running instances
    for INST in `iris qall 2>/dev/null | tail -n +3 | grep '^up' | cut -c5-  | awk '{print $1}'`; do

        echo "`date`: Attempting to thaw $INST" >> $SNAPLOG

        # Detailed instances specific log
        LOGFILE=$LOGDIR/$INST-pre_post.log

        # Thaw
        irissession $INST -U%SYS "##Class(Backup.General).ExternalThaw(\"$LOGFILE\")" >> $SNAPLOG 2>&1
        status=$?

        case $status in
            5) echo "`date`:   $INST IS THAWED" >> $SNAPLOG
               irissession $INST -U%SYS "##Class(Backup.General).ExternalSetHistory(\"$LOGFILE\")" >> $SNAPLOG$
               ;;
            3) echo "`date`:   $INST THAW FAILED" >> $SNAPLOG
               logger -p user.err "thaw of $INST failed"
               exit_code=1
               ;;
            *) echo "`date`:   ERROR: Unknown status code: $status" >> $SNAPLOG
               logger -p user.err "ERROR when thawing $INST"
               exit_code=1
               ;;
        esac
        echo "`date`:   Completed thaw of $INST" >> $SNAPLOG
    done
fi

echo "`date`: Post thaw script finished" >> $SNAPLOG
exit $exit_code
Remember to set permissions:
# sudo chown root.root /usr/sbin/pre-freeze-script /usr/sbin/post-thaw-script
# sudo chmod 0700 /usr/sbin/pre-freeze-script /usr/sbin/post-thaw-script
Testing Freeze and Thaw
To test the scripts are running correctly, you can manually run a snapshot on a VM and check the script output. The following screenshot shows the "Take VM Snapshot" dialogue and options.
Deselect- "Snapshot the virtual machine's memory".
Select - the "Quiesce guest file system (Needs VMware Tools installed)" check box to pause running processes on the guest operating system so that file system contents are in a known consistent state when you take the snapshot.
Important! After your test, remember to delete the snapshot!!!!
If the quiesce flag is true, and the virtual machine is powered on when the snapshot is taken, VMware Tools is used to quiesce the file system in the virtual machine. Quiescing a file system is a process of bringing the on-disk data into a state suitable for backups. This process might include such operations as flushing dirty buffers from the operating system's in-memory cache to disk.
The following output shows the contents of the $SNAPSHOT log file set in the example freeze/thaw scripts above after running a backup that includes a snapshot as part of its operation.
Wed Jan  4 16:30:35 EST 2017: Pre freeze script started
Wed Jan  4 16:30:35 EST 2017: Attempting to freeze H20152
Wed Jan  4 16:30:36 EST 2017:   H20152 IS FROZEN
Wed Jan  4 16:30:36 EST 2017:   Completed freeze of H20152
Wed Jan  4 16:30:36 EST 2017: Pre freeze script finished

Wed Jan  4 16:30:41 EST 2017: Post thaw script started
Wed Jan  4 16:30:41 EST 2017: Attempting to thaw H20152
Wed Jan  4 16:30:42 EST 2017:   H20152 IS THAWED
Wed Jan  4 16:30:42 EST 2017:   Completed thaw of H20152
Wed Jan  4 16:30:42 EST 2017: Post thaw script finished
This example shows 6 seconds of elapsed time between freeze and thaw (16:30:36-16:30:42). User operations are NOT interrupted during this period. You will have to gather metrics from your own systems, but for some context, this example is from a system running an application benchmark on a VM with no IO bottlenecks and an average of more than 2 million Glorefs/sec, 170,000 Gloupds/sec, and an average 1,100 physical reads/sec and 3,000 writes per write daemon cycle.
Remember that memory is not part of the snapshot, so on restarting, the VM will reboot and recover. Database files will be consistent. You don’t want to "resume" a backup; you want the files at a known point in time. You can then roll forward journals and whatever other recovery steps are needed for the application and transactional consistency once the files are recovered.
For additional data protection, a journal switch can be done by itself, and journals can be backed up or replicated to another location, for example, hourly.
Below is the output of the $LOGFILE in the example freeze/thaw scripts above, showing journal details for the snapshot.
01/04/2017 16:30:35: Backup.General.ExternalFreeze: Suspending system

Journal file switched to:
/trak/jnl/jrnpri/h20152/H20152_20170104.011
01/04/2017 16:30:35: Backup.General.ExternalFreeze: Start a journal restore for this backup with journal file: /trak/jnl/jrnpri/h20152/H20152_20170104.011

Journal marker set at
offset 197192 of /trak/jnl/jrnpri/h20152/H20152_20170104.011
01/04/2017 16:30:36: Backup.General.ExternalFreeze: System suspended
01/04/2017 16:30:41: Backup.General.ExternalThaw: Resuming system
01/04/2017 16:30:42: Backup.General.ExternalThaw: System resumed
VM Stun Times
At the creation point of a VM snapshot and after the backup is complete and the snapshot is committed, the VM needs to be frozen for a short period. This short freeze is often referred to as stunning the VM. A good blog post on stun times is here. I summarise the details below and put them in the context of IRIS database considerations.
From the post on stun times: “To create a VM snapshot, the VM is “stunned” in order to (i) serialize device state to disk, and (ii) close the current running disk and create a snapshot point.…When consolidating, the VM is “stunned” in order to close the disks and put them in a state that is appropriate for consolidation.”
Stun time is typically a few 100 milliseconds; however, if there is a very high disk write activity during the commit phase, stun time could be several seconds.
If the VM is a Primary or Backup member participating in IRIS Database Mirroring and the stun time is longer than the mirror Quality of Service (QoS) timeout, the mirror will report the Primary VM as failed and initiate a mirror takeover.
Update March 2018:
My colleague, Peter Greskoff, pointed out that a backup mirror member could initiate failover in as short a time as just over half QoS timeout during a VM stun or any other time the primary mirror member is unavailable.
For a detailed description of QoS considerations and failover scenarios, see this great post: Quality of Service Timeout Guide for Mirroring, however the short story regarding VM stun times and QoS is:
If the backup mirror does not receive any messages from the primary mirror within half of the QoS timeout, it will send a message to ensure the primary is still alive. The backup then waits an additional half QoS time for a response from the primary machine. If there is no response from the primary, it is assumed to be down, and the backup will take over.
On a busy system, journals are continuously sent from the primary to the backup mirror, and the backup would not need to check if the primary is still alive. However, during a quiet time — when backups are more likely to happen — if the application is idle, there may be no messages between the primary and backup mirror for more than half the QoS time.
Here is Peter’s example; Think about this time frame for an idle system with a QoS timeout of:08 seconds and a VM stun time of:07 seconds:
- :00 Primary pings the arbiter with a keepalive, arbiter responds immediately
- :01 backup member sends keepalive to the primary, primary responds immediately
- :02
- :03 VM stun begins
- :04 primary tries to send keepalive to the arbiter, but it doesn’t get through until stun is complete
- :05 backup member sends a ping to primary, as half of QoS has expired
- :06
- :07
- :08 arbiter hasn’t heard from the primary in a full QoS timeout, so it closes the connection
- :09 The backup hasn’t gotten a response from the primary and confirms with the arbiter that it also lost connection, so it takes over
- :10 VM stun ends, too late!!
Please also read the section, Pitfalls and Concerns when Configuring your Quality of Service Timeout, in the linked post above to understand the balance to have QoS only as long as necessary. Having QoS too long, especially more than 30 seconds, can also cause problems.
End update March 2018:
For more information on Mirroring QoS, also see the documentation.
Strategies to keep stun time to a minimum include running backups when database activity is low and having well-set-up storage.
As noted above, when creating a snapshot, there are several options you can specify; one of the options is to include the memory state in the snapshot - Remember, memory state is NOT needed for IRIS database backups. If the memory flag is set, a dump of the internal state of the virtual machine is included in the snapshot. Memory snapshots take much longer to create. Memory snapshots are used to allow reversion to a running virtual machine state as it was when the snapshot was taken. This is NOT required for a database file backup.
When taking a memory snapshot, the entire state of the virtual machine will be stunned, stun time is variable.
As noted previously, for backups, the quiesce flag must be set to true for manual snapshots or by the backup software to guarantee a consistent and usable backup.
Reviewing VMware logs for stun times
Starting from ESXi 5.0, snapshot stun times are logged in each virtual machine's log file (vmware.log) with messages similar to:
2017-01-04T22:15:58.846Z| vcpu-0| I125: Checkpoint_Unstun: vm stopped for 38123 us
Stun times are in microseconds, so in the above example, 38123 us is 38123/1,000,000 seconds or 0.038 seconds.
To be sure that stun times are within acceptable limits or to troubleshoot if you suspect long stun times are causing problems, you can download and review the vmware.log files from the folder of the VM that you are interested in. Once downloaded, you can extract and sort the log using the example Linux commands below.
Example downloading vmware.log files
There are several ways to download support logs, including creating a VMware support bundle through the vSphere management console or from the ESXi host command line. Consult the VMware documentation for all the details, but below is a simple method to create and gather a much smaller support bundle that includes the vmware.log file so you can review stun times.
You will need the long name of the directory where the VM files are located. Log on to the ESXi host where the database VM is running using ssh and use the command: vim-cmd vmsvc/getallvms to list vmx files and the long names unique associated with them.
For example, the long name for the example database VM used in this post is output as:
26 vsan-tc2016-db1 [vsanDatastore] e2fe4e58-dbd1-5e79-e3e2-246e9613a6f0/vsan-tc2016-db1.vmx rhel7_64Guest vmx-11
Next, run the command to gather and bundle only log files:
vm-support -a VirtualMachines:logs.
The command will echo the location of the support bundle, for example:
To see the files collected, check '/vmfs/volumes/datastore1 (3)/esx-esxvsan4.iscinternal.com-2016-12-30--07.19-9235879.tgz'.
You can now use sftp to transfer the file off the host for further processing and review.
In this example, after uncompressing the support bundle navigate to the path corresponding to the database VMs long name. For example, in this case:
<bundle name>/vmfs/volumes/<host long name>/e2fe4e58-dbd1-5e79-e3e2-246e9613a6f0.
You will see several numbered log files; the most recent log file has no number, i.e. vmware.log. The log may be only a few 100 KB, but there is a lot of information; however, we care about the stun/unstun times, which are easy enough to find with grep. For example:
$ grep Unstun vmware.log
2017-01-04T21:30:19.662Z| vcpu-0| I125: Checkpoint_Unstun: vm stopped for 1091706 us
---
2017-01-04T22:15:58.846Z| vcpu-0| I125: Checkpoint_Unstun: vm stopped for 38123 us
2017-01-04T22:15:59.573Z| vcpu-0| I125: Checkpoint_Unstun: vm stopped for 298346 us
2017-01-04T22:16:03.672Z| vcpu-0| I125: Checkpoint_Unstun: vm stopped for 301099 us
2017-01-04T22:16:06.471Z| vcpu-0| I125: Checkpoint_Unstun: vm stopped for 341616 us
2017-01-04T22:16:24.813Z| vcpu-0| I125: Checkpoint_Unstun: vm stopped for 264392 us
2017-01-04T22:16:30.921Z| vcpu-0| I125: Checkpoint_Unstun: vm stopped for 221633 us
We can see two groups of stun times in the example, one from snapshot creation and a second set 45 minutes later for each disk when the snapshot is deleted/consolidated (e.g. after the backup software has completed copying the read-only vmx file). The above example shows that most stun times are sub-second, although the initial stun time is just over one second.
Short stun times are not noticeable to an end user. However, system processes such as IRIS Database Mirroring continuously monitor whether an instance is ‘alive’. If the stun time exceeds the mirroring QoS timeout, the node may be considered uncontactable and ‘dead’, and a failover will be triggered.
Tip: To review all the logs or for trouble-shooting, a handy command is to grep all the vmware*.log files and look for any outliers or instances where stun time is approaching QoS timeout. The following command pipes the output to awk for formatting:
grep Unstun vmware* | awk '{ printf ("%'"'"'d", $8)} {print " ---" $0}' | sort -nr
Summary
You should monitor your system regularly during normal operations to understand stun times and how they may impact QoS timeout for HA, such as mirroring. As noted, strategies to keep stun/unstun time to a minimum include running backups when database and storage activity is low and having well-set-up storage. For constant monitoring, logs may be processed by using VMware Log Insight or other tools.
In future posts, I will revisit backup and restore operations for InterSystems Data Platforms. But for now, if you have any comments or suggestions based on the workflows of your systems, please share them via the comments sections below.