One of the many benefits of using Atelier for your ObjectScript development is its integration with a wide range of source control systems. This integration enables you to use modern development workflows which increase collaboration while minimizing the risk inherent to volatile code bases.
Veteran ObjectScript developers can tell you about the workarounds that were needed before they could use source control systems with products like Caché and Ensemble. One of these was to treat the data store itself effectively as a code repository. And so shared development environments became essential for many of our customers to be productive and successful.
For code shops that rely on shared development environments, adopting Atelier might seem too complicated. This article aims to provide a practical example to guide your team towards success with Atelier.
You can find an overview of the problems and solutions in this article here, which is a good place to start. This article assumes that you are familiar with the concepts introduced there.
Once your team has chosen a centralized source control system, some configuration steps are still necessary.
Organize individual branches to represent one namespace on one instance
Enable exclusive locking on the entire code base
By taking these steps, we transfer the responsibility of version control from the server instance to the source control system.
In this example, we will illustrate this setup and resulting workflow with Perforce. Another popular centralized source control system is Subversion. Your team should research the many options available considering your team’s unique needs. You have a partner in your InterSystems Sales team to guide you through this process and answer any questions.
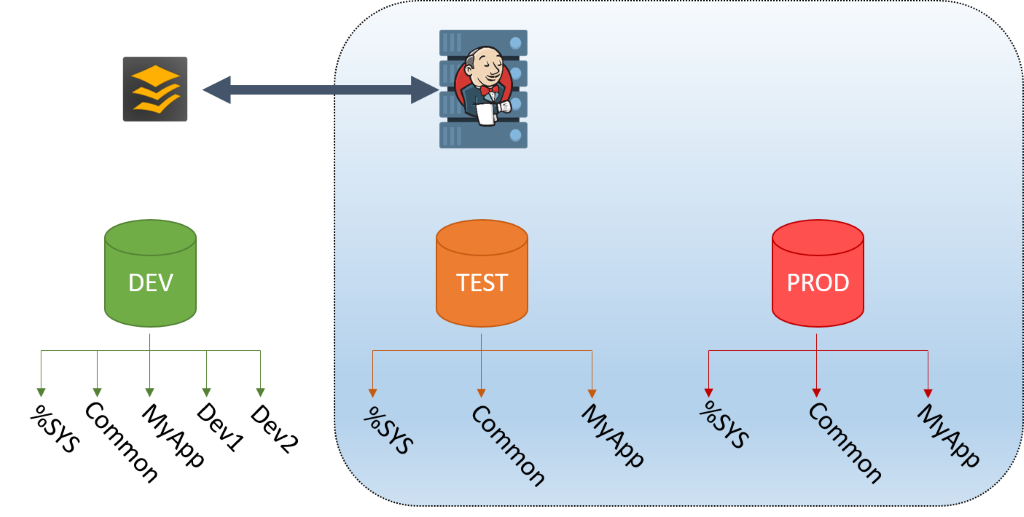
Step 0 is to understand your code base. In this example, our team at Company Inc. has a common library namespace along with namespaces that represent specialized code stored in %SYS, an application, and personal developer sandboxes. In addition, the team has separate instances for testing purposes and for live systems in production. All of these rely on Perforce for version control and on Jenkins to manage the development to deployment pipeline.
Now that we’ve laid out all the relevant namespaces, it should be clear how these would look in source control. The repository is indicated as //CompanyInc in the table below.
| Path | Description |
| //CompanyInc/DEV/_SYS | A space for specialized code stored in %SYS in development |
| //CompanyInc/DEV/Common | A space for common library files in development |
| //CompanyInc/DEV/MyApp | A space for application files in development |
| //CompanyInc/DEV/Dev1 | A sandbox space for developer Dev1 |
| //CompanyInc/DEV/Dev2 | A sandbox space for developer Dev2 |
| //CompanyInc/TEST/_SYS | A space for specialized code stored in %SYS in test |
| //CompanyInc/TEST/Common | A space for common library files in test |
| //CompanyInc/TEST/MyApp | A space for application files in test |
| //CompanyInc/PROD/_SYS | A space for specialized code stored in %SYS in production |
| //CompanyInc/PROD/Common | A space for common library files in production |
| //CompanyInc/PROD/MyApp | A space for application files in production |
Once you’ve organized your code base such that each namespace on each instance is isolated in source control, it is time to configure exclusive locks and determine if exclusive locks are inappropriate for any files.
You can find instructions on how to configure exclusive locks with Perforce here. It is possible to do from the command line or from the graphical interface P4V.
There are some files for which restricting access will significantly reduce productivity. Your team should discuss the tradeoffs involved when determining an exclusive lock blacklist. You may determine that some especially volatile files are better off not being restricted by exclusive locking due to how low risk changes typically are. Your team should also consider which files are touched by automated tests. Any file whose state must be guaranteed for the results of automated tests to be valuable should not be on an exclusive lock blacklist.
Note that exclusive locks are most valuable in areas of the code base where complicated or large changes by multiple developers are regularly expected. This situation should generally only be the case for shared development instances. Test and production instances should not be modified by developers directly since they are expected to be the most stable environments. Instead, these instances should load a snapshot of the code base that meets certain stability or other requirements. (You can learn more about how tools like Jenkins can help your team implement such solutions here.)
Once exclusive locks are configured, developers are required to check out files before making changes and compiling those changes on the shared instance. As a result, all changes on the shared instance are traceable and can be easily reverted or merged with other changes via the source control system.
Developers on your team might be tempted to make changes outside of source control as they learn this new workflow. Or maybe your team has user interfaces that make changes directly on the server instance like the Interoperability editors from Management Portal.
Be warned. Your team can get into trouble if someone tries to work around the restrictions of your source control system. You can use the server-side Audit Log to track any such changes.
Open the Management Portal
Using the menu navigate to System Administration > Security > Auditing > Configure System Events
Enable “%System/%System/RoutineChange” by clicking Change Status in the same row
Your instance is now configured to audit changes to source code on the instance
From the Management Portal home page using the menu navigate to System Administration > Security > Auditing > View Audit Database
Select “RoutineChange” in the Event Name drop down
Click the Search button
Auditing is silent, so you won’t receive a notification when an unexpected change is made. How can your team be made aware of these events?
Atelier provides a conflict resolution wizard which appears whenever synchronizing a change results in a conflict. Each developer must ensure that their user preferences do not silence this guard. In Eclipse with Atelier installed, go to Preferences > Atelier > Save Settings > disable “Ignore conflicts when synchronizing”. Otherwise, the developer’s local workspace version will automatically overwrite whatever version is on the server and changes made outside of source control will be lost.
If a conflict resolution wizard appears in this model, the developer should take the following steps.
Confirm that the Eclipse workspace has the latest revision of files from source control
Check the Audit Log for RoutineChange events with an eye for changes that occurred outside of source control
Collaborate with the author of the conflicting change to merge changes via source control
None of these steps are necessary if developers embrace that source control is the source of truth and rely on it. Files that are edited on the server instance should always be checked out from source control first.
Now that we’ve discussed the major concerns for using Atelier with shared development servers, we’re ready to look at the typical workflow with our chosen source control system, Perforce. Also note that similar steps apply to other Eclipse source control plugins.
Start by completing one-time configuration steps.
Install the Perforce plugin
Navigate to Help > Install New Software …
Complete the wizard
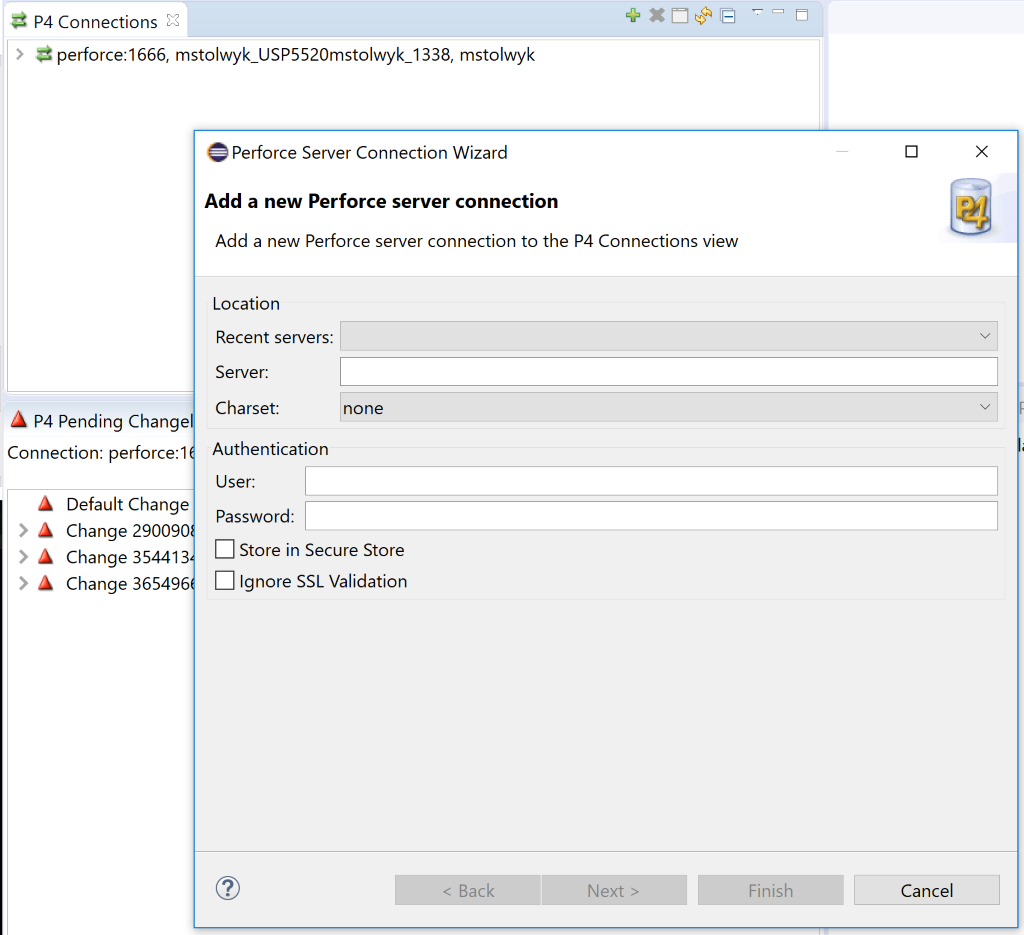
Connect to the Perforce server and your workspace
Once all configuration steps are completed, the typical workflow should resemble the following.
Open Eclipse workspace
Open the Perforce perspective to update the workspace with latest source
 Note: Files with a yellow triangle warning are not the latest version. Make sure to update these files at least.
Switch to the Atelier perspective
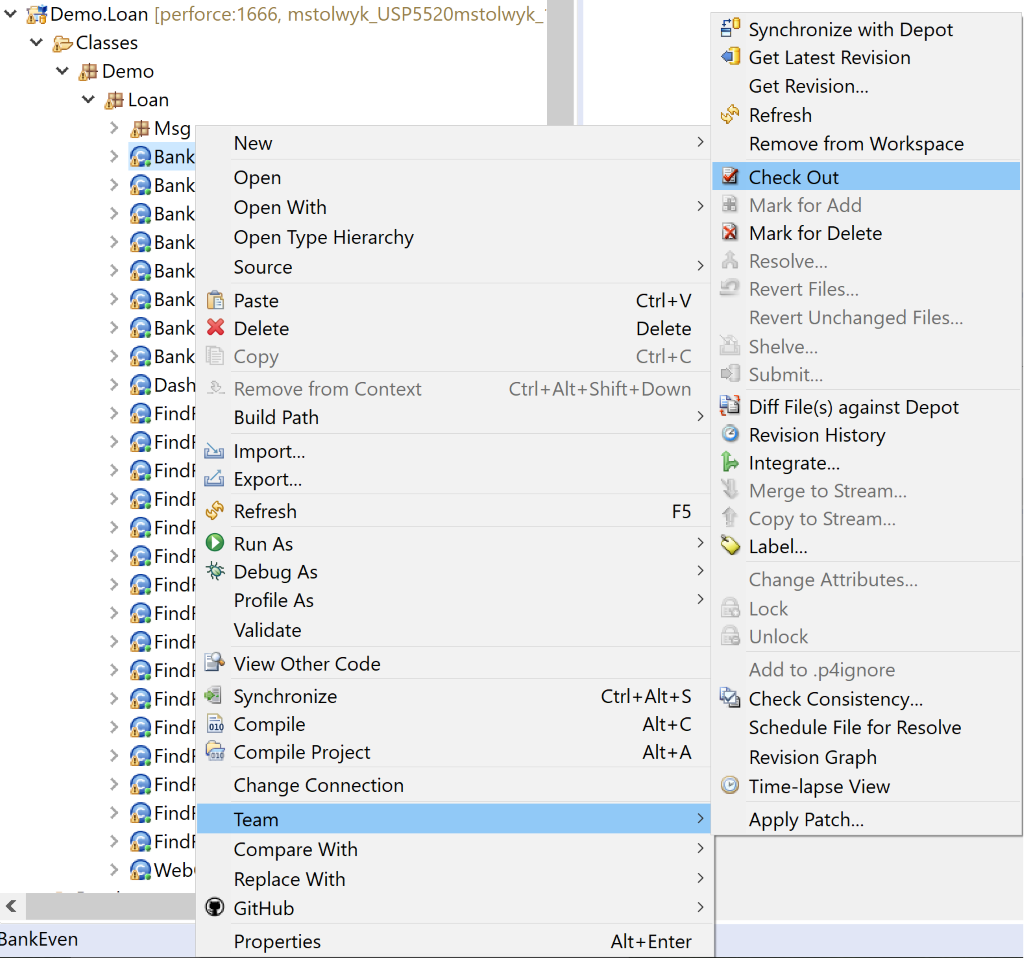
Check out file(s) to modify by right-clicking it and selecting corresponding menu option (Team > Check Out)
Make changes in Atelier editor
Synchronize changes to shared development server using preferred method
Compile changes on shared development server instance using preferred method
Run tests
Complete work
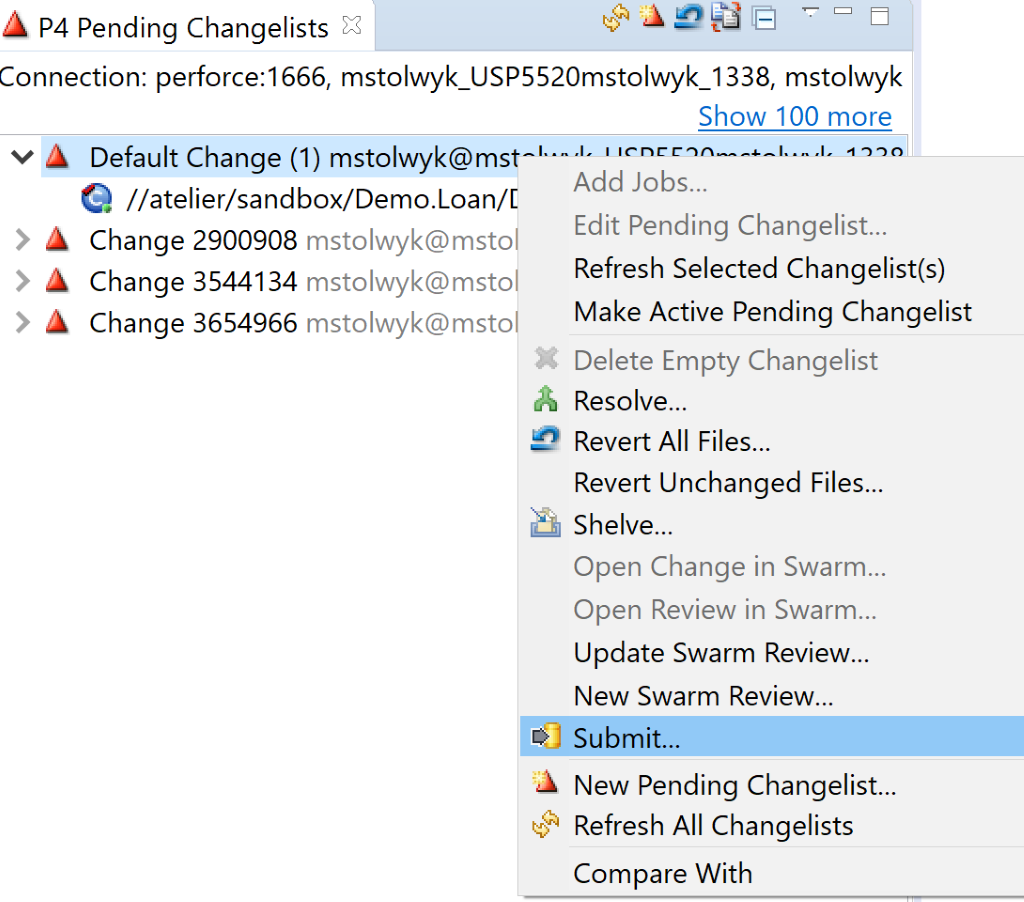
Switch to the Perforce perspective
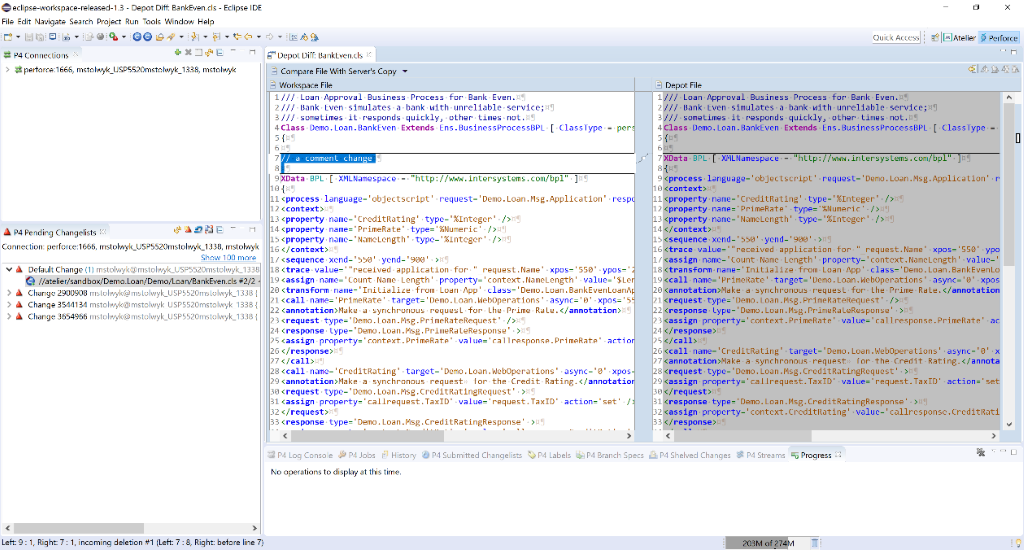
Verify changes in pending changelist using diff utility
Submit changelist by right-clicking it and selecting corresponding menu option
Studio users can also modify files on the shared development instance if they always check files out from their Perforce client before editing and compiling. This approach is vulnerable to user error and is not generally recommended. However, we have found that some customers that primarily use Atelier for development do still rely on Studio for some features. If your team falls into this category, make sure to fully train your developers to ensure files are checked out from source control before any changes are made.
You might be thinking that this workflow is overly simplified. What about testing changes to common files or competing changes? How can multiple developers test changes to the same set of files? What about dependencies? How can a developer trust the results of their testing on a shared development instance?
For starters, we highly recommend automating testing and change promotion through environments. Many of our customers are using Jenkins for this purpose. You can find some pointers here to get you started. Implementing this sort of infrastructure provides the control and traceability that your team needs to ensure stability and code quality without blowing up the number of hours needed to meet high standards.
Second, tests become much more reliable when a separate test instance is used. These instances do not receive changes directly from developers but instead pull a snapshot of the code base from source control. Promotion to a test instance and running of automated tests can all be automated once a solution like Jenkins is available. Note that a separate test instance can be useful even without a fully automated solution.
It is best to have a “sandbox” namespace available for each developer on shared development instances. These namespaces provide a place to run controlled smoke tests before promoting a change to the final destination namespace. Smoke tests look for basic bugs or common oversights. They are also often used to run new unit tests that cover new features. A sandbox allows each developer to catch simple mistakes before they affect the rest of the team, and provide a more stable environment for such tests. The developer should be responsible for keeping their space up to date and the source control system should make this easy to do.
If necessary, developers can also check out files before running tests on common namespaces to guarantee the shared instance state during testing. Common files shouldn’t be locked for longer than a few minutes typically, so the type of tests run should not take long.
Thorough testing should occur on a separate test instance. These tests can take much more than a few minutes. Test results can be relied upon because the state of the test instance is limited by the version of the code base that was pulled before beginning to run tests. This state should not be changed until all tests are completed.
Hopefully this article has clarified how to modify source on a shared development instance using Atelier. We laid out some major configuration and workflow concerns. Here are some additional potential concerns to keep in mind.
No one should ever make changes outside of source control
Be careful not to use graphical editors from the Management Portal for example without checking out the underlying file(s) from source control.
Don’t use server-side source control hooks
Make sure competing source control controls are not enabled. Either the client should be controlling, or the server should be.
All changes must make it to the Eclipse workspace
Changes made directly to static files or changes made on the server via the command line must be synchronized to the Eclipse workspace in order to add those changes to source control
Don’t block other developers by locking common files for long
Make your changes to common files as quickly as you can to avoid blocking other developers from making progress.
Team scale determines how valuable an enterprise solution might be
The recommendations made in this article is targeted for large teams. Smaller teams may not need an enterprise solution, but can pick and choose which elements of it are useful.
There isn’t a one-size-fits-all solution to exclusive locking
Only your team can determine the trade-offs of implementing exclusive locking on your code base. In general, start with an empty blacklist and nominate files for it based on bottlenecks. We recommend you reach out to your InterSystems Sales team with any questions.
Let us know your experiences with any or all elements of this article. What are the best practices your team has adopted?
Happy New Year from the Atelier team to the InterSystems developer community!